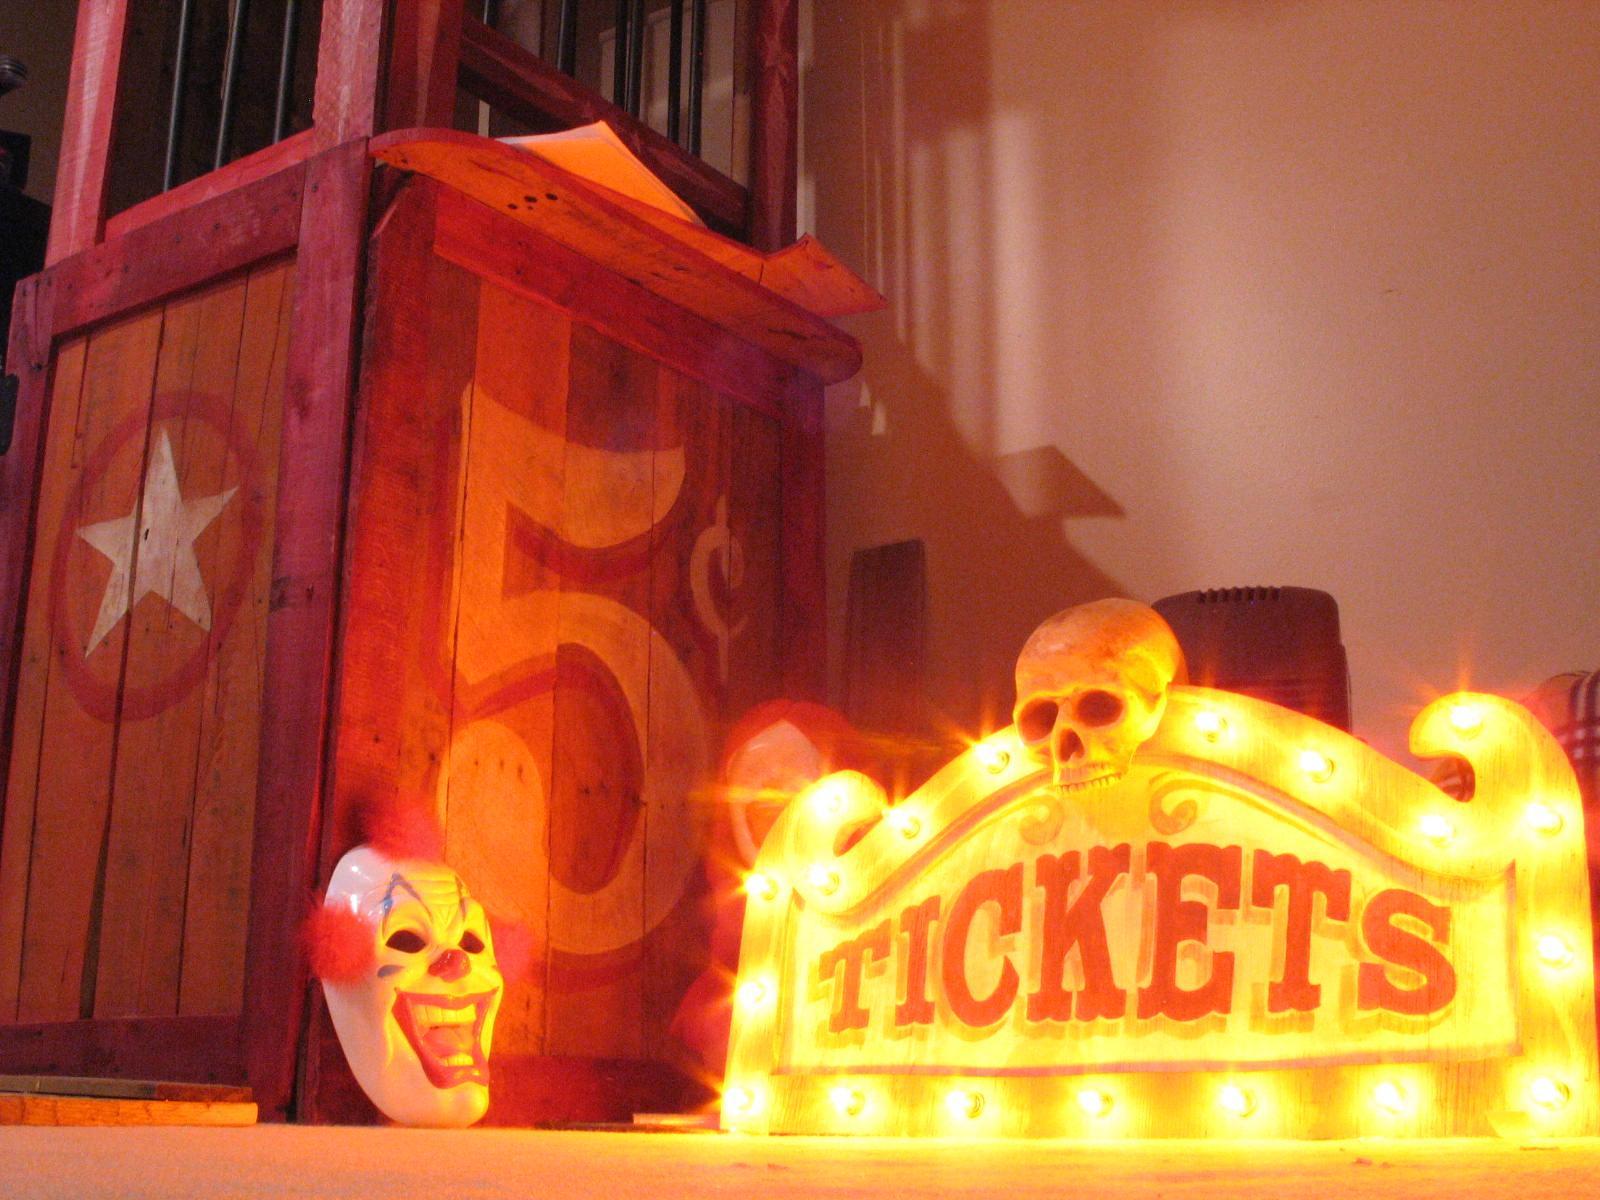
At the last minute this Halloween we decided to decorate in a creepy carnival theme with the goal of not spending too much money on decorations to save more for candy.

One of the many ideas we had was to build a creepy ticket booth to welcome visitors to our house for Trick or Treat.

This ‘back of a napkin’ idea evolved into a recycling mission as we scoured the industrial park for old, weather-beaten pallets and dug through flea market bins for door hinges.

Everything about this project was very freestyle and design-as-you-build but I’ll do my best to nail down specifics so you can recreate this ticket booth for yourself.

There are a LOT of steps here because I like to be as thorough as possible. I’ll keep it as concise as I can.

Also important to note, some pictures will differ slightly from my instructions. This is by no means a ‘to-the-inch’ guide. If I made 5 of these I guarantee they’d be a little different every time. Feel free to wing it a little.

Project Steps

GRAB SOME WOOD

OLD SHIPPING PALLETS

If you choose to use old shipping pallets like I did for your ticket booth you can do a quick search on Craigslist in your area to find a company giving them away or just drive around your local industrial area and ask nicely.

DOGEAR WOOD FENCE SECTIONS

Also sometimes available on Craigslist is old fencing. You might be able to also hit up a local fence company as they usually haul away old fencing from jobs. The benefits of using this material is that it’s usually well weathered, long enough to do a full back door, and much easier to dismantle than pallets.

PLYWOOD

I mean, sure, if you WANT to.. but it just won’t have that cobbled-together carnival look unless you can find some old weathered stuff.

DISMANTLE YOUR PALLETS

Pallets are not meant to fall apart, which means they’re not easy to take apart either. Just keep telling yourself it’s FREE MATERIALS!

Using a combination of your hammer, crowbar/prybar and brute force disassemble your pallets.

Try not to break the wood slats as you pry them from the 2×4 frame that holds them together unless the completely destroyed look is what you’re going for.

BE CAREFUL! There are splinters and rusty nails just waiting for a chance to poke you and end your evil carpentry session. Wear some gloves.

A LITTLE PRE-PLANNING - Dimensions

DETERMINE BOOTH FOOTPRINT

You can either measure the available space you have for your ticket booth or simply line up a few pallet boards until you get the width you like.

For purposes of these instructions we will use 30 inches as the width of each side.

DETERMINE BOOTH HEIGHT

Based on the headroom you need inside the ticket booth if you’re going to have a real person or a prop inside, you will now need to decide how tall you want to make the ticket booth.

Keep in mind that if you will be adding a sign on top of the booth you will be adding anywhere from 10″-12″ to the overall height of the booth.

A LITTLE PRE-PLANNING - Fastening Methods

NAILS

I used a pneumatic nailer which I recommend. You will need a few various lengths of nails or staples as well as some nail-cutting pliers to snip any nails that happen to poke through the other side.

Feel free to use a good old hammer and nails if you feel like tourturing yourself. Hey, it’s Halloween… go nuts.

SCREWS

Using drywall screws and a screw gun will definitely require you to pre-drill almost all your screw holes. While screws will likely make for stronger construction, the pallet wood has a tendency to split when you drive a screw through it without pre-drilling.

LIQUID NAILS

Liquid Nails can’t really be used by itself unless you have a bunch of clamps and nothing but time on your hands, but depending on how sturdy you want this structure, feel free to run a bead on every piece you nail or screw together.

PREPARE WOOD FOR LOWER SIDES - Part I

CUT SIDE BOARDS

Lay out your wood planks, face up, on the floor next to each other until you have made a wall of planks 30 inches wide as shown in Image 1.

Mark and cut each of these planks 42 inches long (or as high as the SHORTEST plank you are using for the bottom portion of the sides.)

REPEAT x 3 – Set these planks aside and do this 3 more times to determine the total number of planks you will need for your 4 sides.

NOTE: If you have long enough planks you can make the back of the ticket booth as long as the total height of the booth. So you’ll only have to make 3 short sides.

PREPARE WOOD FOR LOWER SIDES - Part II

CUT HORIZONTAL BORDERS

Cut 8 planks 30 inches long. These will be used to hold the planks together that make each side of the lower portion of the booth. We will call these the ‘horizontal borders’.

PREPARE WOOD FOR LOWER SIDES - Part III

CUT VERTICAL BORDERS

Depending on the width of your horizontal border planks you will need to subtract the width of 2 horizontal border planks from the height of the side planks. (e.g., 42 – (3.5-3.5) = 35)

Cut 8 planks to this length for your vertical borders.

ASSEMBLE LOWER SIDES

Lay out your wall planks, face up and side by side with the top and bottom edges lined up.

Double check your side measures 30 inches wide.

Place a horizontal border plank along the top and bottom of your wall planks as shown and place 4 nails aligned with each plank below the border as shown in Image 2.

Place your vertical border planks on each side of your wall section to complete the raised edge border.

Repeat x 3

PREPARE WOOD FOR UPPER SIDES - Window posts and back door planks

Since you’ve already determined how tall you want your booth, subtract the height of your lower section from the total height of your booth. Add 6″-8″ to that and you’ll have the measurement for your vertical posts.

Cut the following planks:

(2) front planks

(4) side planks

(?) rear door planks. (the number of planks you need to cut for this will be equal to the number of planks you cut for the back’s lower portion.

If you have long enough pieces of wood you can just use wood the length of the entire height of the ticket booth for your back door.

(2) 30″ Horizontal back door planks

PREPARE WOOD FOR UPPER SIDES - Windows

NOTE: You will need to decide how you want to attach your bars to the windows of your booth. This will determine what size wood you cut to hold the bars.

BARS THROUGH WOOD

Cut (6) 26″ long 2×4 pieces of wood from your pallets.

BARS ON WOOD

Cut (6) 28″ long planks.

ASSEMBLE BACK DOOR

If you are using shorter planks, build your upper back door section by laying out your planks, face up, side-by-side with the ends aligned.

Nail one horizontal door plank at the top off your plank grouping the same way you did in previous steps.

Nail the other 30″ horizontal plank 8″ from the bottom of your back door upper plank group.

With the upper portion of your back door face up on the floor, lay the lower portion of the back door on top overlapping the sections using the 8″ reserved in the previous step.

Nail (or screw) upper and lower sections together at point of overlap.

NOTE: If you had long enough planks to make a full height back door all you will need to do at this point is nail the horizontal back door planks to the back door as shown and go to Step 12.

ASSEMBLE WINDOWS - Bars In Wood

NOTE: Use this step if you want the bars to sit within holes drilled into the wood frame.

The width of your window post planks will dictate how much available window opening width you have.

Mark the window opening on the center of your horizontal window 2x4s.

Measure the space between bars to equally space them in the opening. Mark the center of where the holes for the bars will be drilled on the 2x4s

Using the 3/4″ boring bit drill the top 2×4 all the way through and the bottom hole only half-way through the 2×4.

Create the window frame by nailing the fully drilled top 2×4 to the window post planks aligned at the top, each 2″ from the edge. Nail the bottom window 2×4 8″ from the bottom of the window post planks and 2″ from the side edges of the planks.

ASSEMBLE WINDOWS - Bars On Wood

NOTE: Use this step if you want the bars to sit on the inside of the horizontal window planks.

Create the window frame by nailing the horizontal window planks to the window posts.

Align the top horizontal plank with the top of the window posts and approximately one inch from the edges of the outside of the window posts.

Align and attach the bottom horizontal plank 8″ from the bottom edge of the window posts.

Repeat for left and right sides.

Create the window frame for the front by following steps above but attach the bottom horizontal plank 16 inches from the bottom of the window posts. This will allow for an 8″ transaction opening in the front window. Adjust to suit your taste.

Equally space the bars on the window frame and attach them to the horizontal planks with either screws, liquid nails, silicone caulk, or metal strapping.

ASSEMBLE SIDES AND FRONT

Lay lower side section face down and place window frame on top overlapping it by 8 inches.

Attach both sections together at the points of overlap.

Repeat for opposite side and front sides.

ASSEMBLE BOOTH

Lay adjacent sides face down next to each other with sides touching and bottom edges aligned.

Attach one door hinge 6″ below the top of the adjacent window posts.

Atach one door hinge approximately 18″ from the aligned bottom of adjacent window posts.

Once hinges are attached, knock out hinge pins and separate adjacent sides.

Place other adjacent sides next to each other to repeat this process until all sides have 4 hinge pieces on them.

ASSEMBLE BOOTH

Lay 3 adjacent booth sides face down from left to right in this order aligning hinges: right side, front, left side.

Insert hinge pins.

Fold sides onto front and stand up the 3-section unit. Unfold sides to create a self-standing U-shape structure.

Align back door with sides and attach hinges as shown on each side of back door.

Remove hingepins from one side of back door and step inside ticket booth. Cool, huh?

Standing inside, close back door and ensuring the booth is square, measure and note the inside dimensions of your ticket booth. You will use this measurement if you decide to make a floor for your booth.

Now get out of the booth and take a look at what you made… You’re almost there.

ASSEMBLE ROOF

Using the same method as creating the lower side panels, create the roof.

Lay planks no shorter than 34 inches side by side until you have a panel no less than 34 inches wide. This length and width will allow you to have a 2-inch overhang on the roof.

Mark and cut your planks. Include 2 cross planks to tie them together.

Align roof planks and attach cross planks to complete roof panel.

ATTACH ROOF

Place roof panel on top of ticket booth and attach one hinge to the inside of each booth side and the roof panel.

To remove roof panel, tap out hinge pins.

TIME FOR SOME COLOR

If you’re using old wood you’re already partially there making your ticket booth look old. If you just want a wood colored ticket booth, you can stop here and start selling tickets. For everyone else, keep reading.

You can use latex paint or stain. The goal here is to water down your color to give the wood some color but not necessarily a coat of paint (unless that’s the look you’re going for.)

Place some latex paint into a small plastic container and add water until it is runny but still opaque (you can’t see through it).

Paint your wood with a cheap brush coating the wood plank you’re working on fully. Almost immediately grab your rag and wipe off the paint you just applied.

Work in small sections to ensure the paint doesn’t dry as you’re working. Sometimes it helps to brush down the area you’re working on with water before starting to paint.

FINISHING TOUCHES

First thing here is to spend some time doing your research. While you may have a good idea of what you think ticket booth decoration and embellishment looks like, I prefer to double check what’s in my head with what I can find in real-world examples.

Library books, images.google.com, clip art websites, and the like are great resources for reference imagery.

Be sure to respect copyright restrictions, etc. Just because it’s out there in the world doesn’t mean you can copy it. Search for images to serve as inspiration and reference for your own creations.

Grab a marker, paint marker or paint brush and go to town. Keep your paint watered down and go over the same area a few times until you get the faded look you’re going for. Once it all dries, hit your designs with 120 grit sandpaper for a more weathered look.

Curtains add a great look to the booth. Search fabric store clearance aisles for closeout fabric or thrift stores for old-looking curtains or bed spreads. Heavy cloth with a vintage look will work best. Feel free to drag it on the ground or shred it if that’s your thing.

Simply staple your curtains to the inside of the ticket booth. Pull and tie them back with strips of the same material. Staple tie back strips to inside of ticket booth (unless your booth is closed, then don’t tie them back.)

LIGHTED SIGN - Concept Design

Every idea should have a sketch or reference image so get online to find something to go by or whip out a writing instrument and sketch something up.

Based on my original sketch, there were supposed to be lights running along the bottom of the sign. However, I didn’t realize until the booth was built that it would be a pain to conceal the wires. My design changed somewhat based on that as I was building.

LIGHTED SIGN - Prep Wood

Cut 2 pieces of 3/4″ plywood measuring 30″ wide x 18″ high. (If your design doesn’t call for a raised border cut only 1 piece of plywood and skip the next bullet.)

Align the bottom and side edges and clamp or temporarily screw the pieces together.

Use a piece of cardboard or paper the same size as your plywood and fold it in half, then unfold it. Sketch out the shape of your sign using the crease line as your center line. (you will only need half of your sketch.

Cut out your paper/cardboard shape around the outline and along the center line.

Place the half-template on your plywood and trace the outline, flipping it over to trace the other half of the sign. Ahhhhh, symmetry.

Using the scary jigsaw, cut out the sign around the shape outline you just made.

Separate the pieces and trace a line around the inside of one of the pieces to create a 2″ border. Using the jigsaw, with a plunge cut or by drilling a pilot hole, cut out the inner area of the border.

LIGHTED SIGN - Assemble Face

Nail the sign border to the sign backing panel.

Yep, that’s it for this step.

LIGHTED SIGN - Paint and Lettering

Based on your color scheme, paint the border and base accordingly using the technique outlined in previous steps. Use multiple coats of watered-down paint until you achieve the weathered look you’re going for.

To create the letters you can use any font. I chose to use an older style font similar to those used in wood-type letterpress printing.

Visit DaFont.com to browse through thousands of fonts and choose the one you like for your sign.

Install your font and use a program like Photoshop, Illustrator, or a word processor to type out your sign lettering. Most of these programs have a tool which allows you to shape your text within an arc as shown in the attached photo.

Measure the available space on your sign, allowing for some space around the edges of the letters, and use that measurement to scale your font accordingly in the program you are using.

Most printers allow you to print large images across multple pages which can be taped together to create a large printed image to transfer to your sign.

Using a graphite transfer paper or equivalent (anyone remember carbon paper?) trace the sign lettering onto the sign and paint in your letters using the watered-down paint method. Take your time here; lettering can really ‘make’ the sign.

LIGHTED SIGN - Install Lighting

Decide how far apart you want to place your lights.

Locate the center of your sign and place a pencil mark there to help you equally space the light bulbs on your sign. Place X marks centered within the border around the entire sign to mark the positions of the light bulbs.

If you want to add a skull to the top of your sign like I did, just be sure to leave a space for the skull as shown. If you use a blow-mold hollow skull you can put a light inside the skull to make the skull glow as well. I didn’t.

Starting from the plug end of your light string, place the first socket into the lower left or right corner hole depending on where you wish to run your light string wiring into the booth.

Work your way around the sign inserting sockets into the holes. When you reach the last hole simply cut the string wire 3-6 inches from the last socket and seal off this cut end with electrical tape or shrink wrap.

Using a staple gun, attach all loose wire to the back of the sign to keep things nice and tidy.

Install your bulbs, plug it in and let there be LIGHT!

LIGHTED SIGN - Attach to Ticket Booth

Use galvanized angle brackets or angle iron to attach sign to roof section.

ENJOY!

Stand back and bask in the eerie glow of happiness (or amber lights).

Smile graciously when people ask where you bought that awesome ticket booth and you reply, “I made it.”

Disassemble and store it flat until next season.

Conclusion

My 4-8 hour time estimate is assuming you're working hard, maybe have a helper and are in a rush to get this thing done before Halloween. It helps, but isn't necessary, to have a general idea of basic carpentry (e.g., cutting a piece of wood and nailing it to another piece of wood).