Thorax_Pg1Photo1_Pg3Photo4

This article appeared in the Make: Halloween issue.

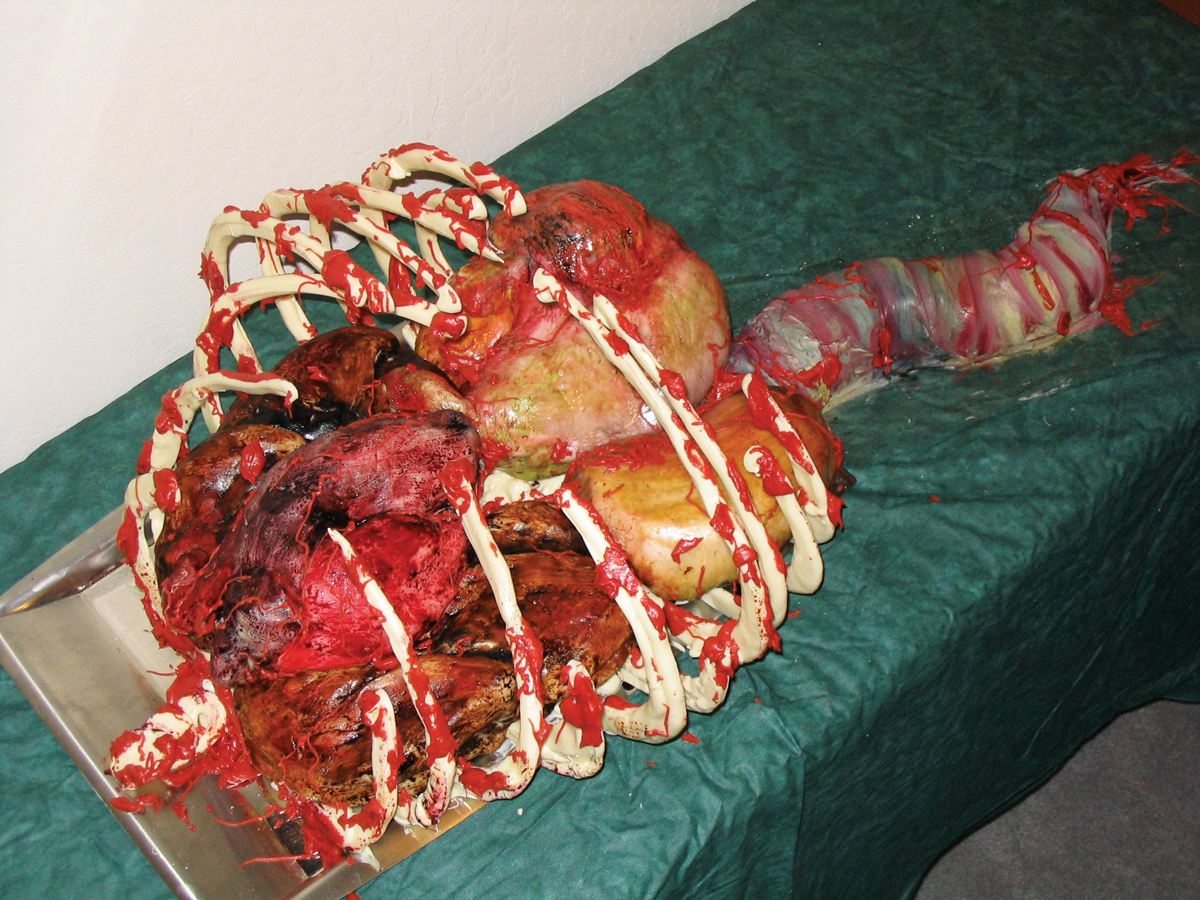
I make a bleeding heart cake for our annual pumpkin carving party. Sometimes the heart beats, sometimes it’s anatomically correct, always it bleeds fresh, homemade raspberry sauce.

This year I decided to go the whole hog and make an entire thoracic cavity cake. Each organ was a different kind of cake, and secreted a different color of fluid when cut into: raspberry, strawberry, mango, and blueberry sauces. The heart bled pretty well, but the other fluids weren’t so dramatic. On the bright side, they were all delicious.

What will the next generation of Make: look like? We’re inviting you to shape the future by investing in Make:. By becoming an investor, you help decide what’s next. The future of Make: is in your hands. Learn More.

Project Steps

Bake the organs (er, cakes).

Bake a different type of cake for each organ. Here are the cake-sauce combinations I used:

  • Heart — Orange cake with raspberry sauce
  • Lungs — Apple spice cake with strawberry sauce
  • Kidneys — Orange cake with blueberry sauce
  • Stomach — Ginger cake with mango sauce
  • Small intestine — Jellyroll with red currant jelly

But don’t add any of the sauces while baking — these will be added later.

Shape the organs.

Once these cakes are baked and cooled, carve them into the shapes of the appropriate organs. Gray’s Anatomy makes a very handy reference.

Add the gooey stuff.

Flip each organ over, hollow out a cavity in the center, and frost the inside of the cavity and the underside of the cake with butter cream frosting. Then spoon in the fruit sauces. Roll out some of the fondant and seal the cavities with it. Flip the organs back over.

Cover the organs with fondant icing. (You could also use white modeling chocolate, which tastes better and sticks to itself better than fondant. But it’s more difficult to work with on cakes like these, which are relatively unstable due to the hollows in the middle. Also, modeling chocolate is difficult to paint with paste food coloring, though it can be painted easily with powdered food coloring dissolved in cocoa butter.)

Assemble the rib cage.

Put your cakes aside, and assemble the white chocolate rib cage in which all the organs will be placed. First I drew the ribs on paper, which I placed underneath the acetate to guide me. Then, temper the white chocolate by zapping it very briefly in the microwave, and pipe the ribs and vertebrae onto acetate with a plastic piping bag. Wait until firm.

Now dip each piece into a bowl of melted white chocolate before assembling the rib cage on a silver tray. Of course, with all the organs on top of it, no one ever actually sees that there is a complete spinal column underneath all the cake, but I say if you’re going to make an edible, anatomically correct chest cavity dessert tray, you might as well do it right!

Place organs (except intestine) into the rib cage.

Once the rib cage is dry, place all the organs into the cage in their appropriate places, again using Gray’s Anatomy as a guide.

Attach the intestine.

Before attaching the intestine, bend the jelly roll into appropriate curves and cover it with fondant.

Move the cake to its final resting place, and then place the intestine. It should trail out of the rib cage, suggesting that the person to whom the thorax had belonged has been ripped apart, rather than carefully dissected.

Paint the organs.

I’m not really sure what colors kidneys and stomachs are supposed to be, but drawing on my vast experience watching people in movies being disemboweled, I gave it my best shot. Have fun with it.

Add final gory touches.

All that’s left is to add the butter cream frosting blood, so it doesn’t look so pristine.

I did little veins on the organs first with a piping bag, then put big globs of gore on the ribs with a knife. A little spritz of corn syrup to give it that all-important oozing, wet look, and voilà! You’re done!