

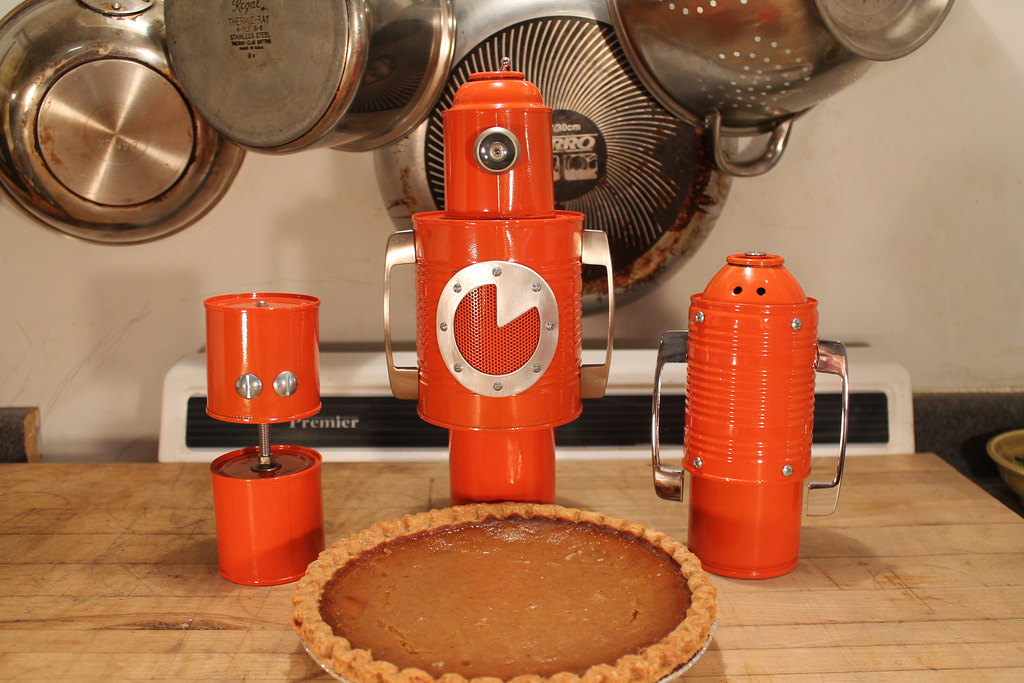

After you’ve had your pumpkin pie this Thanksgiving, why not make some metal toy robots from the left over cans. In the following project you’ll learn how to mockup, assemble, and embellish your robot designs. The bots are durable enough to give to the kids or perfect for your next electronics project enclosure. So grab a drill and a turkey sandwich, because this is one great Black Friday project.

Step 1: Make some Pumpkin Pies
Since you’ll need empty cans for this project, why not make a pumpkin pie? Use your favorite recipe as long as it involves a variety of canned ingredients (i.e. big cans, little cans, interestingly shaped cans).

I made two pies for this project (hopefully yours taste better than mine, yuck). I used a 29 oz. can of pumpkin, a 12 fl oz. can of evaporated milk, two 5 fl oz. cans of evaporated milk, and a 6.5 oz. can of whipped cream for one pie. And a 15 oz. can of pumpkin, two 5 fl oz. cans of evaporated milk, and a 6.5 oz. can of whipped cream for the other.
Warning: For this project you will be working with sheet metal. It can be sharp and can become very hot when drilling. Please take every precaution to be safe, and always wear goggles.
Double Warning: The two whipped cream cans I used were originally under pressure. Do not puncture any can under pressure, it can be very dangerous. I made sure that all of the whipped cream was removed from the cans and all of the gas had escaped. Using a flat head screwdriver I popped the top white cap off. I clipped the rest of the nozzle flush using clippers, and pushed the remaining nozzle into the can. Only then was it safe to drill holes.

Step 2: De-label and Clean the Cans
This is the thankless step, but important for a good paint job later. Rip off the paper labels, soaking the cans in warm water makes this a bit easier. I used acetone (nail polish remover) and paper towels to remove the glue the labels left behind. One can had a “painted on” label I removed by sanding it with a low grit sandpaper. This step is not necessary if you plan to eventually prime and spray paint your robots.

Step 3: Mock-up Your Robots
Stack little cans on top of big cans. See which combinations work for you, what gives the most personality (dents can be good). Use a Sharpie to draw eyes or components to get a better feel of the final product.

Step 4: Finding the Center of the Cans
I find that I often connect the cans through the middle, so I usually just mark all of the centers at one time using a center finder, a handy thing. Place the tool on the can, make a line, turn the tool about 90 degrees, and mark another line. Where those two lines cross is basically the center of the can.


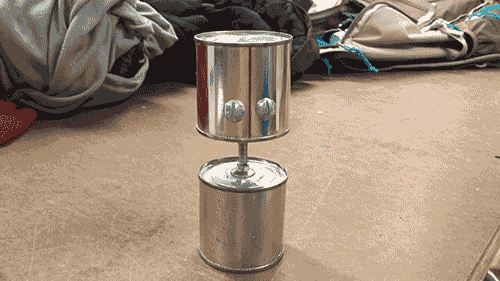
Step 5: Making Robot #1
My two pumpkin pies left me with a lot of cans, so I decided to make 3 different toy robots. For the first bot, I used the two 5 fl. oz. cans of evaporated milk. These cans have “Shake Well” embossed on them so I thought I would make a robot bobble head, using a door stop spring as the neck. I also used some scrap Delrin rod I had lying around the shop, but you could use a wooden dowel or other wood scraps instead.

I drilled through the centers of the cans and rods. Using a machine screw, I attached the smaller rod piece to the top of the door stop and the larger rod into the end of the door stop.


Step 6: Making Robot #2
For the second robot, I used the 12 fl. oz. can of evaporated milk and the can of whipped cream with the rounded top.


Drill four ⅛” diameter holes around the top and bottom of the pumpkin can. These will later be used to fasten the outer can to the inner whipped cream can.
Drill an 11/64” hole on either side of the pumpkin can, near the top, shoulder position. Then attach two drawer pulls using ¼” 8-32 screws and washers (the screws that come with the pulls will most likely be too long).

Warning: Make sure that you have removed all of the whipped topping from the can and that it is no longer under pressure before you drill into it.
Drill eyes into the whipped cream can. I drilled two 3/16” diameter holes. I also drilled a 13/16” diameter hole in the bottom of the whipped topping can so I could properly clean the inside.


Step 7: Making Robot #3 — The Head
For this robot I used the 29 oz. pumpkin can, the 5 fl. oz. evaporated milk can, and the remaining whipped cream can.

Warning: Make sure that all of the pressure has been released from the whipped cream can before you attempt to puncture it.


Drill a ½” hole into the top of the whip cream can cap, for the toggle switch. Then make sure all of the pieces fit. I had to hacksaw about a half inch off the back of the peep hole so the toggle switch could fit correctly.

Step 8: Making Robot #3 — The Chest Plate
This step is overly complicated, completely unnecessary, and really just an excuse to use some tools I recently bought. You can make a perfectly good robot if you skip the chest plate step all together. That said, this is how I fabricated the chest plate.
I cut down some thin aluminum sheet I got at the hardware store. I found the nibbling tool left a better cut than tin snips (slower but better).

I created a simple vector drawing and loaded it into Otherplan and cut it out on my Othermill using a 1/16” diameter straight bit. You could pretty much use any CNC mill to cut this piece. Or you could also use snips, a nibbling tool, a drill, and some files if you want to.


Step 9: Making Robot #3 — Body


I used the following lighting hardware to assemble the robot: a toggle switch, a hickey, a 12” threaded nipple, and a flat bracket cap. You can think of these kind of like the robot’s spine.


Slide the head can (the one with the peep-hole) under the switch and cap, slide on the pumpkin can, and then slide on the whipped cream can (just a little bit of the threaded nipple should be visible at the bottom of the whipped cream can). Screw on the bracket cap to hold it all together.

Step 10 : The Paint Job
The robots can be left raw metal, can be spray painted, or even dipped in Plasti-dip, but I decided to go with powder coating. I don’t expect a lot of readers to have access to a powder coating set up, but the final result is a very durable finish, that I’m a sucker for. Everything I learned about powder coating I learned from this video I saw on MAKE a few years back:

Disassemble all of your robots and decide which components get painted and which parts don’t. Just for good measure, clean up all of the parts using acetone one more time.
I baked all of the cleaned cans before I powder coated them. This ensures that you’ll get any last glue off. There may be a little smoke when doing this.


Step 11: Final Assembly
Put them all back together and have a slice of pie, you earned it.


Final thoughts
Now that the robots are done I just want to add extra stuff to them. I think the two smaller bots could use a little more embellishment, maybe they should all have a chest plate. I’d also like to add some electronics, LED eyes, glowing chest plates, maybe sound effects.
Have an extra slice of pumpkin pie this Thursday. Happy Thanksgiving and happy making.


