This project originally appeared on Hackerfarm, a community of hackers, engineers, and tinkerers  from the countryside of Japan.

Steam sterilization is an easier process because the transition from water to steam occurs at a fixed temperature (100 deg C) which means you don’t need any specific gear to regulate temperature. For heat sterilization, you would need some control mechanism to keep the temperature at approximately 70 degrees C for thirty minutes in order to properly sterilize a mask or tools, at least according to Stanford Medicine.

I decided to see how difficult it’d be to set up a heat sterilization chamber. Interestingly enough, it’s not as difficult as I expected.

The Theory
Heat sterilization is quite straightforward. Viruses similar to Covid-19 such as SARS and influenza are known to be weak against temperatures greater than 60 degrees C and it’s believed that Covid-19 is as well. There are still further tests that need to be conducted regarding definitively proving heat can deactivate Covid-19, and various groups are working it.

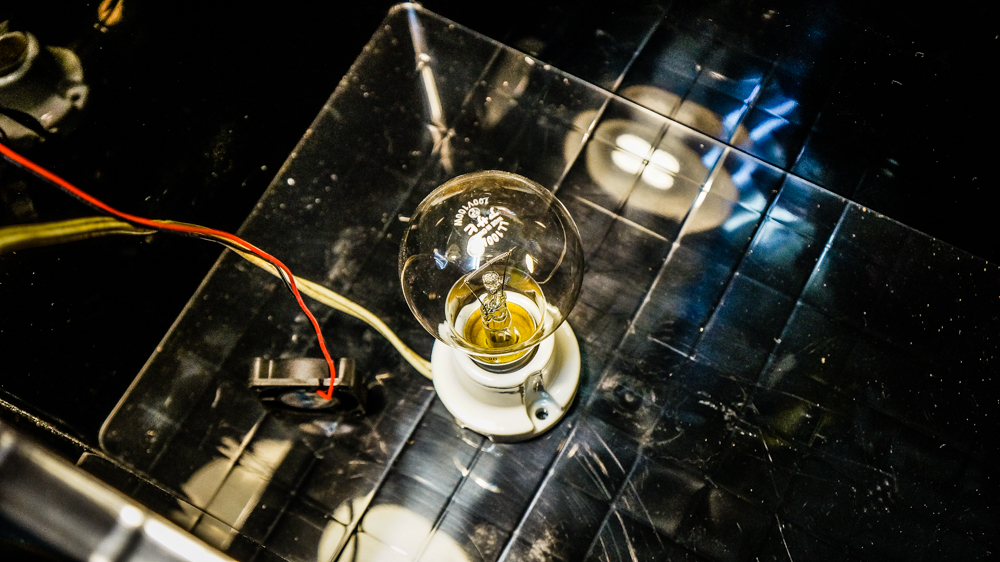
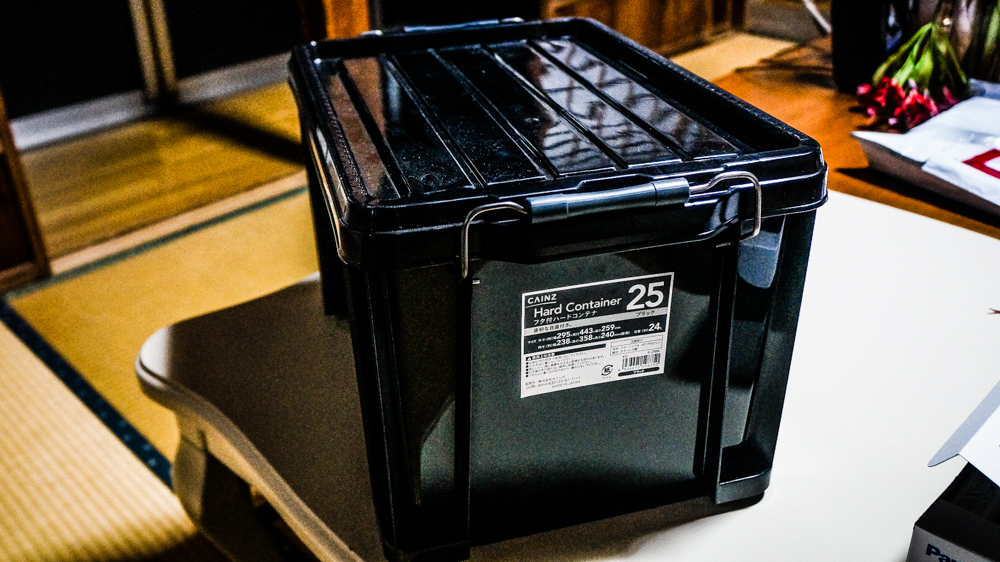
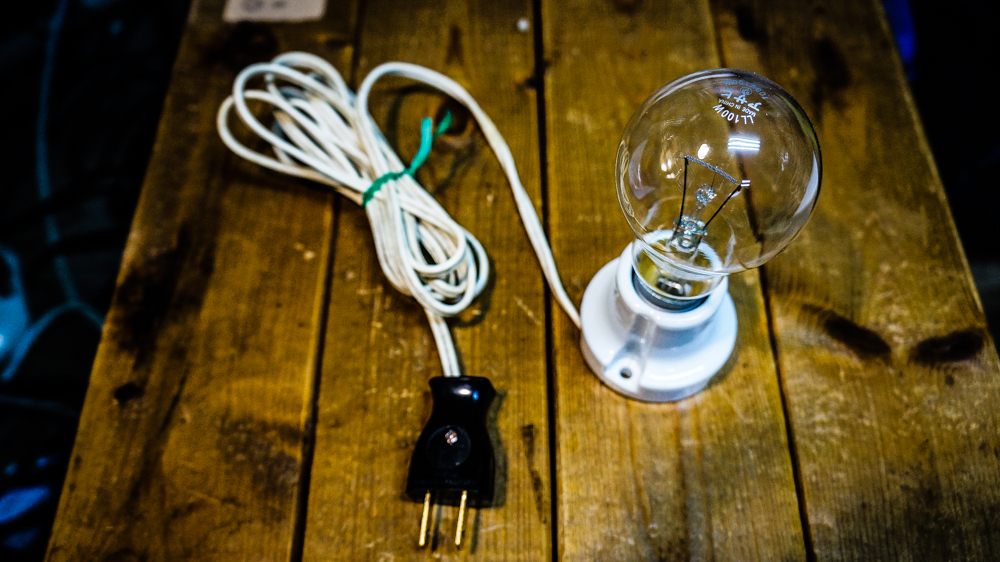
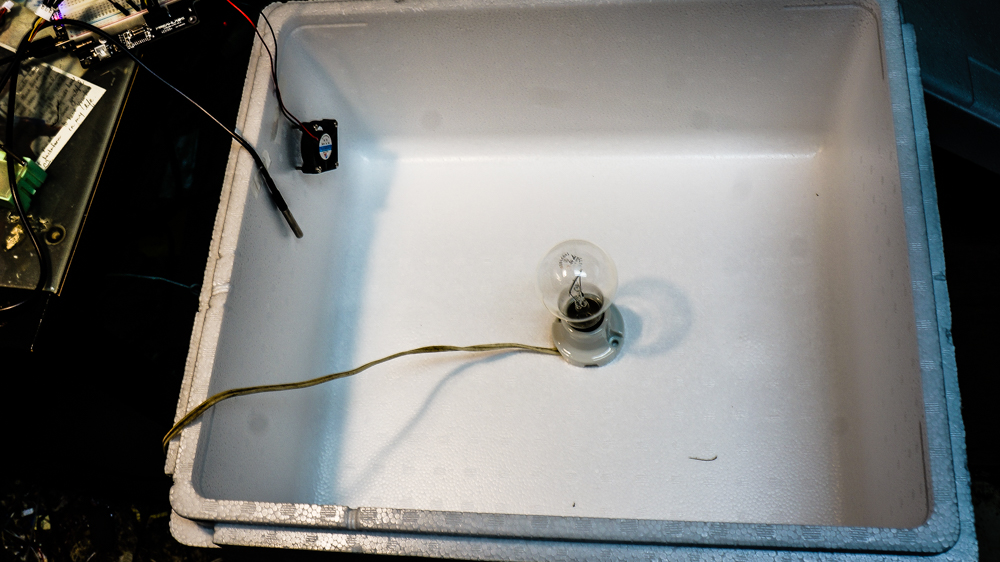
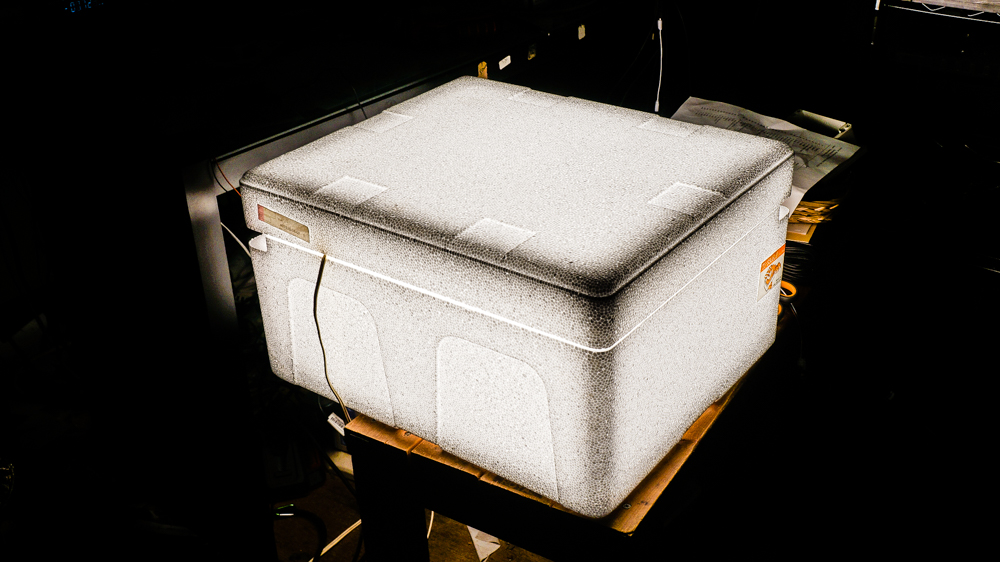
In the meantime, let’s discuss how we’re going to set up a low cost heat sterilization chamber. Trying to hit 70 degrees C is actually not a herculean effort, since typical consumer ovens go higher than 200 degrees C. Generally we’d need a heating element, temperature controller, and a suitable chamber.

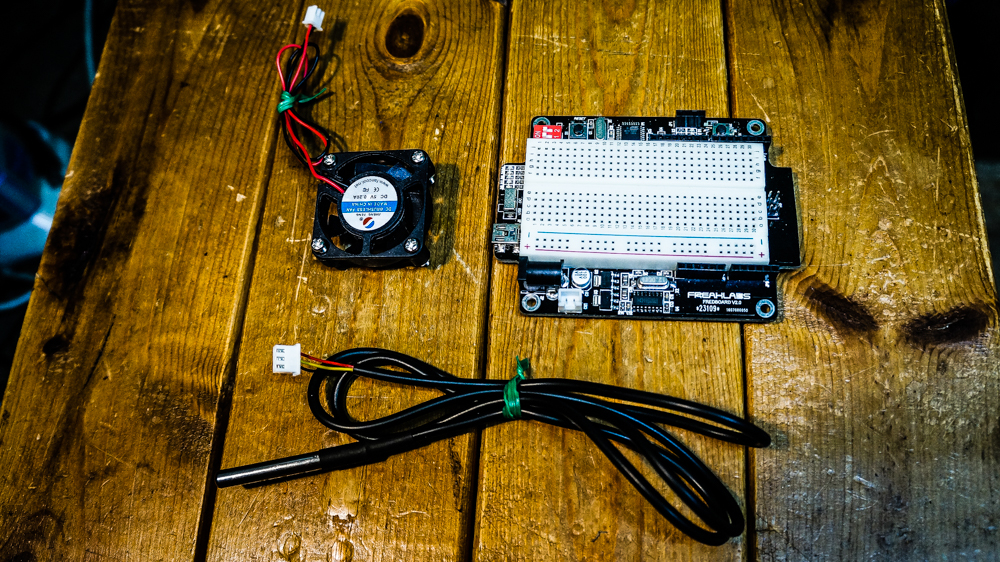
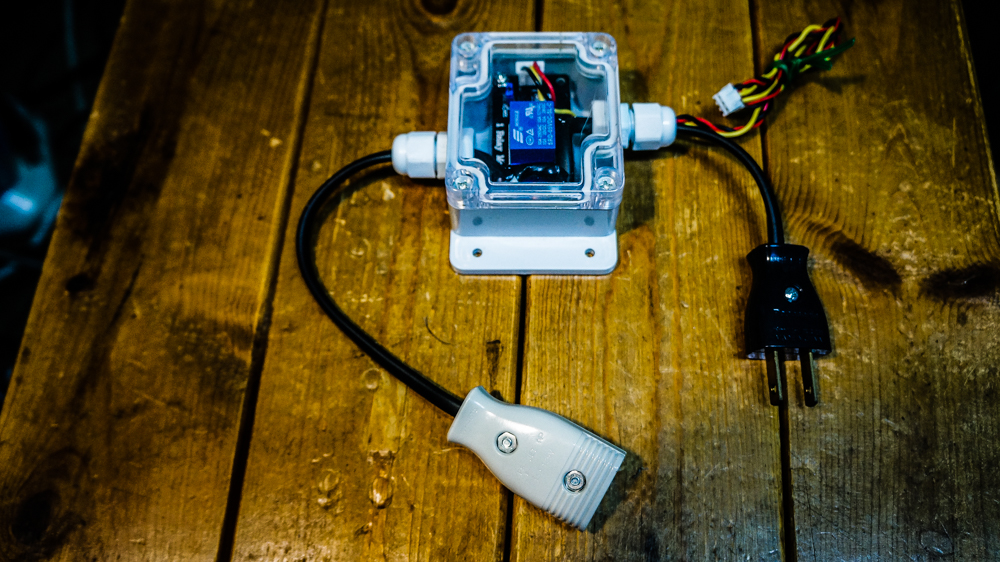
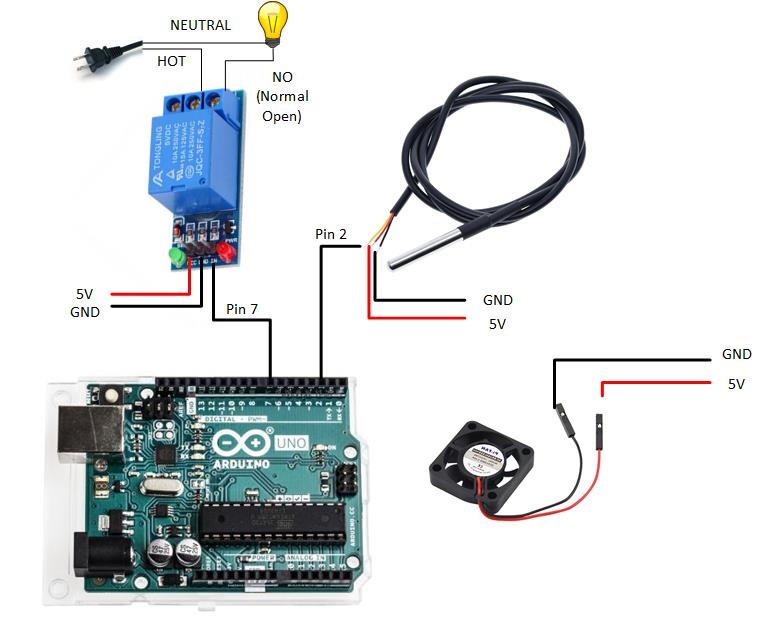
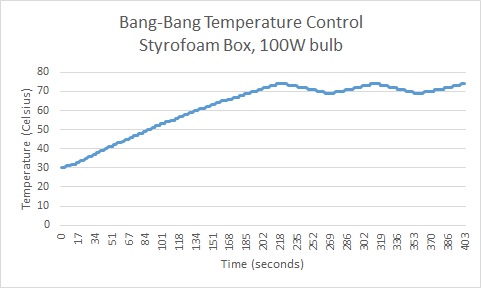
For the control, I ended up building it myself for this experiment. I used an Arduino and a relay module and implemented a very simple form of temperature control called bang-bang. It’s simply an on-off control mechanism similar to a thermostat. When you hit the low temperature set-point, you turn on the heating element. When you hit the high temperature set-point, you turn it off.

Bang-bang temperature control isn’t a great control mechanism and is usually only good if you:

  • Don’t need super accurate temperatures
  • The temperatures don’t fluctuate quickly

Luckily in this case, both criteria are met. We just need to hit around 70 degrees C and the temperature doesn’t change so quickly in our chamber.

Project Steps

Heating element

The first thing to think about is what we’re going to use to heat the enclosure. Heating elements are quite specialized devices that are both hard to get and can be expensive. Instead I decided to use a standard 100W incandescent light bulb.

Incandescent light bulbs are still plentiful and can be purchased at most hardware stores or via Amazon. They are horribly inefficient as a light source with only 10% of the energy that goes into them producing light. Luckily the other 90% of that energy produces heat meaning it’s quite efficient as a heat source. Yay!

Light bulbs are actually quite good as heaters and if you’re old enough to remember the EZ-Bake Oven, the oven was heated using one. So a 100W light bulb with 90% heat essentially becomes a 90W heating element.

Enclosure

Because we’re not dealing with high temperatures, I decided to use standard, low-cost plastic enclosures for my sterilization chamber. As long as the melting point was much higher than the target temperature, I thought it might be okay so I decided on the following enclosure.

This was a fail. I didn’t take into account that because it wasn’t an insulated enclosure, it was losing heat like crazy through the sides and the top. The further I tried to heat the inside above the ambient room temperature, the faster the heat would leak out. Finally I hit an equilibrium where I just couldn’t heat it above 42 degrees C.

After going back to the drawing board, I figured I would either need more light bulbs or a well insulated sterilization chamber. I decided to start with the insulated chamber.

I went with a styrofoam box from the local hardware store which is used for keeping vegetables or meat cold as they’re being transported. Since we’re in a farm town near a fishing town, these get used quite often by the locals. This particular one was around $8 USD. I think any kind of cold storage box would do as well such as an Igloo cooler (US) or Esky (Australia).

Now that I had the chamber squared away, I put together my heating setup. Before I continue, I found out that you could just buy a temperature controller for about $20. I totally recommend going this route, unless you really like doing things from scratch.

Heating Setup

My heating setup consisted of the following:

An Arduino-compatible board (The FreakLabs Fredboard), fan, and temperature sensor (DS18B20). The fan is used to churn the air so the heat gets evenly distributed. The temperature sensor is used for the temperature control of the system.

A relay module. This one is the same as the cheapies you’d buy for $1 on eBay. We use these in our Arduino workshops and we package it up so it’s safe and a bit more user friendly. Essentially, it’s used to turn on and off electrical appliances.

And our heating element, a 100W incandescent light bulb.

The setup is actually quite simple and followed this connection diagram. We used the Arduino to control when to turn on and off the light bulb based on the temperature. For any temperature below 70 deg C, we turned on the light bulb. For any temperature above 73 deg C,we turned it off.

The reason we had a gap between our ON and OFF set points was so the controller wouldn’t quickly cycle on and off, which happens if we have the set points at say 70.1 deg C and 69.9 deg C. That gap is called hysteresis and is mainly used so you don’t oscillate between the ON and OFF states so much.

Here’s a shot of how the system actually looked

It’s quite simple.

This time, the project was a success and I can definitively say you can heat the inside of a styrofoam box to 70 degrees quite quickly. In fact, I logged the temperature vs time so you can see how quickly it heats up:

It takes approximately 3 minutes to go from ambient to 70 degrees C using the 100W light bulb. From there, the bang-bang controller keeps the temperature oscillating between 70 and 73 deg C. Since it’s an insulated box, the heat take a while to dissipate so the relay isn’t toggling on and off so quickly.

The styrofoam box also looks quite stunning when you turn off the lights. When the heating element turns on, the box becomes translucent.

The Code

The code for the temperature controller is here. You will also need the OneWire library and the Dallas Temperature library for Arduino.

#include <OneWire.h>
#include <DallasTemperature.h>

#define SET_TEMPERATURE_ON 70
#define SET_TEMPERATURE_OFF 73
#define ONE_WIRE_BUS 2

OneWire oneWire(ONE_WIRE_BUS);
DallasTemperature tempSensor(&oneWire);

int relayPin = 7;
unsigned long startTime;
static FILE uartout = {0};

void setup()
{
fdev_setup_stream (&uartout, uart_putchar, NULL, _FDEV_SETUP_WRITE);
stdout = &uartout ;

pinMode(relayPin, OUTPUT);
digitalWrite(relayPin, HIGH);
Serial.begin(57600);
tempSensor.begin();
startTime = millis();
}

void loop()
{
int temperature;
unsigned int elapsedTime;
tempSensor.requestTemperatures();

temperature = floor(tempSensor.getTempCByIndex(0));

if (temperature < SET_TEMPERATURE_ON)
{
digitalWrite(relayPin, LOW);
}
else if (temperature > SET_TEMPERATURE_OFF)
{
digitalWrite(relayPin, HIGH);
}

elapsedTime = (millis()-startTime)/1000;
printf("%d,%dn", elapsedTime, temperature);
delay(1000);
}

/**************************************************************************/
// This is to implement the printf function from within arduino
/**************************************************************************/
static int uart_putchar (char c, FILE *stream)
{
Serial.write(c);
return 0;
}

Conclusion

So finally, it actually is slightly more fiddly to create a temperature chamber but you can take a huge shortcut by buying a temperature controller. With heat sterilization, the plus side is that you can actually scale the size of the temperature to the largest insulated box you can find. You might need more than one light bulb, but those are cheap. I suspect this is a slight advantage over steaming since most steam chambers I’ve seen are not very large.

I also think that dry heat has a benefit over ultraviolet sterilization (UVGI). For UVGI, you can only decontaminate the surface. Any shaded areas will not be sterilized or at least receive a much smaller dose than surfaces directly exposed to the UV light. Heat on the other hand is pervasive and as the mask or whatever tool is being sterilized comes to the target temperature, it should inactivate the viruses even in the pores and folds.

Good luck and stay safe, from Hackerfarm.