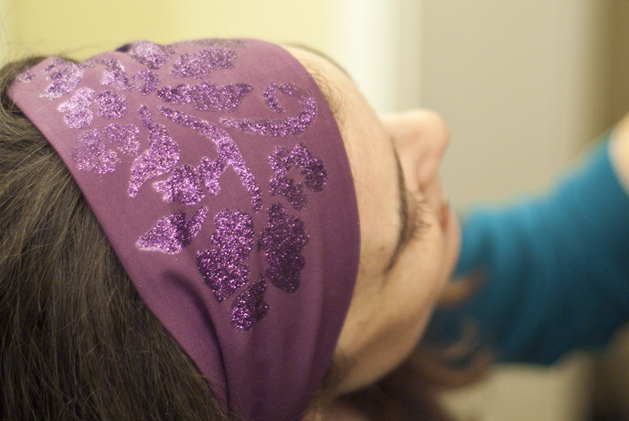
Glitter has always been my absolute favorite. I love anything that sparkles, gleams, or shines! The way that glitter captures the light intensifies color and that was the inspiration for these “tone on tone” headbands. They are great accessories that are both sophisticated and sparkly! ILoveToCreate.com sent me a stunning rainbow of glitters, and using their easy stencils, I was able to make super intricate designs without any fuss. Now I’m addicted and I’ve made a headband in every color!
Enter the iLoveToWin Daily Giveaway to win a huge stash of materials including all the Fashion Glitter, Glitter Bond adhesive, and Sticky Fabric Stencils that I used for this project. This giveaway lasts two days, December 15 and 16 so you have no reason not to head over to their site to enter to win! Good luck!
Materials
Tulip Fashion Glitter
Tulip Fashion Glitter Bond
Tulip Sticky Fabric Stencils
Fabric scraps
Elastic, 1″ wide
Scissors or cutting mat and rotary cutter
Iron
Sewing machine
Directions
Step 1: Cut the fabric into a rectangle, 20″ long and 9″ wide.
Step 2: Fold the fabric in half lengthwise, set the sewing machine to a straight stitch, and sew the folded fabric closed along the long edge.
Step 3: Turn the fabric inside out to hide the seam, and then press it flat with an iron.
Step 4: Remove the backing from the Sticky Fabric Stencil. It has a slightly sticky back that will hold it perfectly in place. Center it onto the fabric and gently press it into place with your hand.
Step 5: Squeeze the Glitter Bond glue onto the sponge that is included in the package. Use it to coat the stencil with a thin layer of adhesive. Press the glue onto the fabric. Try not to smear it under the stencil.
Step 6: This is the best part! Cover the glue with the Fashion Glitter. I chose purple on purple, but you can use any color, or colors that you like! Sprinkle the glitter everywhere, then set it to the glue by tapping it down with your fingers.
Step 7: Allow the glitter to set for a few minutes before you shake loose the extra. Then gently and slowly lift the stencil up to reveal the perfect design. Let the glue fully dry for 2 hours, but don’t wash the fabric for 72 hours!
Step 8: When glitter is dry enough to work with, it can be sewn into a headband. Cut 4″ of elastic. Fold down the edges of the fabric, about 1/4″. Put the elastic into the ends of the head band, and stitch it together using the sewing machine.
ADVERTISEMENT


