By Susan Beal
I find it all too easy to spend lots of money on tempting new gardening tools and supplies, so I wanted to share a few ideas for reusing and recycling basic household stuff into handy essentials for watering and nurturing your plants. I’d love to hear yours, too!
Milk-Jug Irrigation
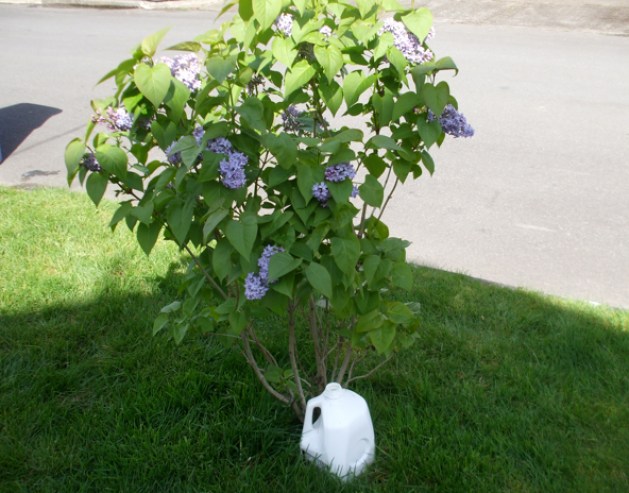
This super-simple idea is nothing new, but it’s great for smaller shrubs and bigger garden plants — during high summer, I use them for my tomatoes. In this photo, I have one next to our small lilac bush, delivering about a gallon of water, give or take, slowly to the root system instead of in one big overwhelming gush, like a hose.
To make one, simply cut or punch 4 small holes into the bottom of a clean and rinsed gallon milk jug (or any other similar plastic container). You can place it right next to a plant and fill it with a hose or a pitcher of rain-barrel or bath water (or carry it over, dripping a bit of water as you go). I punctured mine evenly across the bottom, and I just alternate sides of the plant when I water, but you can also place your holes to one side of the jug and orient it so the water flows more directly to the roots, for smaller plants.
Bucket Irrigation
This is great for new trees and larger shrubs that need a bigger drink. We planted 5 trees with Friends of Trees about a year ago and have been using this method for the dry months with lots of success. Like the milk jug, you’ll place a drilled 5-gallon bucket right by the trunk or base of your plant (here it is next to the Purple Ash in our parking strip) for a gradual and steady watering of the roots.
To convert a bucket, just drill 5 or so small holes (like the pattern shown) into the bottom of the bucket.
Place it by the tree and fill a second, unaltered bucket with as much water as you want and carry that over to pour a big satisfying splash of water into your drilled bucket for gentle watering. Five gallons takes quite awhile to drain, so you may want to drill a few to use at once if you have lots of trees to water.
Note: Five gallons packs a punch if you’re walking far, so splitting it in half can save your back!
Recycled Can Mini-Planters
I made these cheerful little cans into planters for my tiny kale and pea starts last spring, so they had a little longer to grow before they went into our raised beds. You can see more details over at CraftStylish, but the idea is very basic: drill or nail holes into the bottom of clean, rinsed cans, add a layer of pebbles for good drainage, and transplant your starts into them with potting soil for more root space and a chance to get a little bigger and hardier before going outside.
Bike Wheel Cloches
Another fantastic idea for nurturing small or delicate seedlings is this project that Patrick Vinograd, my collaborator on the Raised Beds article, made: recycled bike wheel-rim cloches! With a cloche in place, you can start your growing season earlier and extend it later, protect vulnerable plants from temperature extremes and pests, and create a gentle (and even portable) greenhouse effect for exactly as long as you need it. Patrick got a few old wheels for free from our neighborhood bike shop, sawed the metal rims in half to create half-circles, and placed 6 of them in perpendicular rows of 3 across one of their raised beds.
Patrick secured his cloches on the rims and to the sides of the raised bed with spokes from the bike wheels and draped a lightweight semi-opaque plastic over the whole configuration, as shown in the photos.

Rocks hold down the outer sides of the tarps to keep things in place. He and his wife Caitlin have their baby radishes and spinach under the cloches for now, until our weather gets a little more consistent!
About the Author:
Susan Beal is a crafter and writer in Portland, Ore., who loves to drink coffee, sew, and make things with buttons. Her book, Button It Up, is out now!
ADVERTISEMENT


