Although I have been working as a full-time artist in Los Angeles for more than 10 years I am probably best known as an independent toy designer. Toy design is something I fell into after I first discovered the world of designer toys while wandering into a Kidrobot store on Haight Street in San Francisco back in 2002. Since my first glance at their bizarre toy collection I instantly knew it was something I had to be a part of and, although I had no background in toys I would figure out a way. Since then, I’ve created almost 200 designer toys and held toy releases and signings all over the world; from Amsterdam to Beijing and Tokyo to Istanbul.
For the past nine months I’ve been working away on a toy project called The Chaos Bunnies, and I’ll share with you the steps I took to make it happen. From beginning to end I documented my role from conception, design, packaging, photography, promotion, and everything in-between. I really hope you can take something away from this. It might be a bit extensive, but I thought it was important to show how much time, effort and elbow grease goes into making these and that none of this just magically happens. I hope you enjoy this backstage pass as I welcome you into my creative process.
Concept
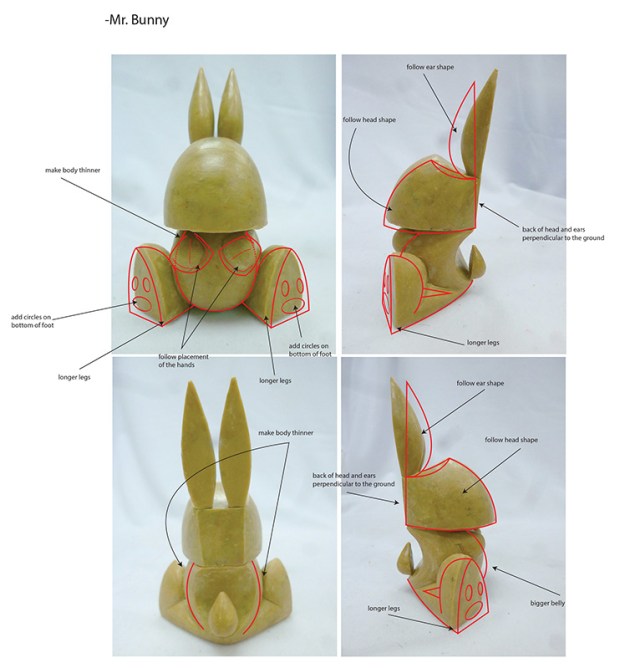
It all starts with an initial idea or concept for a toy. In this case I wanted to base this project on my popular character called Mr. Bunny. Mr. Bunny has been depicted in my paintings since I first began showing in galleries over 10 years ago. I have always treated him a bit like a punching bag – depicting him in all kinds of ironic, unfortunate, and precarious situations. The idea here is to bring Mr. Bunny to life in 3D, mini-figure sized, and in a variety of shapes and personalities.

The Chaos Bunnies will be a “blind boxed mini-figure series” – a staple in the designer toy world, meaning these will be an assortment of 4-inch tall figures boxed randomly in identical packaging. Like baseball cards, you don’t know which one you might get. As some figures are more rare than others this encourages collecting, and brings excitement, trading, community and often a touch of frustration to the designer toy collecting game.
The beauty about creating a designer toy is that it really isn’t intended for kids. These are truly art pieces, made by artists with the intent to be art. Almost always made in limited editions of 1,000 pieces or lower these are often seen as 3D fine art prints or sculpture, but instead of using bronze casting, it utilizes more democratic and affordable materials like plastic and vinyl. The materials make them playful but they can be highly valuable. Although retail prices for many figures can range from $15 – $200, aftermarket prices on some Designer toys can reach well over $10,000 based on the popularity of the artist and the size and rarity of the figures. It’s an art movement which began in Hong Kong and Japan in the late 1990’s and has spread internationally and in popularity and importance over the years.
Development
Getting started on the Chaos Bunnies began by digging through my archive of bunny sketches, to remind myself what I’ve come up with in the past and revisit older and sometimes forgotten ideas.
Then it’s lists, lots of lists that I’ve kept for years of various bunny names and ideas. It’s all about narrowing down a cohesive group that can make sense not only thematically and aesthetically, but also with a sense of variety and difference. I want to include some classic bunnies, but add some exciting new stuff as well.
Turnarounds
Moving on it’s time to sketch out the turnarounds of the figures. Turnarounds are like an architect’s blueprint; diagramming the front, back, top, bottom, and sides of the figures. In my case, the sketches are usually quite rough. After I scan them into the computer I can work them out in Adobe Illustrator where it’s much easier and faster to make precise and to-scale renderings of the figures.
Once I have my turnarounds completed in Illustrator, I’ll print them up and pencil-in artwork ideas to figure out what works best to further narrow this project down to 12 different figures.
At this point the factory needs two things from me: turnarounds of each of the 12 figures and artwork mock-ups so they can give a price estimate based on complexity of the artwork, sizes of the figures, how many molds will need to be made, and the amount of tooling required.
Factory Pricing / Negotiation
Once I have all the turnarounds and mock-up artwork completed I copyright each character. Then it’s time to reach out to factories and get a price estimate on what exactly this project might cost. In the case of the Chaos Bunnies I worked with a company called The Loyal Subjects who financed the project and worked directly with a factory in China. Pricing will vary depending on your edition sizes, figure sizes, materials used, artwork complexity, and packaging. I often begin each project with my dream scenario of super complex artwork, small edition size, larger figures, and top-notch beautiful packaging materials, all of which is often too price prohibitive, so I just pull it back until I find a happy medium thats do-able.
In my personal experience the factories usually want you to cover all of their tooling/mold costs as well as 50 percent of the final product costs up front. I find that wiring tens of thousands of dollars to a factory the craziest and scariest part of the process. However with this Chaos Bunnies project I was not part of this process and was not privy to any of the specific numbers. Once the factory is paid the project officially gets underway, and the excitement begins.
Sculpture
I know some artists who are great at sculpting their own figures, either by hand or with 3D software. I have found that there are some amazing in-house sculptors at some of the factories I work with in China, and prefer to work with them. Soon enough the factory sculptor will email initial sculpture photos based on my turnarounds. This is where I put on my art director hat and make notes, adjustments and tweaks to the images. Eventually after a few rounds of back and forth we nail this down.

Wax Samples
Wax samples are then created from the sculptures. This is the final step in the sculpture phase, where the figure is smoothed out, fine-tuned and perfected before the final production molds are made. It’s always a good ideas to triple-check here that the eventual artwork deco will fit the shapes correctly because once I move forward I’ll need to live with these sculptures from here on out. It’s also time to remind the factory that I need those bunny heads to articulate.
Master Mold Pieces / Paint Samples
It’s always exciting when the vinyl figures arrive! I always get the factory to ship me copies of the blank vinyl figures once they’ve been made. At this point the artwork deco is only in the tentative phase and it makes a world of difference if I can have these figures here and design the final artwork by hand.
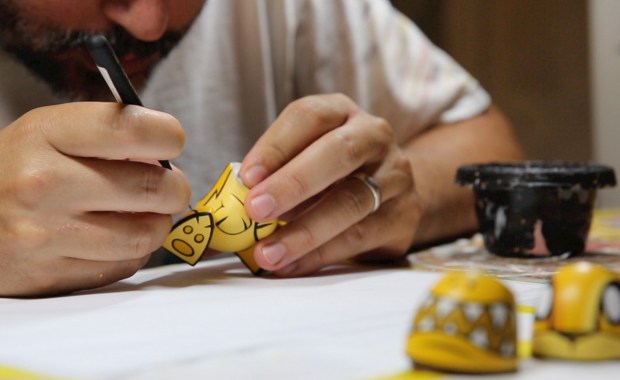
Like with any painting I begin these designs with pencil sketching on the figures. Using the contours of each shape to get the most out of both the sculpts and the design. Obviously it’s much easier to make decisions with the figure in my hands than virtually in a computer with 2D low-res factory photos – which is your alternative.
Moving on, I just go for it and paint these doing my best to match the pantone colors I’ve already decided on. Toy design is a lot of work when it’s just one figure, but with a mini-figure series (as you can imagine) it’s literally 12 times the work. At this point you really start to feel that. But at the same time this is the most fun and exciting part of the process because they finally come to life in a real and tangible way.
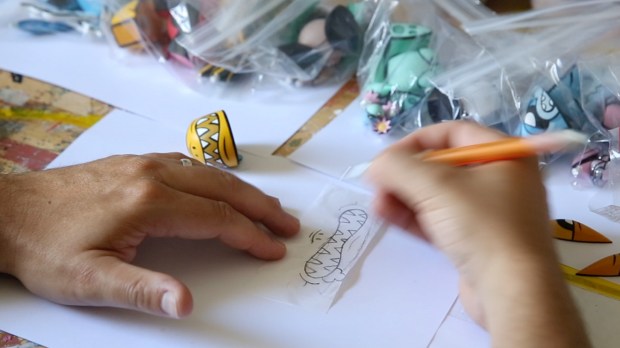
One of the benefits of having these figures on hand is also that I can flatten out the artwork perfectly for the factory’s process of applying the art deco. If I give them just plain 2D turnarounds of the front, back, top, bottom and side profiles the deco artwork will be distorted because it’s on a curved surface. So it’s important for me to give them the exact deco that can perfectly wrap around the curvatures of the heads.
Vectorize
Once these have all been painted I need to photograph them so I can trace my paint work in Illustrator to provide the factory with vector art that is usable for them to create pad prints and spray masks they will use to apply my artwork during production. This part of the process can be super tedious – and it’s really my least favorite part. Here I need to make templates of each figure at all angles – times 12. It’s pretty monotonous, but you just gotta plow through it.
Next, I move on the tracing the black linework of the figures. This is another point in the process where I begin to feel the factor of 12. This took me about 2 weeks to get through all the tracing, touch-ups, and fine tuning these vector files so they are absolutely as perfect as possible for the factory to use. I want to take all the guess work out of their hands. If there is a decision to be made I want to be the one to make it… I don’t want to leave anything to chance in the hands of the factory. It’s my job to be thorough and really answer in advance any questions that might arise down the road. It’s super important to be clear, make notes, and be as detail-minded as possible at this point.
Here we go! All the vector artwork is finally finished and sent out to the factory:
Packaging
Once all the vector work is complete and emailed over to the factory I move right on to the packaging design. Based on the figure sizes the factory provides me with a perfectly sized template for both the individual blind boxes as well as the display case. Of course beginning with a rough sketch concept and moving forward on the design.
Just like with the figures, it always best to make design decisions if you have the object in your hands. So I make rough mock-ups – which leads to design adjustments. And once I feel I have something that works for me, I go forward with an actual full-scale mock up to get the perfect idea of how the final product will end up.
Photography
A great benefit and pay off to having all the hand painted samples and full scale packaging is that I can go immediately into the promo photography of the Chaos Bunnies even before production at the factory has begun. I can develop all the promo materials early and take my time so I’m not scrambling at the last minute if a producer suddenly wants to do a pre-sale or something ASAP. I’m ready to go with something well thought-out and carefully designed.
Bonus Cards
Now that I have the most important work under my belt – I get back to work sketching the set of cards that I want to include with each figure.
Art Deco corrections
Soon enough photos of production samples appear in my inbox. These are always urgent as you don’t want to be the reason production might slow down, so I drop everything to get notes and corrections over ASAP. With a bit of back and forth, these all eventually get approved. This is one of the toughest parts of the process, because the factory often makes mistakes here. It’s important to be calm, and clear with the corrections and not to overdo it. I always prioritize and fix the important things first.

Often if you give them too much to correct or the correction is too minuscule you receive revisions where maybe some of your corrections are fixed, and new mistakes are made. Sometimes you end up with more issues than you started with. One step forward, two steps back sort of a thing. Of course you want a perfect product, but at the end of the day there needs to be an understanding of what is feasible on a production scale including the limitations of the factories equipment, time constraints, and what you can get away with. I’ve found that my biggest successes and the figures I’m most proud of are a concerted effort between you and the factory. Obviously it’s a bumpier road if it’s not a team effort. Eventually all the art deco on the production samples are approved by me, production goes full steam ahead.
Promotion
As the producer decides to go with a pre-sale months before the delivery of the figures, I began to roll out my promotion materials. Starting with video teasers and then on to full-on reveals, doing my best to stir up excitement and anticipation months before the actual release.
Thanks for following me on my designer toy adventure! I also made a video of the process which you can check out below. I can’t wait for the Chaos Bunnies to finally arrive (hopefully March/April 2014). Hope you enjoyed the process and learned a few things. Be sure to visit my website for more news and info on my Chaos Bunnies and other upcoming projects at joeledbetter.com. Have a great day and we’ll see ya next time!
ADVERTISEMENT


