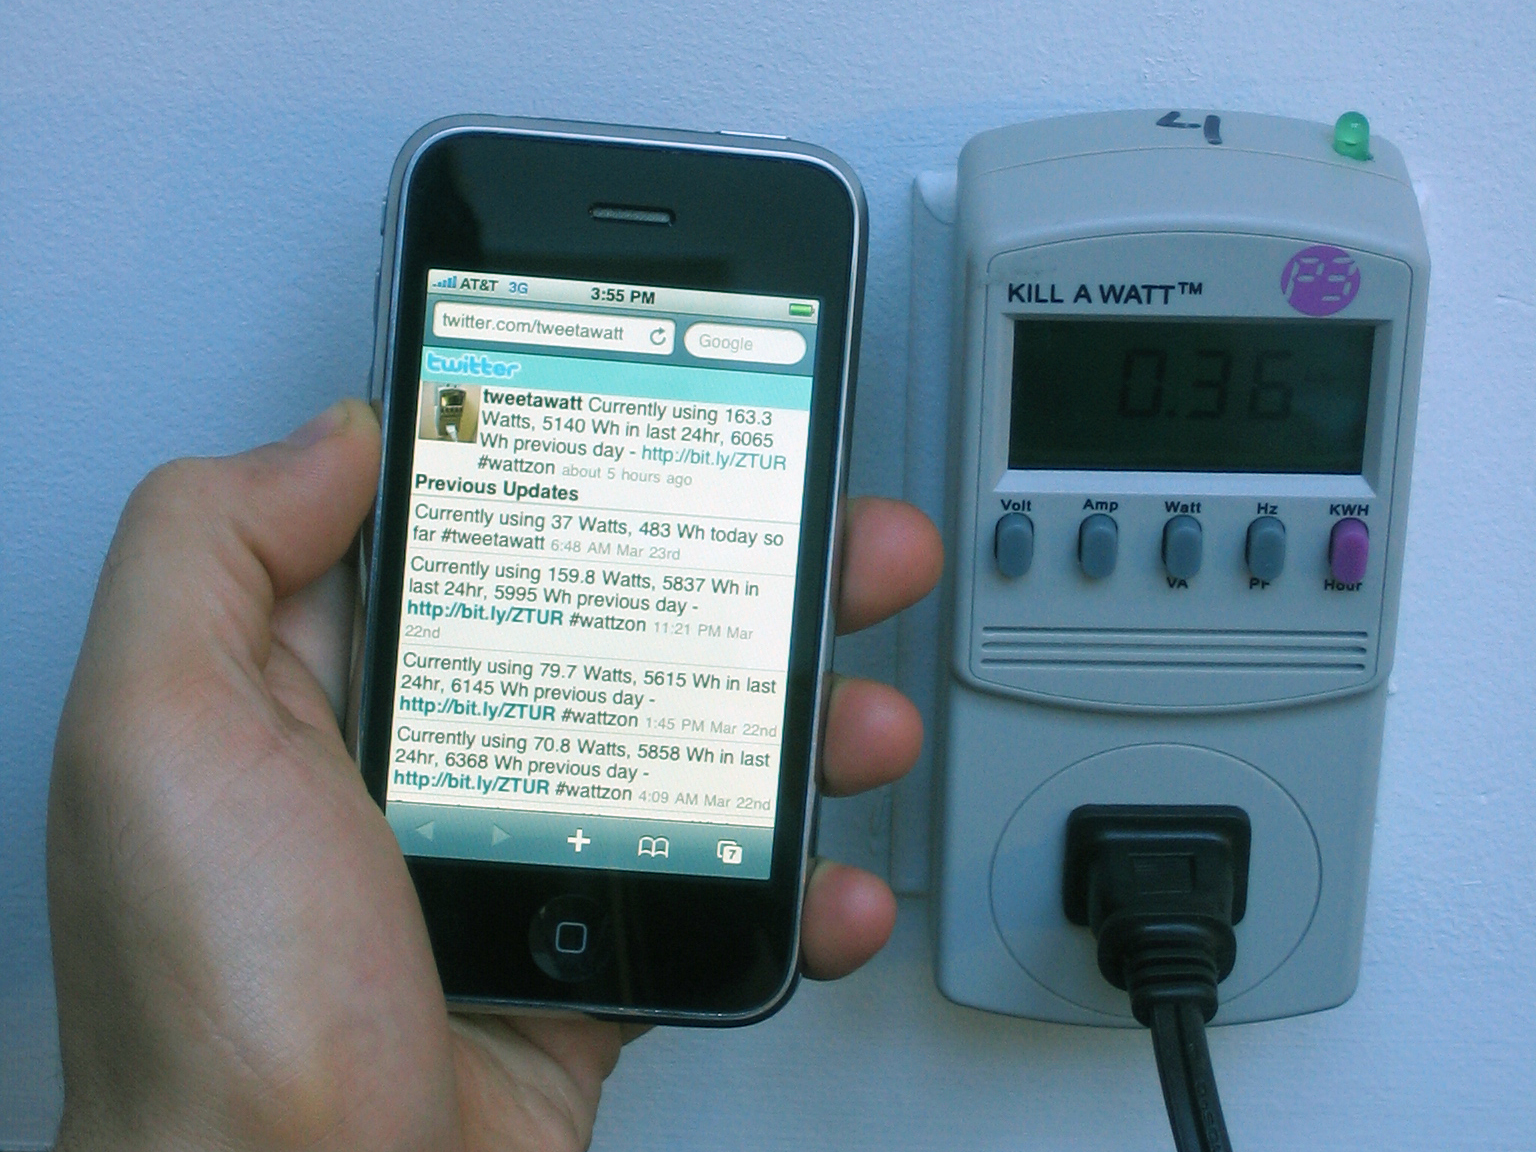
By Limor Fried and Phillip Torrone

We live in a rented apartment, so we don’t have hacking access to a power meter or breaker panel. But we still wanted to measure our household power usage long-term, so we developed the Tweet-a-Watt. It uses plug-in electricity monitors at each outlet to wirelessly send readings to a base station, which assembles them into reports you can analyze and graph. It can also broadcast updates via Twitter.

Building your own power monitor isn’t too tough and can save money, but we’re not fans of sticking our fingers into 120V wiring. Instead, we built on top of a P3 Kill A Watt power monitor, which we found at the local hardware store. To track usage room by room, for example “kitchen,” “bedroom,” “workbench,” and “office,” you can use a 6-outlet power strip in each room to feed all the room’s devices through a shared monitor. Each Kill A Watt can measure up to 15 amps, or about 1,800 watts, which is plenty for any normal room.

You can build each wireless outlet monitor for about $50 with a few easily available electronic parts and light soldering, and about the same for the receiver. No microcontroller programming or high voltage engineering is necessary!

What will the next generation of Make: look like? We’re inviting you to shape the future by investing in Make:. By becoming an investor, you help decide what’s next. The future of Make: is in your hands. Learn More.

Project Steps

PREPARE THE WIRELESS MODULES

Assemble one of the XBee adapter kits into an XBee breakout board, following the included instructions.

Plug an XBee module onto the XBee breakout board and connect it to your computer via the FTDI cable. Plug the cable into the 6 XBee pins running from GND (ground) to CTS (flow control), marked by a strip of metal flashing.

Identify which serial port (COM) the cable is connected to. Under Windows, open the Device Manager and check how the port is listed. Ours was COM4.

Download and install X-CTU software, which you can find by searching for “X-CTU” at digi.com. Launch the software, which configures and tests the XBee’s radio.

In X-CTU, under the PC Settings tab, select the port you identified in the previous step and set the connection properties to 9,600bps, 8 bit, no parity, 1 stop bit, no flow control (or 96008N1). Click the Test/Query button. A pop-up window should tell you that the communication was OK.

Under the Modem Configuration tab, click the Read button to read in the current version and settings of the firmware. Download the latest version by clicking the Download New Versions button and selecting Web. Then select the last version in the Version dropdown on the right, and click the Write button to upload it to the XBee. Check the Always Update Firmware checkbox to keep things up-to-date.

Unplug the XBee module and repeat the upgrade for your other modules. You can hot-swap if you’re careful: unplug the adapter from the cable first, gently swap modules, and plug in the adapter again. Then run Test/Query, Read, and Write from X-CTU.

Now we’ll configure the monitor modules to send the data we want and sleep between transmissions. For each XBee module (except for one), plug it back into the cable, run X-CTU, and under Modem Configuration click Read to load the settings. Configure the modules as follows, scrolling down as needed to click and enter parameters in place:

1. Set the MY address (the identifier for the XBee) to 1, then increment for each additional transmitter to tell them apart.

2. Set the Sleep Mode SM to 4 (cyclic).

3. Set the Sleep Time ST to 3 (3 milliseconds after wake-up, go back to sleep).

4. Set the Sleep Period SP to C8 (0xC8 in hexadecimal = 200 = 2 seconds between transmits).

5. Set ADC 4 D4 to 2 (enable analog-digital converter D4).

6. Set ADC 0 D0 to 2 (enable analog-digital converter D0).

7. Set Samples to TX IT to 13 (0x13 = 19 samples).

8. Set Sample Rate IR to 1 (1ms between samples).

Basically this means we’ll have a single PAN network, each XBee will have a unique identifier, they’ll stay in sleep mode most of the time, and they’ll wake up every 2 seconds to take 19 samples from ADC 0 and 4, 1ms apart.

Click the Write button to upload the new settings. You should see the green activity (RSSI) LED blink every 2 seconds, indicating wake-up. Note that once the XBee is told to go into sleep mode, it won’t communicate with X-CTU until you reset it by unplugging it from the FTDI cable. Repeat Steps 1h–1i for the other transmitter modules. Then label the XBees, using a Sharpie, stickers, or similar, so you can tell which ones are transmitters and which one is the receiver.

ASSEMBLE THE TRANSMITTER BOARDS

For wiring, refer to the schematic diagram at makezine.com/18/tweetawatt.

The unassembled XBee adapter kit(s) are for the transmitter modules. With each board, solder in the power supply components (labeled C1, C2, and IC1 on the schematic), the sockets, and the LED marked ASC.

Don’t install IC2, R1, R3, or the RSSI LED. Don’t clip the legs of the ASC LED, so that it will extend out to fit through the Kill A Watt case, and you can optionally replace it with a brighter LED.

Follow the schematic to solder in the two 10K resistors R4 and R6 from the XBee’s AD0 and AD4 (analog ins) to ground. Since we’re not installing the voltage level shifter IC2, just run the resistors to the closest grounds, the pads for IC2 pins 10 and 13. These resistors form a voltage divider that reduces the Kill A Watt’s 5V signal down to 3.3V for the XBee.

Cut and peel a 6″, 4-wire length of ribbon cable. Solder 2 adjacent strands to the 4.7K resistors, reinforcing with heatshrink tubing. These wires will carry the current and voltage readings from the Kill A Watt. Clip the other ends of the 4.7K resistors short and solder them to piggyback on top of the 10K resistors on the analog-in side.

Solder the 2 other wires from the ribbon to +5V and GND on the breakout pin contacts at the bottom of the board.

Solder in the reset capacitor, C3, between the XBee’s reset pin (RST) and the nearest ground (the pad for IC2, pin 4). The long lead side (+) connects to reset. Give it some lead length so you can bend the cylinder down to tuck it next to the 3.3V regulator (IC1). This cap trickle-charges on the reset line so that the XBee waits a few seconds to start up. This prevents the XBee from drawing too much current from the Kill A Watt.

At the other end of the 4-wire ribbon, solder the +5V and GND wires to the positive (+) and striped negative (–) terminals of the enormous capacitor C4. This capacitor continuously vampires power from the Kill A Watt, then dumps it to the XBee every few seconds when the radio transmits.

Trim the legs of the supercap and solder its anode (+) leg to diode D3’s striped cathode (–) end. This diode makes doubly sure that the capacitor won’t be drained by the Kill A Watt.

Solder 2 more wires to the ends of the supercap’s legs, black to – and white or red to +. Then heat-shrink over the whole diode and the exposed capacitor leads.

ASSEMBLE THE SENSOR/TRANSMITTER

Now, the fun part — we’ll fillet, stuff, and reassemble the Kill A Watt!

Open the Kill A Watt by removing the 3 screws. Be careful not to damage the ribbon cable holding the sides together!

NOTE : If your Kill A Watt looks a little different from this photo, that’s OK. The innards are the same. You may just need longer wires to place the supercap.

Now it’s time to jack into the sensor output! Melt a bit of solder to “tin” the ends of your power, ground, and sensor wires from the XBee board, then tin pins 1, 4, 11, and 14 of the LM2902 op-amp chip inside the Kill A Watt. Connect power to pin 4, ground to pin 11, analog in AD0 to pin 14, and AD4 to pin 1.

Plug a configured XBee module into the adapter board, put some foam sticky tape or hot glue on the back, and fit it into the Kill A Watt case. Also find a place for the supercap, using tape or glue if needed. They should fit with no problem.

Find a good place in the Kill A Watt case for the activity indicator (RSSI) LED, and drill a hole to fit. This lets you see when the XBee is transmitting.

Close it up and plug it in. You’ll notice it’s a bit finicky for a few seconds as the big capacitor charges up, but after about 15 seconds you should see the display stabilize and the red LED blink every 2 seconds.

PREPARE THE BASE STATION

Go back to your computer and plug the receiver XBee into the USB adapter. You should see its RSSI LED light up whenever the transmitters send data. That means you have a good link!

Run X-CTU and open the Terminal tab. You’ll see a lot of junk, but what’s important is that a new chunk is added every 2 seconds. The hardware is done. Good work!

INSTALL AND CONFIGURE THE SOFTWARE

If you don’t already have Python, download and install it from python.org/download. We built Tweet-a-Watt using version 2.5, so that’s the safest. We installed it into the directory (file folder) C:python25.

Download and unzip the Tweet-a-Watt code bundle from makezine.com/18/tweetawatt into a new project directory, C:wattcher. This includes the wattcher.py Python script. Download 3 additional libraries linked from the same page, and put them into this project directory: win32file, so Python can write out the power data log file; pyserial, so it can communicate with the XBee through the serial port; and simplejson, to call the Twitter API.

Open wattcher.py in a text editor and change the SERIALPORT = line near the top (line 24) to specify your serial port, from Step 1c.

Make sure one of your sensor/transmitter units (Kill A Watt + XBee) is plugged in and blinking every 2 seconds, and that the receiver XBee’s RSSI LED is also blinking. Nothing should be plugged into the Kill A Watt yet, and its LCD should be clear, not fuzzy.

Open a Terminal window (Run cmd), navigate to the project directory (cd c:wattcher), and run Python on the wattcher.py script (C:python25python.exe wattcher.py). You should see a steady stream of data listing current, wattage, and watt-hours since the previous reading. Hooray! We have wireless data!

The output of the script probably says that power is being used, so we need to calibrate the sensor in the code so that it knows where zero is. Type Ctrl-C to quit the script, then run it again with the debug flag -d (C:python25python.exe wattcher.py -d). In the output, look for lines that start with ampdata and note the number that follows. Quit the script, open wattcher.py in an editor again, and change the VREF calibration number listed for the sensor to this number.

Repeat Steps 5d–5f to test and calibrate your other sensor/transmitters one at a time.

Run the code, and watch the watts! A nice way to test is by sticking the meter on a dimmable switch and seeing how the dimmer affects the numbers.

Finally, let’s configure the Tweet-a-Watt to tweet. If you don’t already have a Twitter account, sign up at http://twitter.com/signup. Then edit wattcher.py again, and change the 2 lines defining twitterusername and twitterpassword to specify your username and password. Then run the script as usual, and it will send a Current Usage tweet every 8 hours, at midnight, 8 a.m., and 4 p.m.

USE IT

Graphing Data: An extra feature built into the Python script is code that graphically displays 2 hours of energy usage coming in from one of the sensors. To run this, install into the project directory the free graphing modules wxPython (wxpython.org), matplotlib (matplotlib.sourceforge.net), and NumPy and PyLab (both from scipy.org). Then edit wattcher.py to set GRAPHIT = True.

Base Station Variations: Because the web/Twitter app uses Google authentication, we can feed data into it from a computer. A great enhancement would be to program an Arduino so that it could update the app’s database, either by getting it to simulate a computer or by using another authentication scheme. The Arduino would let the base station be small and portable, drive outputs such as displays through simple direct circuitry, and work all the time on batteries without having to be booted up — all without requiring a big computer.

Phil’s Story: Limor and I live at the same address, and after we developed the Tweet-a-Watt, she would look at the power graphs it created each morning. She saw these huge spikes every 2–3 hours at night, so she asked me what was going on. I needed to admit that I have a hard time sleeping, and those spikes were when I went to the other room (my office) and turned on my giant 30″ monitor. This project now gives away some of my sleep problems — if I could fix those, I’d likely consume less power.

RESOURCES

Tweet-a-Watt GAE web app: wattcher.appspot.com

Limor’s original Tweet-a-Watt tutorial: ladyada.net/make/tweetawatt

Tweet-a-Watt Twitter account: twitter.com/tweetawatt

Conclusion

This project first appeared in MAKE Volume 18, page 112.