This article appeared in Make: Vol. 90. Subscribe for more maker projects and articles!

Starting to learn animatronics as an art form can be really intimidating. Programming, mechatronic design, electrical engineering … the list of required skills goes on and on. And to be honest, I think that’s no fun! Animatronics should be an art form available to everyone.

To make animatronics more accessible, I’ve been developing Bottango for over five years. Bottango is free animatronic animation software that’s been used for years by beginners on up to industry professionals to create dynamic animatronic performances.

In Bottango, you use industry-standard animation workflows for animating digital characters, like you would in 3D movies and games, and apply those techniques to real-world animatronics. Instead of creating animations in hard-to-visualize code, you use keyframes along a timeline to make movements of a 3D simulation of your robotic invention. You can get as fine tuned as editing the interpolation of movements using an industry-standard animation graph editor, or even do live recording of puppeteering on a gamepad which automatically converts to editable keyframes.

Bottango works on any Arduino-compatible microcontroller and easily produces lifelike and creative movements of your own robot designs, using open source hardware you probably already have in your closet.

To make something fun and simple for Halloween, I was inspired by Louie Zong’s viral Ghost Choir video (below).

YouTube player

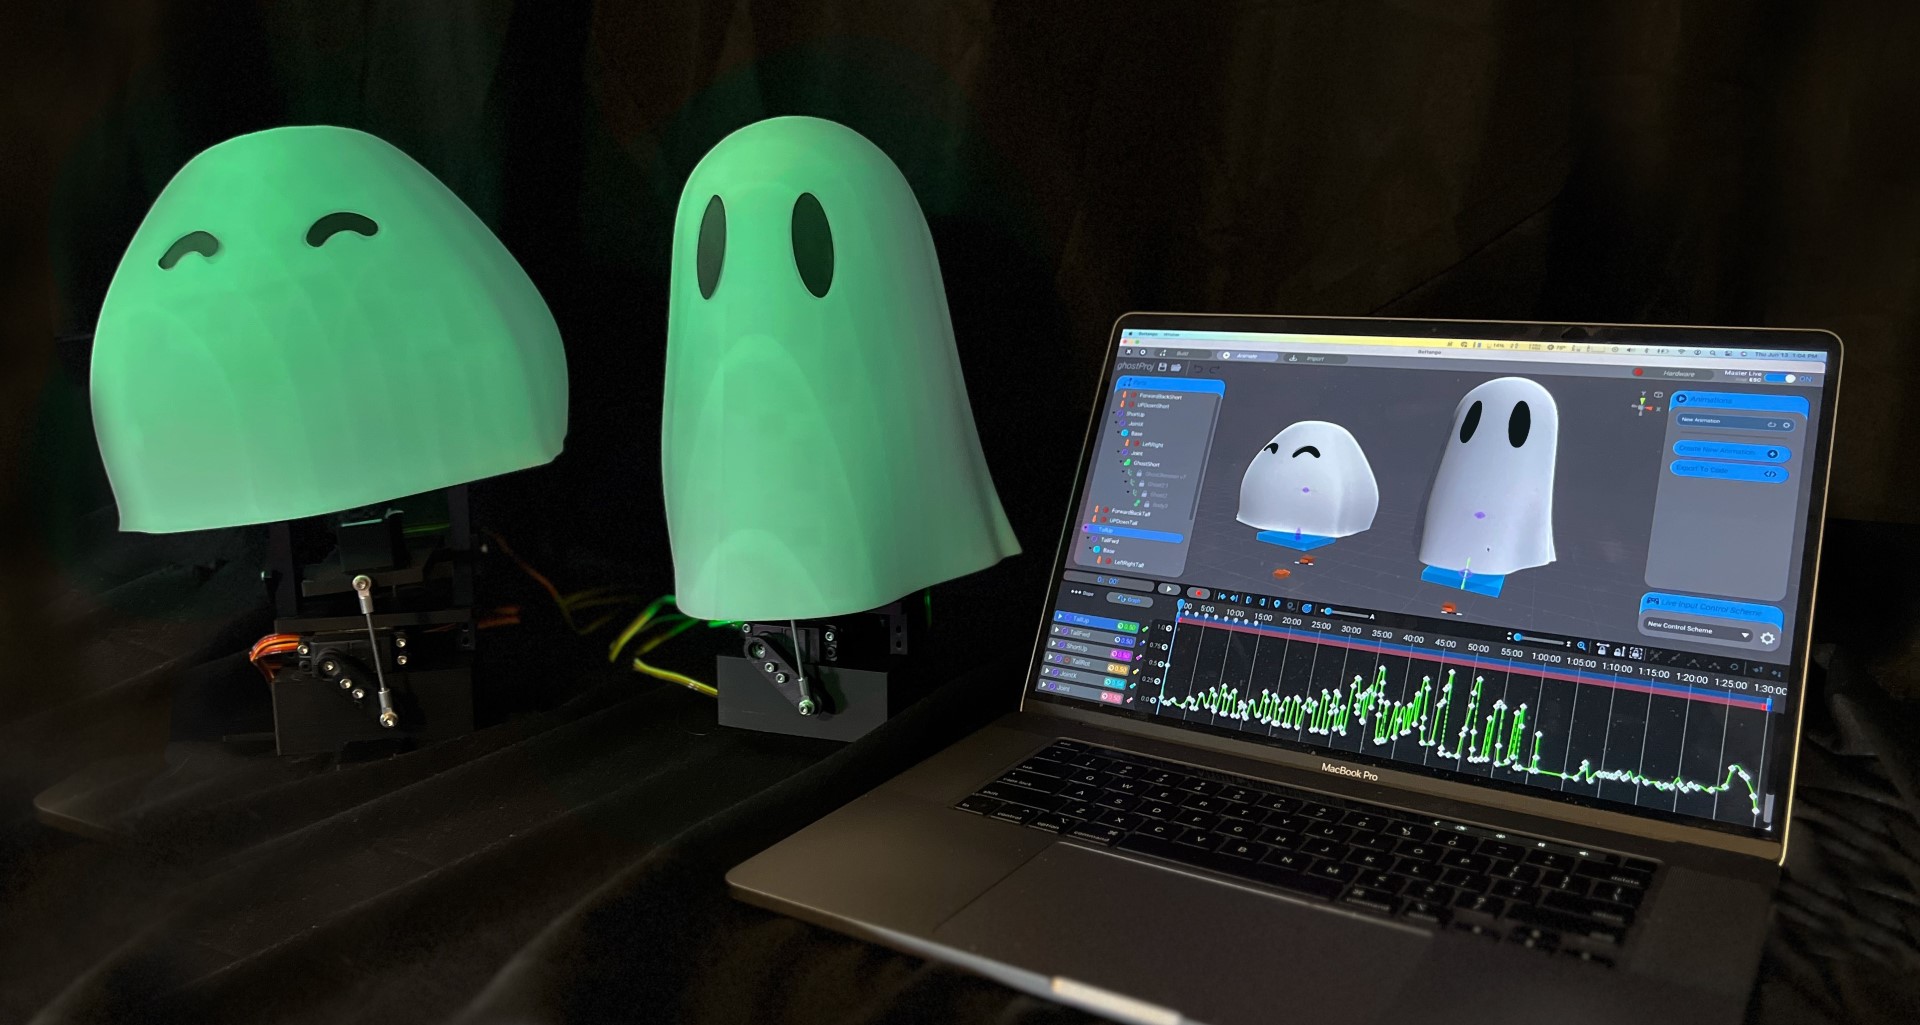
Once you finish building these characters and mechanisms, you’ll use a premade Bottango project and animation to perform the Ghost Choir song right out the gate. Big thanks to Louie Zong for giving permission to use his song for this build. You can see a video of the final result below.

And after it’s all built, you can then use Bottango to bring in your own audio and create your own animations for the characters.

Designed To Be Easy

For this project, I wanted to design a simple animatronic that anyone new to the art form could put together. Each ghost can float up and down, look/bend up and down, and look/turn left and right (Figure A). Though the characters and mechanisms are simple, by using powerful animation tools, you can get a lot of emotionality in the animatronic performance.

Figure A

In order to keep this build easy, the design has some drawbacks. I wanted it to be entirely 3D printed, without hard-to-source hardware like bearings, and take under an hour to assemble. With those considerations, understand that the movement will be a bit shaky and noisy, as the plastic reverberates from the servos and doesn’t have additional hardware to “shore it up.” Better quality and quieter servos can help and, as with all animatronics, you will cover up some of the noise with your own soundtrack playing over speakers.

Build Your Singing Animatronic Ghosts

You can get the 3D model files for printing, recommendations of specific materials and hardware, and more details for this build at the project page. If you’d like to discuss the build and learn more about using Bottango, join the Bottango Discord server.

What will the next generation of Make: look like? We’re inviting you to shape the future by investing in Make:. By becoming an investor, you help decide what’s next. The future of Make: is in your hands. Learn More.

Project Steps

1. Set up your Arduino

To start, we need to get a microcontroller and power circuit ready to go for our servos. The easiest and most accessible microcontroller option is a tried and true Arduino Uno.

When you download Bottango, you’ll find a BottangoArduinoDriver folder. Using the BottangoArduinoDriver.ino Arduino sketch in that folder (Figure B), you’ll have everything you need already coded for you. Install the driver onto your Arduino using the Arduino IDE, and it will be ready to communicate with the Bottango desktop app.

Figure B

You can use most any Arduino-compatible microcontroller with Bottango, as long as it can reliably move servos. For less common microcontrollers, you may have to make a few minor changes to the driver, but it’s open source!

2. The power of servos compels you

To power the servos, I’m using Bottango’s Servo Shield (Figure C) and a basic 5V 5A power supply. It plugs straight into the Arduino Uno and takes a normal power supply barrel jack. That’s it! I designed it to be the easiest way to power servos with an Arduino.

Figure C

Check the project page for some alternatives as well. You can easily use the 8-channel Servo City power distribution board. A popular option, though not recommended for this project, is the Adafruit 16-channel PCA driver. To use it, you’ll need to make a few minor (and documented) changes to the open source Bottango driver, as well as to the provided ghost project file. Note that some lower-cost versions of that board may not handle higher-current applications, and the extra I²C communication required to use that board can add some latency to the animations.

Figure D

Plug the Bottango Servo Shield (if you’re using it) into the Arduino (Figure D). Now the headers on the shield are connected to the pins on your Arduino. A servo plugged into the header 2 on the shield will be connected to pin 2 on your Arduino.

Figure E

The headers are labeled to match standard servo cables (Figure E ):

+ will be the red wire on your servo

will be the black (or brown) wire on your servo

S will be the white (or orange) wire on your servo.

3. Print, print, print

Both ghosts have the same mechanisms, so you’ll print everything twice, except the two ghost shells; you’ll print one of each of these. I printed the mechanisms in black PLA so they’re less visible, and the ghosts in glow-in-the dark PLA (Figure F). Glow filament is very abrasive, so you need a steel nozzle that’s made for abrasive materials or you risk damaging your printer.

Heads up that these are some big ghosts, so cozy up for a long print! The wider ghost is 228mmL × 223mmW × 185mmH. The taller ghost is 202mmL × 207mmW × 246mmH. If you need to shrink your ghosts slightly to fit on your printer, you may be able to; there’s some clearance between the mechanisms and the shell. Be prepared, if you do scale them, to drill or adjust the top mounting holes to get back in alignment with the mechanisms. I printed all my parts and ghosts on a Bambu Lab P1S.

Figure F

The parts were designed for 3D printing. Everything in my build was printed without supports, but depending on how well your printer can handle bridging, your large ghost shells may need some support under the tops.

Print the parts named Side1, Side2, SquareNut1, and SquareNut2 on a smooth surface plate. You want one side of each of these parts to be as smooth as possible, as they’ll be sliding against each other.

The holes in the printed pieces have been sized a little tight to allow a bolt to self-tap while driving into place, and stay in place.

4. Prep the servos

For selecting servos, we aren’t moving anything too heavy here, so you don’t need enormous torque. Just make sure they’re “standard size” servos (Figure G).

Figure G

The better servo you buy, the smoother movement and quieter sound you should expect, and the longer you can plan for this build to keep working.

Personally, I hate the plastic horns that come with servos; they’re almost impossible to work with. Instead, we’ll use nice metal horns that have easy-to-use, threaded M3 bolt holes (Figure H) at 12mm, 16mm, and 20mm.

Figure H

These are generic pieces that multiple manufacturers make; if you search Amazon for “metal servo horn” you’ll find a few different brands that look just like this.

The print files are designed with this specific metal horn in mind, but the STEP files should let you change things up if you need to move the mounting holes on the project around. Having threaded mounting holes on the horns is a must!

Make sure each servo is centered before you put the horns on. It’s important that your servos are in a predictable state when at their “home” resting position. On the project page, I’ve included a simple Arduino sketch for centering servos. Upload the ServoCenter.ino sketch onto your microcontroller, and connect power to the servo shield. Then if you put the servo on pin 3, you’ll test if it can move correctly; it should sweep back and forth. When you put the servo on pin 5, it’ll center the servo. Always put the horn on while the servo is centered, ideally with the servo connected to pin 5 with this test sketch running.

For all six servos, attach the horn pointed back in toward the center of the servo (Figure I). I like to use some of the M3 8mm bolts to attach the horn, rather than the screws that come with the servos.

Figure I

Add the rubber isolator grommets that came with your servos to the servo mounting holes (Figure J). These grommets help adjust for differences in exact servo dimensions between models, as well as dampening vibrations. We’ll skip the metal eyelet inserts; they’re more for the world of RC, and not needed here.

Figure J

5. Build the base

For the following assembly steps, you’ll be doing everything twice, once for each ghost. Use 12mm M3 bolts unless called out to use an 8mm bolt.

Mount two servos onto the base. The cables should be inside, and leading the same direction on both servos. You want the horns pointing in the same direction as well (Figure K). Use hex nuts to secure the servos in place.

Figure K

Add the printed horn extensions to both servos, again pointing in the same direction (Figure L). Use 8mm bolts to attach these; 12mm bolts will go too far.

Figure L

Attach the two side pieces to the base. You want the smoothest printed face of each one facing outward (Figure M).

Figure M

Finally, slide the tensioner piece from the top down (Figure N). This helps keep the side pieces straight so there isn’t extra play at the top.

Figure N

6. Set up the main deck

Attach the two square nuts to the main deck, with their smooth printed side facing inward. Then slide the main deck down the two side pieces until it rests on top of the tensioner (Figure O). As the two base servos move together, they’ll move the base up and down, and as they change their relative movement, the base will rotate.

Figure O

Try moving the main deck up and down. If it feels too tight at the bottom of the range of movement, you can adjust the tension by loosening the square nuts. Find the right balance of tension so that it doesn’t have too much play at the top, while not being too tight at the bottom.

Take two threaded rods and attach ball joints to both ends. Bolt one ball joint to the end of a horn extension, using a hex nut to hold it in place, and bolt its opposite ball joint to one side of the main base. Repeat on the other side (Figure P).

Figure P

7. Assemble the rotation servo

Put aside what you’ve built so far, and move to the third servo and ghost body.

Attach the long ghost stand piece to the printed rotation horn (Figure Q).

Figure Q

Attach the rotation horn to the metal horn of the third servo. Be sure to use 8mm bolts here again (Figure R).

Figure R

Take a printed ghost shell, and attach it into the top of the ghost stand as shown in Figure S, with the servo’s cable leading toward the back of the ghost. This may be tricky, as you’ll be working a bit blind, and if your printer didn’t get the bridging great, it may be a little messy around this part. Stick with it, though; this is probably the hardest step!

Figure S

Finally, slot the ghost body and rotation servo into the main deck. You won’t need to do any blind bolting here; the large slot on the deck should hold everything in place. Make sure the ghost is facing forward, and oriented so the servo cables on the stand are facing its back, and the servo cables on the base are on its right (your left) (Figure T).

Figure T

I cut out some black sticker paper to darken the eyes. You could do the same, or use markers or paint, or leave them as printed with an inserted look.

8. Wire it up

That’s it for the assembly of the mechanisms! Add servo extensions to all servos, and then connect the servos to the headers on the servo shield as follows:

  • Tall ghost front base servo (2)
  • Tall ghost back base servo (3)
  • Tall ghost rotation servo (4)
  • Short ghost front base servo (5)
  • Short ghost back base servo (6)
  • Short ghost rotation servo (7)

With power into the servo shield, and the Arduino set up with the Bottango driver and connected to your computer, you’re ready to bring these ghosts to life … well … as much life as a ghost can have.

9. Prep for launch

Along with the 3D model files, in the downloads for this build there’s a ready-made Bottango project file with an animation and song. It was made with the same tools that animatronic builders use to set up their own custom builds in Bottango. Make sure you’ve downloaded the latest version of Bottango, then launch it and open the project file.

With the project open you should see the ghosts, and the Build tab selected at the top (Figure U). This is where you set up the project and simulate your real-world animatronic, but we’ve done all that work for you.

Figure U

First, you’ll need to connect to the Arduino. Select the Hardware tab at the top of the screen, and then the Drivers sub-menu (Figure V).

Figure V

We need to tell the project which serial port your Arduino is on. Press the Select Port button, and then select the port from the right side of the screen. On Windows it will be something like COM3, though the exact number may change. On Mac it’ll usually start with TTY.USBSerial or something similar.

If you’re successfully connected, you should see a “green light” in the status section of this menu (Figure W). If not, feel free to dig into the Bottango documentation, or visit the Bottango Discord server for help.

Figure W

We need to “turn on” each of the six servos now; they’re off by default in Bottango. Move over to the Status submenu, and click the on/off switch on each of the six servos to turn them on (Figure X). As you turn them on, if everything is powered correctly, the servos may jump back to home.

Figure X

We Are “Go” for Ghosts!

Head back over to the Animate tab, and click the Play button in the bottom of the animation view (Figure Y ). Sit back and enjoy the show!

Figure Y

A big thanks again to Louie Zong for letting me use his song in this build!

Conclusion

Create Your Own Ghostly Performance

These aren’t just one-trick ghosts. You can bring in your own audio files (or videos) and animate these singing ghosts yourself.

Because the project file has been set up with the 3D models of the ghosts and digital twins of the mechanisms, as you animate your characters on the screen, you’ll see the exact same performance, one to one, between the digital copy and the real-world animatronics.

You can animate more than just servos too! You can bring your creativity to life using stepper motors, lights, relays, Dynamixel actuators — even add your own custom hardware into Bottango.

Animations in Bottango are created using keyframes, along a timeline, interpolating from one key pose of the ghosts to the next (Figure Z).

Figure Z

These are the same kinds of tools that the pros use to make digital animations. You can bring in reference videos and animate your characters right along with a real-world performance. Or record a video of yourself doing your own spooky dance, import it into the project, and then use that as a reference for an animation. Or hook up a game controller to live-puppeteer the characters, and it will be recorded and translated back to editable keyframes.

When you download Bottango, you’ll find a thorough, 300-page documentation PDF that teaches you all the ways to use and animate with Bottango. The Bottango Discord community is a great place to learn and ask questions.

Ready-to-Build Animatronic Kits

Maybe you had so much fun building these ghosts that you want more characters. Or it’s a little intimidating to try and source all these parts and know if you’ve got the right pieces. Bottango, besides making awesome free software, has “everything in the box” animatronic kits available (Figure Aa).

Figure Aa

Bottango’s kits are a really easy and fun way to explore the art of animatronics, no prior experience or special tools needed. You get all the parts, hardware, circuits, tools, and servos you need to build a fully functional character, plus a fun 3D assembly program to show you how to build (Figure Bb), and special optimized animation tools to animate the character.

Figure Bb

This project appeared in Make: Vol. 90. All images and screenshots by Evan McMahon.