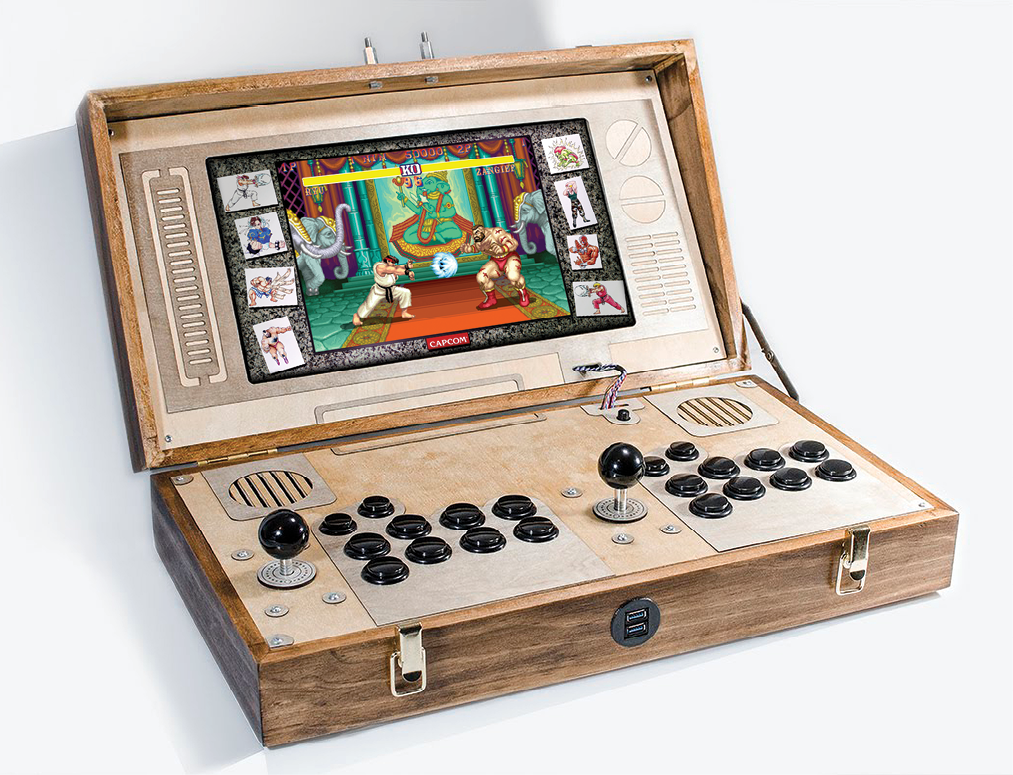
Not long ago my brother asked me to help him convert a glass coffee table into a cocktail arcade machine. I was already familiar with RetroArch and emulation in general, but this was the first time I worked with a Raspberry Pi. It was so easy to set up, and so much smaller than I expected, that I thought to myself, “I could do more with this.” That build was pretty simple, but it gave me an itch I could not resist. I resolved to build a system into a disused suitcase that could be folded up and carried.

I kept an eye out for an appropriate folding case, but after a couple of weeks of looking I was at a dead end. Every box I came across was too small, too big, too shabby, too expensive, too thick, too thin, and so on. I realized I would probably just have to make it myself. Thinking more about it and drawing out a design in my head, I found myself with a list of design requirements:

  • Foldable
  • Light enough to carry
  • Small enough to move easily
  • Big enough to be functional
  • Well-made and well-finished wood construction

This was becoming a pretty ambitious project given that I had no tools of my own, no experience working with wood, and only a passing knowledge of electronics. Fortunately there happened to be an amazing makerspace really close to me called Reforge Charleston . After joining, and with guidance from a few of the members (and a lot of YouTube videos), I taught myself basic woodworking, how to use the 3D printers, laser cutters, CNC machines, and everything else I would need to make my arcade box. Here are the main elements of what it entailed.

What will the next generation of Make: look like? We’re inviting you to shape the future by investing in Make:. By becoming an investor, you help decide what’s next. The future of Make: is in your hands. Learn More.

Project Steps

Design Layout

I used the measurements of the arcade controller parts I had selected to design the layout of my buttons and joysticks in Adobe Photoshop and Illustrator.

The layout out of these controls, accounting for speakers and space for the other electronics, gave me the dimensions of the box I needed to make — 21″×11¾”×5⅜”.

Construct Box

I made the box using pine boards from Lowe’s. I constructed the frame first, then ran it through a table saw to cut it into two pieces to make the base and lid of my box.

Glue and sand

I glued in the top and bottom boards; once dry, I sanded it all from 80 grit to 220 grit.

Stain

I used a pre-stain conditioner, red oak stain, and many layers of spray lacquer to finish the box. I know many woodworkers frown on using stain, but I opted for it because I wanted to keep costs down and also I didn’t yet trust myself not to ruin perfectly good walnut.

Laser Cut

Using the layout designs I had created in Illustrator, I laser-cut the control face from birch plywood with all the holes needed for speakers, buttons, and joysticks. I used the same process to cut the board I would use to mount the screen.

I went back to Illustrator and designed the overlays for the control and screen boards, as well as the Pac-Man-inspired dust covers for the joysticks. I laser-cut all these overlay pieces from ultra-thin birch sheets, then I used spray adhesive to secure them over the plywood faces. All the plywood was pre-sanded, so I coated them in many layers of spray lacquer and called them done.

RetroPie

I’m familiar with gadgets and electronics and games, but I’m no coder. That being the case, I used RetroPie which is open-source software specifically for the playing of retro games on the Raspberry Pi. All that was needed was to download a RetroPie image of my choice, flash it to a microSD card using Etcher or other flashing software, plug it into the Pi, and boot it up.

Attach USBs

I wanted to reserve two USB ports to be accessible from the exterior of the box so I ordered two USB extension cables and took measurements of the female ends. I used these measurements to custom design a pass-through piece in Tinkercad that would allow me to attach the USB cables from the interior and look nice and flush on the exterior. I got the right fit with my second 3D-printed iteration.

Wire controllers

The controls were all very plug and play. All I had to do was wire each button and joystick to its corresponding plug on the controller board and plug the board into the Pi via USB. Then I configured the controls in RetroPie and everything worked smoothly.

Connect Display

The display is a salvaged 15.6″ LCD screen from an old disused laptop. I looked up the model number on eBay and found an appropriate LCD controller board. This would allow me to connect the screen (and repurposed speakers) to the Pi via a short HDMI cable.

Repurpose Speakers

For my sound solution, I repurposed some old desktop PC speakers. Breaking the speakers out of their casing required the use of a vise. However, once I got the speakers and electronics out I made the mistake of moving things around too much. Wires that weren’t supposed to move were jostled and inevitably broke. This required a lot of tiny resoldering and spiteful amounts of hot glue to remedy.

Attach Speakers

The speakers sit in the base of the box, facing upward. I designed (again using Tinkercad) and 3D printed a pair of lifts to which the speakers could mount. These allowed the speakers to be attached to the base, but be almost perfectly flush with the control face when it was laid into place over the top of the speakers.

Connect Power supply

To power all this, I wired the head of a 3-plug extension cord to an arcade power switch that passed through the back of the box and attached to a wall outlet via a standard PC power cable. The LCD controller board required a 12V, 1A power supply and I easily found one at a thrift store, but I had to modify it to fit inside the case.

Final Assembly

All the parts were done, all components tested and working. All that was left was to assemble the box. In the final stretch I found that the lid would not close over the joysticks as I had intended. I had already lowered the joysticks as far as I could with spacers and I found that no matter what angle I set the screen at, it would not close. I tried unscrewing the joystick ball tops from their posts and, voilà, the lid closed. There were mere millimeters of space between the screen and the bare posts, but this was enough for them to never touch.


I hadn’t yet decided on a handle for the box so my solution was to add posts to the front of the box that the ball tops could attach to and be used as a carry handle. I did this without knowing if it would be a good idea because it was my only real option at this point. To my surprise it was ergonomic and quite comfortable to carry this way.

I could not be more satisfied with the end result of my build. It works exactly as I had hoped and has already seen many rounds of Street Fighter 2. Odd as it may sound, the process of making this arcade case was a revelation. It was one of my first real projects and completing it was among the most rewarding experiences of my life. It gave me a new direction, new ideas, and new goals to strive for. The learning, problem solving, designing, and working in the shop felt intuitive and gave me a sense of being at home, which is a rare thing
for me. I feel made to make and I can’t wait to make more.

Conclusion

Editor’s Note: Tyler now makes and sells these machines at Endboss Customs