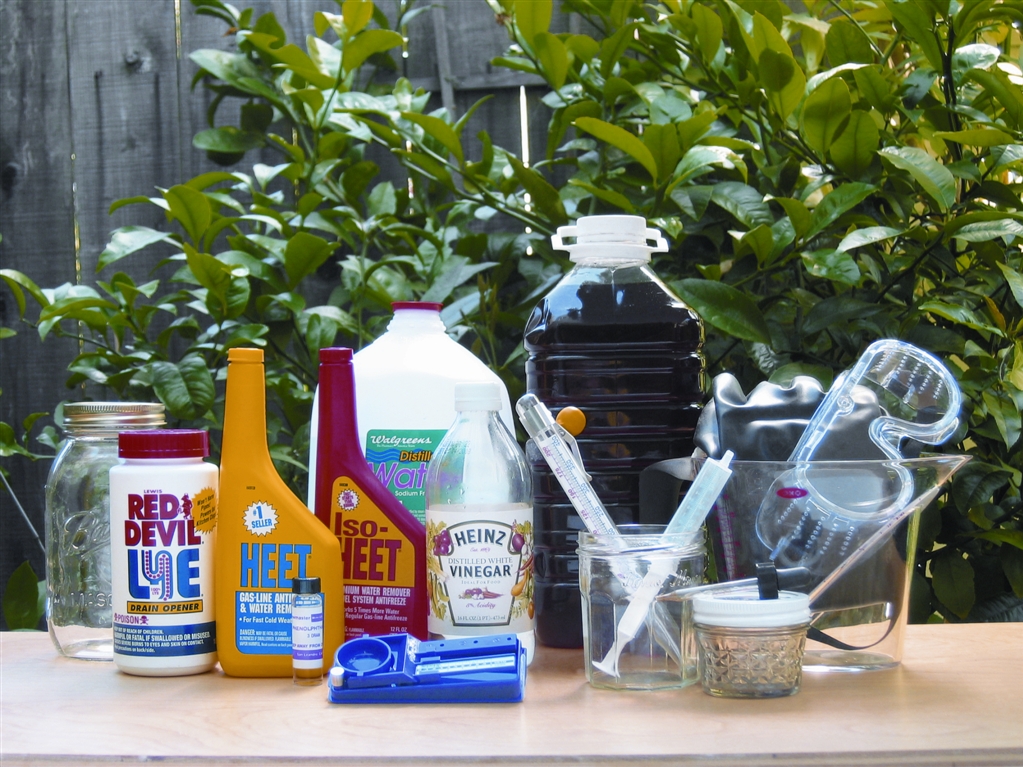
It’s easy to make a small batch of biodiesel that will work in any diesel engine, from a model airplane engine to the family car. You don’t need any special equipment — an old juice bottle will serve as the “reactor” vessel — and on such a small scale you can quickly refine your technique and perform further experiments. After a few liters’ worth of experience, you’ll know if you’ve been bitten by the biodiesel bug.

The principle behind biodieseling is to take vegetable oil (either new or used), and process it into a fuel that’s thin enough to spray from a regular diesel engine’s fuel-injection system. This is done chemically, by converting the oil into two types of compounds: biodiesel, which shares the original oil’s combustibility, and glycerin, which retains the oil’s thick, viscous properties. Drain away the glycerin, and you’re left with a fuel that you can pour into any diesel vehicle with no further modification.

Once you get to the far side of the learning curve, making biodiesel is very much like cooking. In fact, a commercial biodiesel production plant shares more in common with a large-scale bakery than a petroleum refinery. There’s organic chemistry involved in baking a cake, but most bakers wouldn’t consider themselves organic chemists.

What will the next generation of Make: look like? We’re inviting you to shape the future by investing in Make:. By becoming an investor, you help decide what’s next. The future of Make: is in your hands. Learn More.

Project Steps

Biodiesel Homebrewing Safety

While biodiesel is safe to handle and store, the homebrewing process involves flammable, poisonous, and caustic chemicals, alcohols, and lye.

Keep all chemicals clearly labeled, sealed, and out of reach of children and pets. When handling methanol and lye, wear long sleeves, safety glasses, and gloves made out of nitrile — or, even better, PVC.

Wash the gloves after each use, and be careful not to touch your skin or eyes. Keep a water hose nearby in case of skin contact. Methanol can be absorbed through the skin, so wash immediately with water if contact occurs. Immediately flush lye off skin with water or vinegar.

Methanol fumes are poisonous, so wear a mask, or hold your breath while pouring, and work outside or with good ventilation.

Filter and De-water your oil

If you’re using new oil, you can skip to Step #5. But if you’re starting with waste oil from a restaurant fryer, it will contain food particles, water, and free fatty acids (FFAs) — contaminants that you need to remove or adjust for. The FFAs make the oil more acidic, (a.k.a. rancid), which counters the effect of the lye.

You can compensate for this by adding more lye into the main reaction later, but you need to perform a titration test beforehand in order to determine how much extra lye you’ll need.

Start with more than one liter of oil, since the following steps will slightly reduce your oil’s volume.

Warm the oil to about 95ºF in a pot on an electric hot plate (don’t use a gas burner, here or anywhere else in this project), then filter it through a few layers of cheesecloth in a funnel (or use a coffee filter).

Heat the oil to 140ºF and maintain the temperature for 15 minutes.

The water will fall to the bottom, so you’ll risk steam explosions if the temperature gets too high. Pour the oil into a bottle or other vessel and let it settle for at least 24 hours. This removes water, which would produce soap in your batch. If you see water at the bottom (it will be dirty, not clear), don’t pour it back out with the oil.

Test your oil to determine its acidity

Dissolve one gram of lye in one liter of distilled water (0.1% lye solution), or use an equivalent ratio to make a smaller amount.

This is your reference test solution, which you can store sealed and re-use for later batches.

In a small jar, dissolve 1ml of slightly warm oil in 10ml of isopropyl alcohol.

Stir until clear, then add two drops of phenolphthalein solution.

Using a graduated syringe or dropper, add your reference test solution drop-by-drop into the oil/alcohol solution, keeping track of how much you’re using. The more acidic the oil, the more you’ll need to add.

Stir constantly, and continue adding solution until the mixture stays pink for ten seconds.

Note the number of milliliters of lye solution you used; this is the number of extra grams of lye you’ll need to add per liter of oil.

This process is called “titration,” and it’s a standard method of determining a solution’s acidity.

Process the oil

This is the main chemical reaction that produces the biodiesel.

First, calculate how much lye you need.

If you’re using new oil, use 5 grams of NaOH or 7 grams of KOH per liter.

With used oil, use these amounts plus one gram for every milliliter of solution you used in the titration step 7.

For example, if it took 1.5ml of lye solution to turn the mixture pink, use 6.5g of NaOH or 8.5g of KOH.

Measure your lye into a clean Mason jar.

Add 220ml of methanol, cover securely, and tip the jar to make sure the lid doesn’t leak.

Then swirl or shake the jar gently until the lye dissolves fully. This will take a few minutes, and the jar will become slightly warm in the process.

This mixture is the methoxide solution, and it’s dangerous stuff; you’ll need to wash the Mason jar lid after you’re done with your batch, or its seal will dissolve. (Some regular homebrewers prepare methoxide ahead of time and store it in #2 HDPE plastic.)

Warm a liter of your oil up to 130ºF. Let it cool down if the temperature gets too high.

Pour the oil into a large bottle, add the methoxide solution, cap tightly, and shake like crazy for about five minutes.

The contents might change color a couple of times.

Set this mixture aside, and admire.

In half an hour or so, you should see a darker, dirty, glycerin layer start to sink toward the bottom, and a larger, lighter, biodiesel layer rise to the top. This is a good time to clean up.

If you’re sure your bottle won’t leak, you may want to let it settle upside-down, so you can drain the glycerin out by cracking the bottle cap. Or you can lay it sideways to make it easier to pour off the biodiesel.

Let the liquids continue to settle overnight.

Separate, wash, and dry your biodiesel

Your bottle now contains biodiesel, glycerin, mono- and di-glycerides, soap, methanol, lye, and possibly a little leftover oil (triglycerides). The glycerides are all oil-soluble, so they’ll reside predominantly in the upper, biodiesel layer. The thin layer of glycerin, which is water-soluble, will sink.

Depending on the oil and catalyst you used, it might be either liquid or solid. Soap, methanol, and lye, which are also water soluble, will be mixed throughout both layers — although some of the soap can sometimes form its own thin layer between the biodiesel and glycerin.

If you see more than two layers, or only one, then something’s wrong — possibly excessive soap or monoglyceride formation. These are both emulsifiers, and in sufficient quantities they will prevent separation. In this case, check your scales, measurements, and temperatures. You can reprocess the biodiesel with more methoxide, or try again with fresher oil (or new oil). If you can, shake the bottle even harder next time.

In an engine, glycerin droplets in biodiesel will clog fuel filters, soap can form ash that will damage injectors, and lye can also abrade fuel injectors. Meanwhile, methanol has toxic and combustible fumes that make biodiesel dangerous to store. You don’t want any of these contaminants in your biodiesel. If you left your biodiesel to settle undisturbed for several weeks, these water-soluble impurities would slowly fall out of the biodiesel (except for the methanol). Washing your biodiesel with water removes the harmful impurities, including the methanol, much faster.

Unfortunately, washing will not remove the invisible, oil-soluble mono- and di-glycerides. These are a problem in rare instances when large amounts of certain types of monoglycerides crystallize. This can clog fuel filters and injectors, and cause hard starts, especially in cold weather. High-quality, commercial biodiesel has very low levels of mono- and di-glycerides, which is the ideal for biodiesel homebrewing.

You can roughly test for the presence of mono- and di-glycerides in your own batch by processing it a second time, as if it were vegetable oil, starting with step 2 again. If more glycerin drops out, then your first reaction left some unfinished business behind.

Pour the biodiesel layer off the top, into another bottle.

Don’t pour off any of the glycerin, as it makes washing difficult; better to leave a little biodiesel behind.

If you let the bottle settle upside-down, drain the glycerin from the bottom.

Gently add some warm distilled water to the biodiesel.

Rotate the bottle end over end, until the water starts to take on a little bit of white soapiness, which may take a few minutes.

Do not shake the bottle. You want to bring water and biodiesel into contact, without mixing it too vigorously. The biodiesel contains soap, and if you overdo the agitation, the soap, biodiesel, and water will make a stable emulsion that won’t separate.

Turn the bottle upside-down, crack the cap, and drain away the soapy water.

If you’re using a soft drink bottle with a narrow neck, you can plug the opening with your thumb instead of using the cap.

Add more warm water and keep repeating the sloshing and draining process. Each time there will be less soap, and you can mix a little more vigorously.

If you go too far and get a pale-colored emulsion layer between the biodiesel and white, soapy water, don’t drain it away; it’s mostly biodiesel. Just keep washing and diluting until the water becomes clear and separates out quickly.

It takes a lot of water. But if the emulsification layer persists, try applying heat, adding salt, and adding vinegar, in that order.

After draining the last wash water away, let the biodiesel sit to dry in open air until it’s perfectly clear, which may take up to a couple of days. In general, the better your washing, the faster the fuel will clear.

If you’re in a hurry, you can dry the fuel faster by heating it at a low temperature. As with the evaporation method, the fuel is done when it clears.

If you can read a newspaper through the biodiesel, it’s dry and ready to pour into a vehicle. Congratulations — you’re done!

Biodiesel Chemistry (background information)

Vegetable oil is a triglyceride, which means that its molecule consists of a glycerin “backbone” with three fatty acids attached, forming a shape like a capital letter E. To make biodiesel, we add lye and methanol. The highly caustic lye breaks the three fatty acid branches off of the glycerin backbone. These free fatty acids then bond with the methanol, which turns them into fatty acid methyl esters — otherwise known as biodiesel. The freed glycerin, which is heavier, sinks to the bottom, leaving the fuel (and lye) on top. Wash the lye out of the upper layer, and you have pure biodiesel.

But it’s not that simple. With some triglyceride molecules, only one or two fatty-acid branches break off, which leaves mono- or di-glyceride molecules (shaped like capital Ts or Fs), rather than free glycerin. At the same time, mixing methanol and lye produces some water — and oil, water, and lye mixed together make soap. With all of these incomplete and competing chemical reactions, your batch will inevitably contain soap, water, leftover lye, methanol, and mono- and di-glycerides, along with the nice biodiesel and glycerin. Mono- and di-glycerides are emulsifiers, so they prevent mixed liquids from separating, making it harder to extract biodiesel. The picture gets even muddier when you use waste vegetable oil rather than pure oil, since it contains free fatty acids, water, and countless random contaminants from all those French fries.

These by-products are bad for an engine, potentially causing micro-abrasions that damage fuel injectors or clog fuel filters. But you can remove them by washing or cooking the biodiesel in various ways, or by processing the incompletely converted biodiesel again, as if it were vegetable oil. In extreme cases, you’ll end up with a thick, soapy mass that never separates. All biodieselers wind up with a batch of this glop sooner or later. Fortunately, you can use it to make a good, grease-cutting soap — which is something that all biodiesel homebrewers need to have on hand.

Conclusion

Related Posts on Make: Online:

Flashback: Mod Your Rod

http://blog.makezine.com/archive/2009/02...

Talented Teen Turns Cooking Oil Into Fuel

http://blog.makezine.com/archive/2007/02...

NOTE: This project first appeared in MAKE Volume 03

https://makezine.com/03