Beatjazz-1

For as long as I can remember, I have wanted to make music when I dance, and even generate music from my dancing. From marching band performances to dance club sets, playing music and movement have always been inextricably linked for me.

As a saxophone and general woodwind player, I discovered the Yamaha WX7 MIDI wind controller in 1993, went electronic, and never looked back. Over years of busking, touring, and recording, I condensed my setup down to the controller and a laptop, and developed a methodology for live-looped, soft-synth-based improv that I call Beatjazz.

But I got tired of standing and pushing buttons. I knew that gestural sensors and wireless devices could let me create music freestyle, the way a beatboxer or breakdancer might do — to be a part of the party instead of just standing on the side playing for it.

I began experimenting with gestural control last year by strapping an iPhone running TouchOSC to my arm, and using it to send motion data to Pure Data (Pd) on my laptop. This whet my appetite, and so I decided to build the performance interface that I had always wanted.

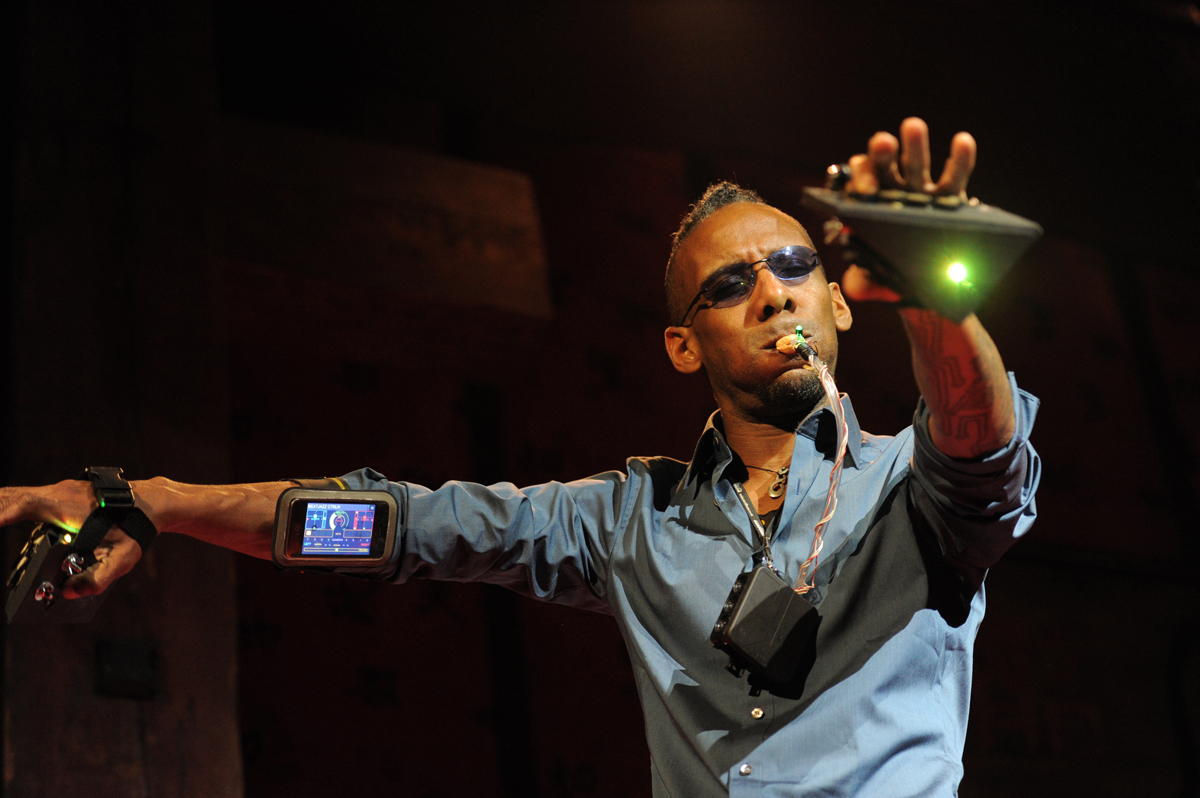
Introducing the Beatjazz Controller, a wearable, wireless, 3-node network interface for live performance. At its core, it’s a MIDI wind controller that you wear, not hold. It lets you move your hands and head independently. But it uses standard woodwind fingering, so if you know how to play a sax, clarinet, flute, or recorder, you can play any digital synth and sound like or “be” anything.

Beatjazz-2

In addition to its 8 regular finger sensors, the system has an accelerometer on each hand for gestural input, and 4-position “joy-toggle” mini joysticks at the index fingers and thumbs. The controls feed wirelessly into Pd running on a nearby laptop, and Pd translates their readings into MIDI notes, volume levels, and any other events and control parameters.

Pd lets you link the inputs to anything you want, so that, for example, you can change the sound you make by moving and tilting your hands in midair, and even switch the entire interface into a different mode by flicking a finger against a joystick.

To add more control options, the 8 regular finger buttons are force-sensing resistors (FSRs) that read variable pressure. Press one normally, and it keys just like a regular woodwind, but press it hard, and you can trigger any other action you assign in Pd.

Each network node (left hand, right hand, and mouth unit) has an Arduino microcontroller and an XBee wireless transceiver that communicates with corresponding modules on the base station laptop. I chose the Arduino Fio, which is designed for wireless applications. It’s small and has a built-in “shoe” for plugging in an XBee. For its power (which also supplies the XBee), you connect its BAT pins to a 3.3V LiPo (lithium polymer) rechargeable battery, and you can charge it up by connecting 5V to the CHG pins.

The Fios and laptop all run Firmata, a system that lets Arduinos work as I/O devices for a base station computer. On the computer, Firmata converts all the signals it receives wirelessly from the Fios into OSC-formatted streams of numbers for output to Pd.

The Beatjazz Controller uses all open-source software and hardware. It works as one cohesive instrument, but every aspect of the design can be modified and shared.


Code and Configuration

Schematic Diagrams

All schematic files are in .fz format, created and viewable in the free Fritzing application.

Templates for Hand Cases

Resources


This article appeared in MAKE Volume 28, page 116.

What will the next generation of Make: look like? We’re inviting you to shape the future by investing in Make:. By becoming an investor, you help decide what’s next. The future of Make: is in your hands. Learn More.

Project Steps

1. PROGRAM THE XBEES

First, install the FTDI drivers on your computer. This will let you program the XBee modules by plugging them into an XBee Explorer board and hooking the board up to your computer via USB.

I use faster 60mW XBee-Pros at the base station and the lower-power 1mW versions in the body units. Using Pro units all around would reduce latency at distances over 20–30 meters, I’ve found, but then the Arduino would have a hard time supplying the power. When I perform at normal distances from the com- puter, the 1mW body units and 60mW base units work well together.

To configure the XBees, I use Digi’s X-CTU software — note that it’s PC only. From X-CTU, update the firmware on each unit to the latest version, then download the config profiles and load them to the units (Modem Configuration → Profile Load). Among other things, this will configure the body and base unit XBees to operate as pairs on 3 different channels.

2. PROGRAM AND TEST THE ARDUINOS

The USB port on the Arduino Fio is only for charging batteries, not for programming. So to upload Firmata, you need to either connect it using an FTDI USB-to-serial (5 pin) adapter, or do it wirelessly via XBee. I chose the latter, following the directions at arduino.cc/en/Main/ArduinoBoardFioProgramming.

Beatjazz-3

To test the computer connection, plug each body unit XBee into an Explorer board, then connect the board to a Fio using a mini USB cable. Plug your base station XBees into your computer, and their green communication lights should light up. Note in your computer’s System Properties which serial port the base stations are using, and also which physical USB ports they’re plugged into (and use those same ports every time).

Download the Pd patch arduino-test.pd, open it in Pd, and click the base station’s port on the “serial port #” array at upper left.

3. HAND UNIT ELECTRONICS

The left and right hand control units are identical, so I’ll just describe how to build one. The Fio has a narrower pin layout than a regular Arduino, so you can’t plug in any of the standard prototyping shields. Instead, I soldered my own shields, which makes wiring (and rewiring) easier.

Beatjazz-4

The shields are just pieces of protoboard with 2 parallel 2×14- pin female headers spaced apart so their inner rows match the Fio’s pins. Each contact is then jumpered out to its adjacent outer header. Voilà: a Fio shield.

Beatjazz-5

Connect 1×14-pin male headers to the back of the Fio, and plug them into the shield. Then you can plug jumpers into the shield’s outer header rows, and swap Fios without having to undo any wiring.

Beatjazz-6

I mounted the joysticks with their resistors on their own mini protoboards. This conserves space on the shield and makes it easy to mount the joysticks inside the hand unit cases.

Beatjazz-7

The FSRs, accelerometer boards, and tricolor LEDs all connect via jumpers to the shield. Note that the tricolor LEDs have 4 pins: R, G, B, and V+.

With everything plugged in, attach your battery to the Fio and turn it on. If the magic fried-electronics smoke doesn’t escape, you’re doing OK. Open the Beatjazz Controller patch in Pd, and enter the requisite port numbers for each unit in the “analog inputs” and “digital inputs” arrays. You should be able to jiggle the accelerometers and twiddle the FSRs and joysticks and see the numbers change on screen. If any input doesn’t register, backtrack and see what’s not working.

4. MOUTH UNIT

The mouth unit consists of a mouthpiece that connects via a plastic breath tube to a small control box that I hang around my neck. Inside the box are an air pressure sensor with a hose barb that takes the other end of the tube, plus an XBee, Fio, and supporting electronics — just like with the hand units. To furnish some bling, a tricolor LED sits on the tube in front of the mouthpiece, controlled by wires wound up from the box.

The mouthpiece lets me keep the tube in my mouth and articulate properly while I play. I designed a custom-print mouthpiece recently that I plan to make available for sale, but the first-generation mouthpiece described here is made by hot-gluing 2 guitar picks around the end of the breath tube.

Beatjazz-8

As a woodwind player, you want your top teeth to rest about 4mm back from the leading (pointy) edge of the mouthpiece, with your bottom teeth just slightly in front of the edge, not resting on the bottom pick. This positioning helps you stabilize the mouthpiece and lets you to articulate the “Tu” sound that woodwind players use to “hit” their notes. After testing the mouthpiece in my mouth, I found the sweet spot. Then I cut a soft plastic button in half and super-glued the halves to the top and bottom picks to create anchors for my teeth to “lock” the mouthpiece in the right position. I covered the anchors with more hot glue, then shaved it down until it was all smooth and comfortable in my mouth.

Beatjazz-9

For the mouth unit controls and wireless, I used a small plastic junction box. I soldered a 5-pin female header to a small piece of protoboard, plugged in the pressure sensor, and connected the LED wires and necessary resistors on the board.

Beatjazz-10

Plug the breath tube into the pressure sensor and test the system the same way as the hand units: turn on the Arduino, open the Pd patch on your computer, and blow. The slider onscreen should move up and down with your breath pressure.

Before you cut the tube down to size, try wearing the mouth unit. Put the mouthpiece in your mouth, and turn your head in all directions. The tube should be just long enough to let you move your head freely.

For the final touch, insulate the LED’s legs from each other, tape or zip-tie it to the tube (or any other location you see fit), and wire it along the tube to the box.

5. HAND UNIT CASES

At this point you’ve assembled all the electronics, but your hand units are still 2 octopi of wiry wireless creatureness. It is time to give them exoskeletons. For my first hand unit experiments I tried PVC pipe, but that was too bulky, so I switched to strong cardboard. It’s durable, cheap, and easy to work with, and if it tears, you just buy and cut some more. Once I converge on a design I like, I’ll make a more durable version using carbon fiber.

Beatjazz-11

To make the hand cases, print out the templates (left and right), transfer to poster board, and then cut and score where indicated with a sharp blade. Fold along the score marks, glue the side reinforcement flaps, fold the joint, and let dry. Then glue the lid reinforcement. The case should now be very sturdy.

Beatjazz-12

Beatjazz-13

For the straps, I used 10″ lengths of nylon strapping bolted to the cardboard and fit with buckles. The end result is a 3-way harness with straps in front of the wrist, behind it, and through the case.

Beatjazz-14

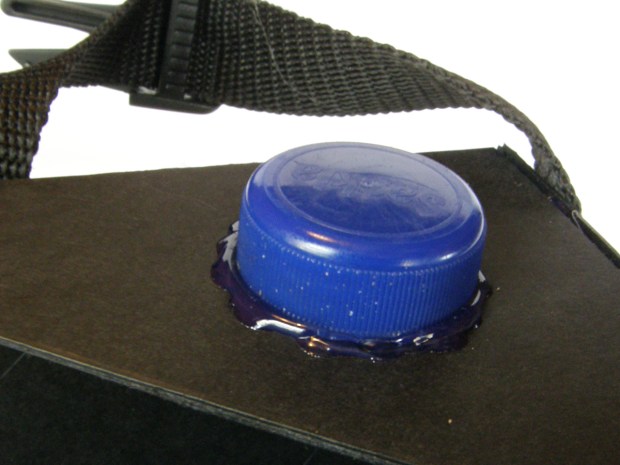
Glue padding underneath the buckle, as it can become painful after a while. Try the boxes on, and hot-glue a bottle cap where your palm “dimples” in the middle; this will lock the controller in place. Glue more padding along the edge where your palm touches the case just below your pinky and index fingers. This makes it easier to play notes that require no fingers or one finger.

Follow the case templates to mark and then drill or cut the holes for the FSRs, accelerometers, joysticks, and LEDs. Then mount the electronics.

Beatjazz-15

I glued foam padding underneath each FSR to give them some spring action.

Beatjazz-16

I also glued a button to the top of each lower joystick toggle switch, angled down so that I could flick it with a sideways twitch of my index finger without taking the finger off the key. The accelerometer is mounted so that its x-axis runs left to right as you hold your hands palm down in front of you, the y-axis forward/back, and the z-axis up/down. Finally, I tied the battery down inside the case through small holes drilled in the back.

Beatjazz-17

That’s it — once these parts are all assembled, you should have a working Beatjazz Controller!

6. TIME TO PLAY!

Beatjazz-20

In the Beatjazz Controller Pd sketch, the FSR keys are numbered 1 through 4 for the left hand and 5 through 8 for the right, both running from index to pinky finger. Every control input should make something in the patch blink or move. Do a systems check: press the keys; move the joysticks in all directions; tilt and move your hands along each axis; blow into the mouthpiece lightly, then progressively harder, and back to lightly. The breath slider should mimic your expression. If it tops out or doesn’t go its full range, calibrate it with a multiplier.

Now it’s time to play some synths. Set Pd to transmit to the MIDI output. To connect it out to hardware, you can use a USB-to-MIDI dongle. But I do it all on the laptop, using FL Studio or Ableton Live for synth hosting and control (like looping), and a variety of synth plugins, including Native Instruments Kore 2, Minimonsta, and Drumaxx. To do this, use a virtual MIDI port like MIDI Yoke from MIDI-OX to route the output from Pd into your synth host. Select a synth, blow, and you should hear something. You’re on your way!

Pd can assign control inputs to program changes as well as MIDI messages, which gives you super powers over changing modes mid-performance — kind of like immediately switching to a completely different instrument. In my example patch, for instance, the right upper joystick remaps the functions of both accelerometers. With so many possible control inputs, you won’t run out of controller abilities anytime soon. The main challenge is developing sets of control function that work together symbiotically.

THE FUTURE

It took a lot of tinkering and a couple of blown Arduinos to get this first version to work. One design stretch is the breath pressure sensor; it’s rated at 14.5psi, but humans blow most comfortably in the 1–2psi range. So I had to multiply the signal to death in the Pd patch, which makes it about one-third noise. For the next version I’ll use a more suitable sensor.

I plan to incorporate gyroscopes and other sensors into later versions, but I have yet to max out the potential of the 2 accelerometers, so I want to do that first.

All along, my goal with this project was just to entertain myself. Performing for me was becoming more like a job — I was supposed to play covers, or my own stuff that people had heard before. Instead, I want to make people dance, move, or groove to what is going on at that exact moment, good or bad, to create a unique singularity of now. By creating sounds that respond to natural movement, you tell a story that can never be planned or repeated, and can only be fully appreciated by the people experiencing it in the same time and place.

I believe that everyone should be able to create and experience such stories, and I envision as many ways of creating Beatjazz as there are people. When this happens, there will be no performers and no audience, only creators connecting to each other. I offer the Beatjazz Controller as a step in this direction, and I hope that we get to play together some day. Live long and prosper.

Conclusion

This article appeared in MAKE Volume 28, page 116.