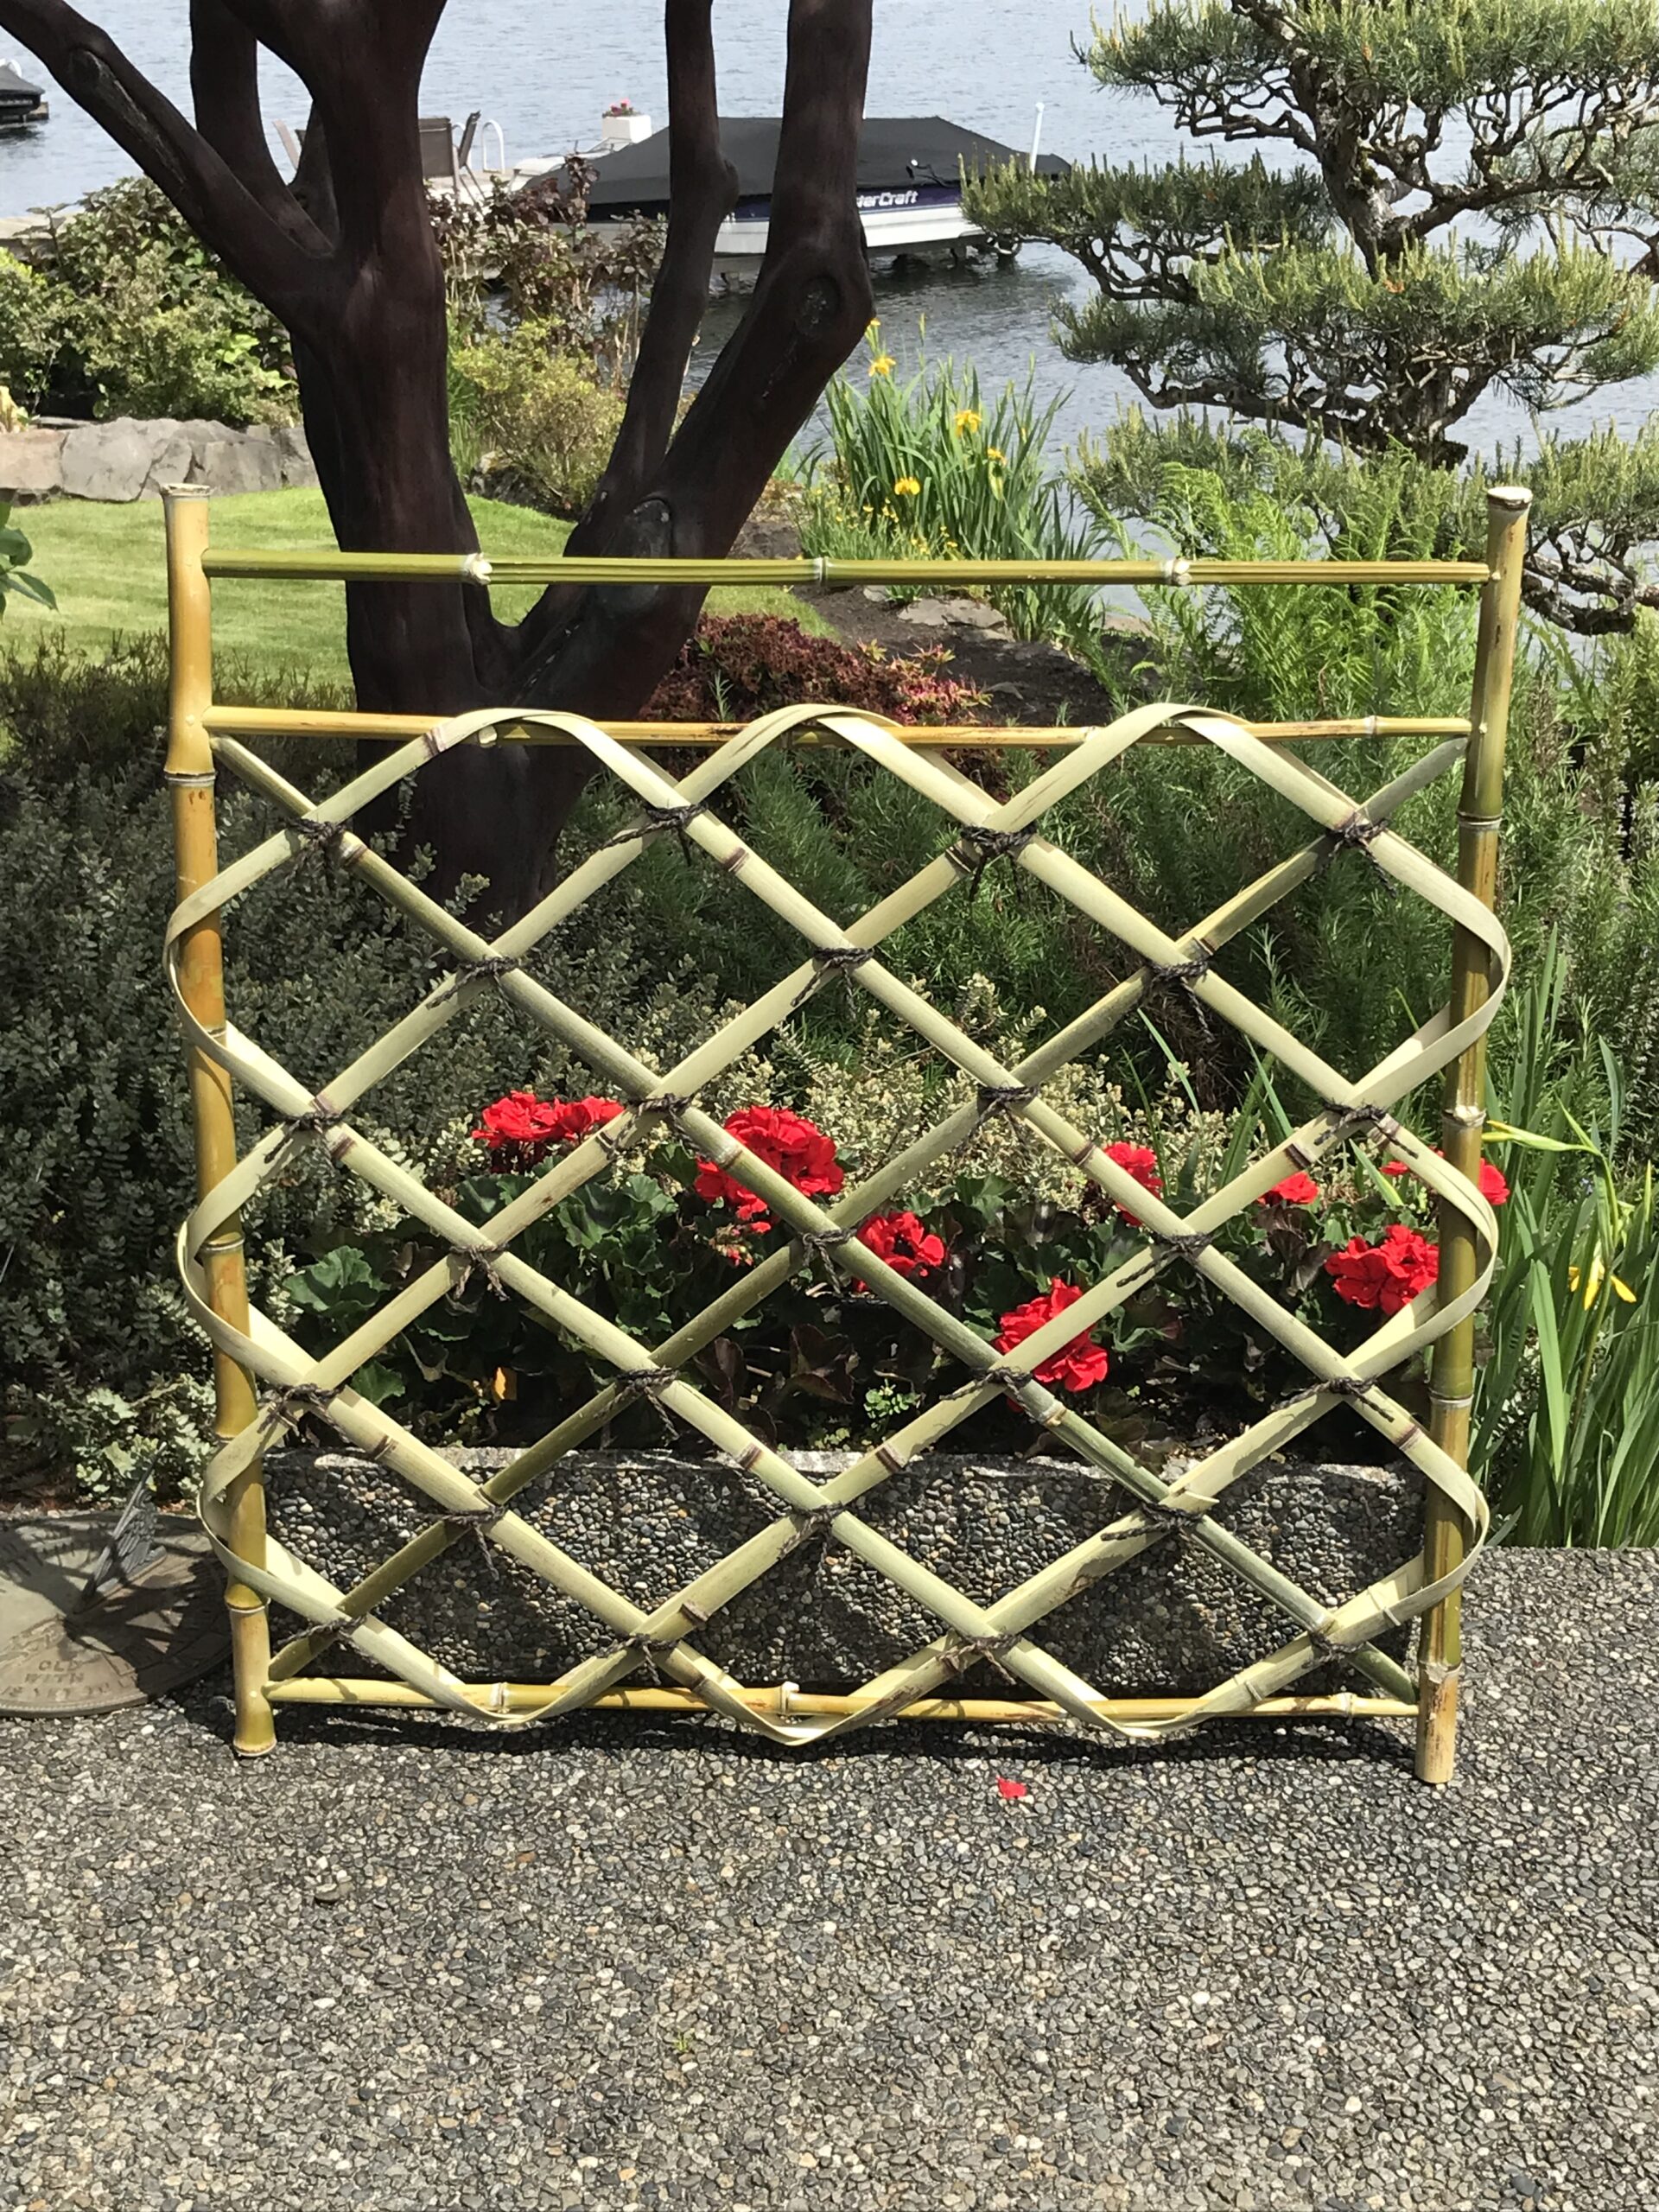
A couple years ago, longtime Make: author Len Cullum came to my house to purchase a pile of granite cobbles that I had left over from a driveway project. We chatted a bit and found that we shared an affinity for Japanese aesthetics. I gave him a copy of a little instruction booklet I had made on how to construct a shiorido tea garden gate, which he later shared with the folks at Make: magazine.

Subscribe to Make: for this and more projects and articles.

Many years ago, at an instructional class at the Portland Japanese Garden, I had made a shiorido, but that gate is long gone. So I told Make: I’d build another one, so that you can see the actual finished product. The design of the gate is not mine. It is a traditional and ubiquitous design, long used throughout Japan.

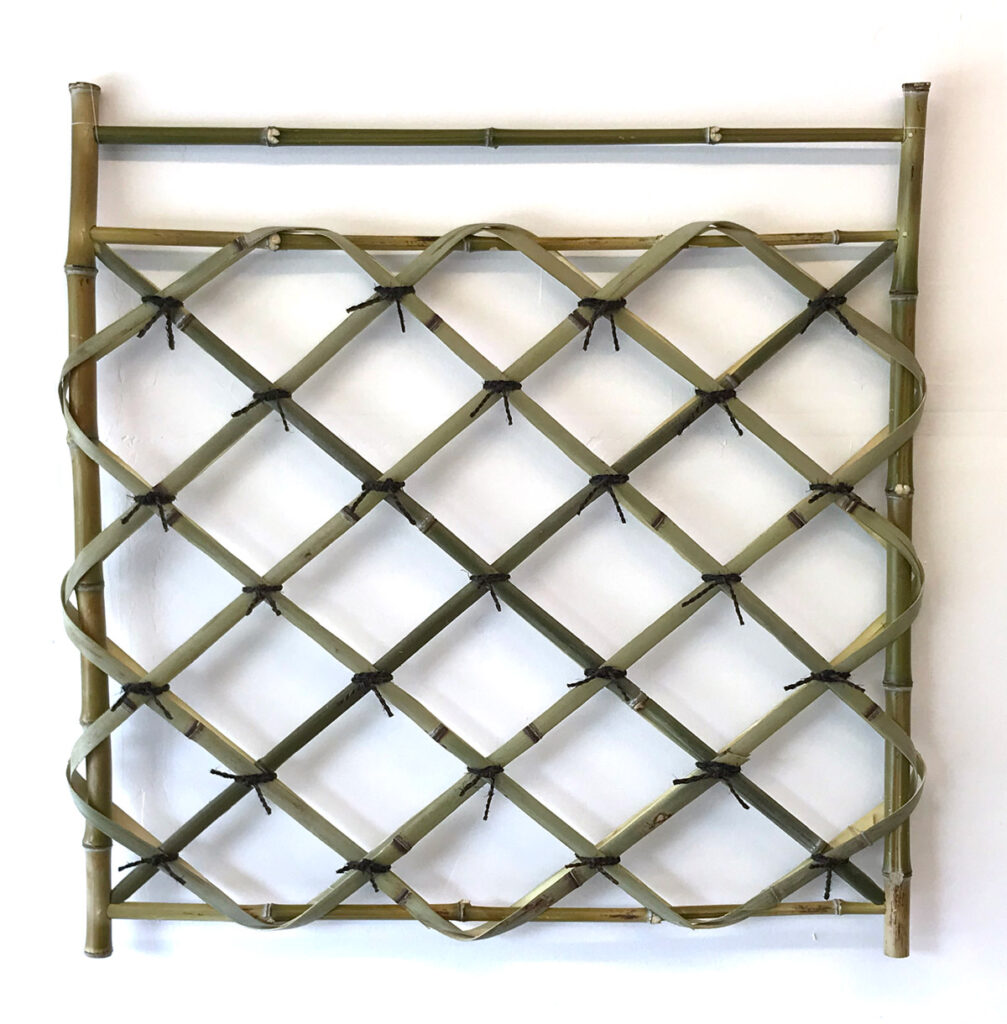
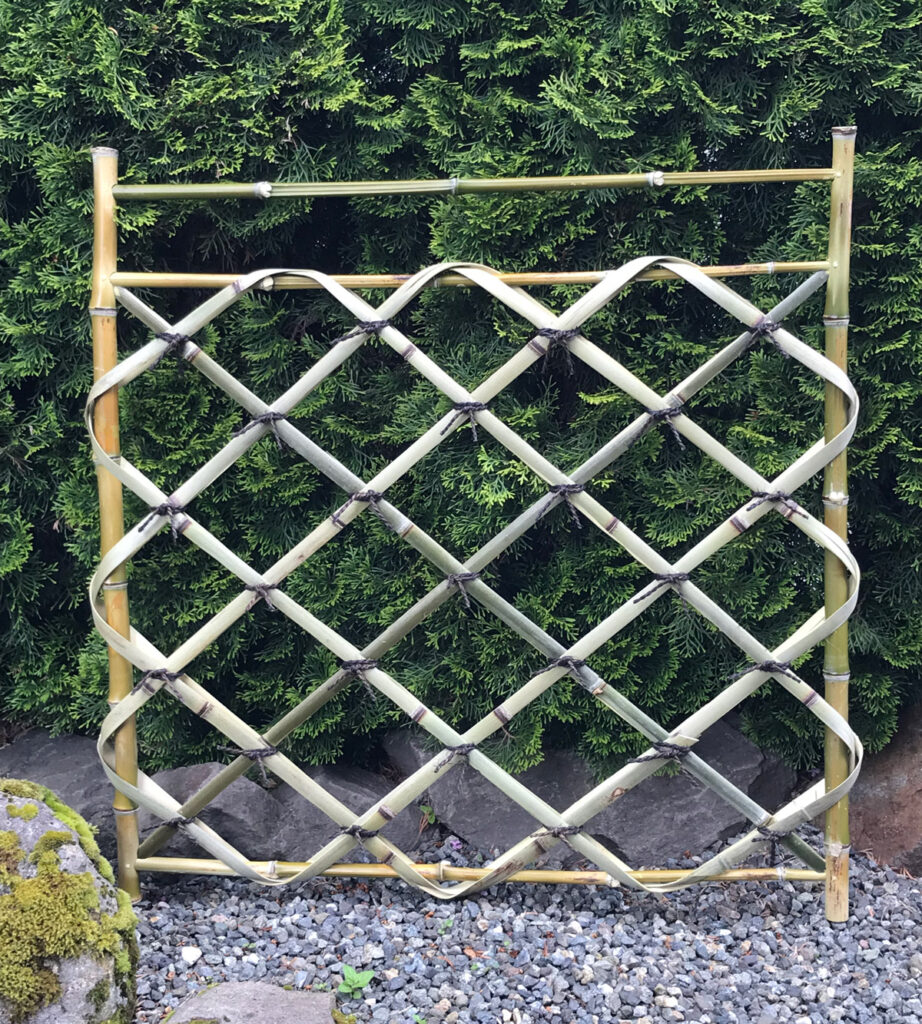
shiorido is a very simple light partition inside a garden made by wrapping thin strips of bamboo sheath around a rectangular frame of fine round bamboo poles, weaving the strips into a diamond-shaped pattern. The name shiorido, or “bent branch door,” comes from the bending of the strips of bamboo sheath around the frame.

—Isao Yoshikawa, The Bamboo Fences of Japan

It’s a simple and rewarding build that looks beautiful in your yard or garden. Once you’ve finished making the frame from bamboo poles, also known as canes or culms, you’ll apply the lattice-work of split green bamboo sheathing. For that, you’ll need to search out culms of thin-walled green bamboo, which can be difficult to source, but you’ll find some eventually. 

WORKING WITH BAMBOO

• Wear heavy leather gloves when splitting bamboo.

• Place all vertical bamboo to match the direction of natural growth. Observe a node to determine direction (Figure A).

A

• Check poles for “zigzag.” Place zigzag in line of sight with the viewer to hide it.

MAKE YOUR SHIORIDO BAMBOO GATE

To see how the professional folks do this work in Japan, please watch this YouTube video from Japanese Garden TV.

YouTube player


I wish I had access to their bamboo inventory!

What will the next generation of Make: look like? We’re inviting you to shape the future by investing in Make:. By becoming an investor, you help decide what’s next. The future of Make: is in your hands. Learn More.

Project Steps

1. Cut the Poles

Figure B

Use a fine-tooth saw to cut the poles. For the cleanest edge, rotate the pole in the jig as you cut.

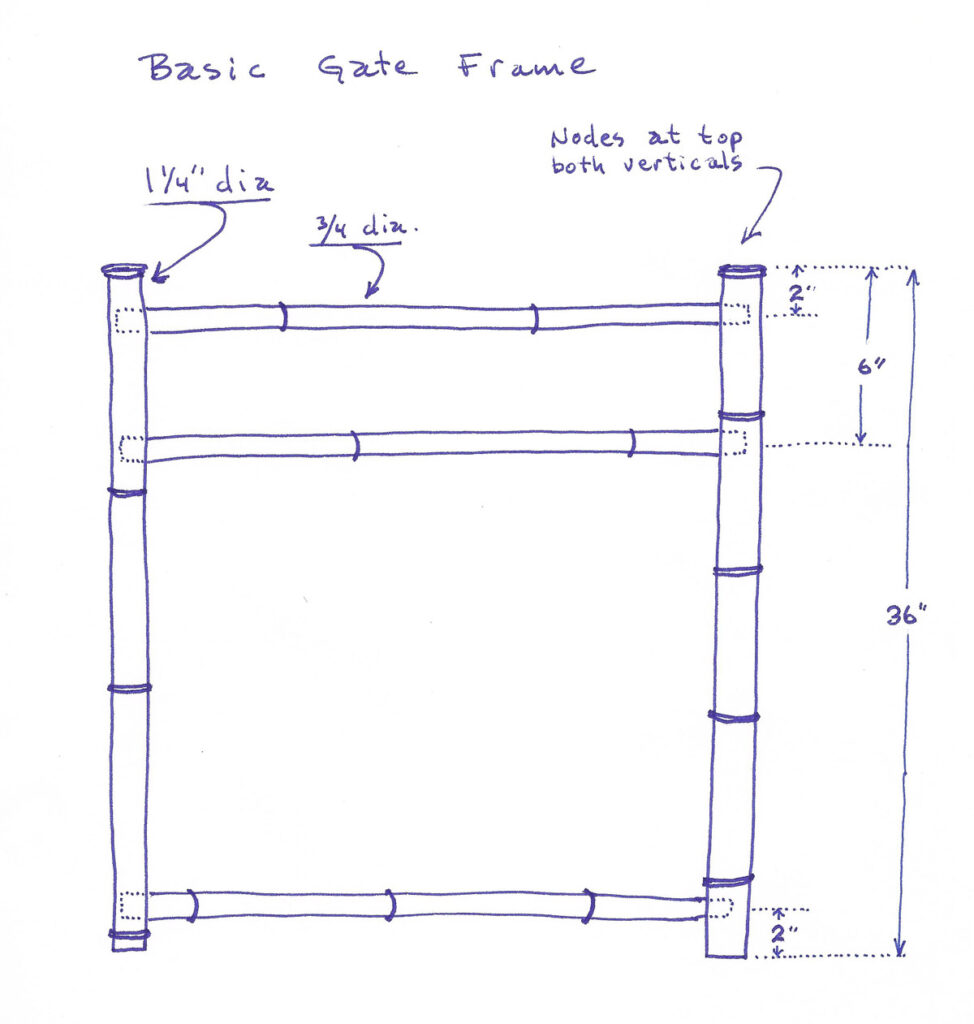
Vertical gate pieces should be about 36″ long, with a node at the top (Figure B). Horizontal pieces should be about 32″. Use 1¼” diameter for vertical, ¾” diameter for horizontal

2. Join the Framework

After positioning the poles to minimize any obvious zigzag, mark the vertical poles for the location of the horizontal poles. Drill each hole in one side of the vertical pole, not all the way through, sized just under the smallest cross-section diameter of the horizontal pole. Do not use excessive pressure or bamboo may split.

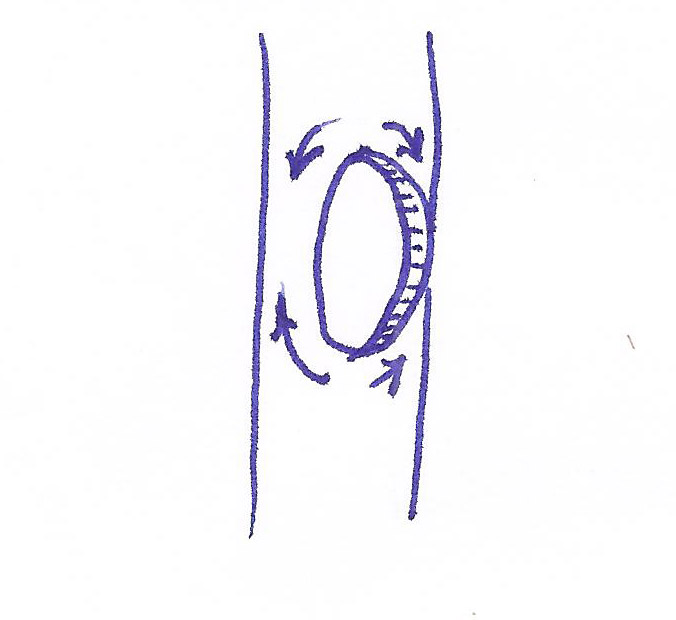
Figure C

Once holes have been drilled, carefully enlarge them to match the size of the end of the ¾” pole by carving with a small knife. To avoid splitting, carve each quadrant in the direction shown (Figure C).

The ¾” pole should fit snugly into the 1¼” pole and rest against the back side. Do not force or the bamboo may split!

Repeat this step in six places to temporarily assemble the basic frame.

3. Cut the Brace Keyways

Figure D

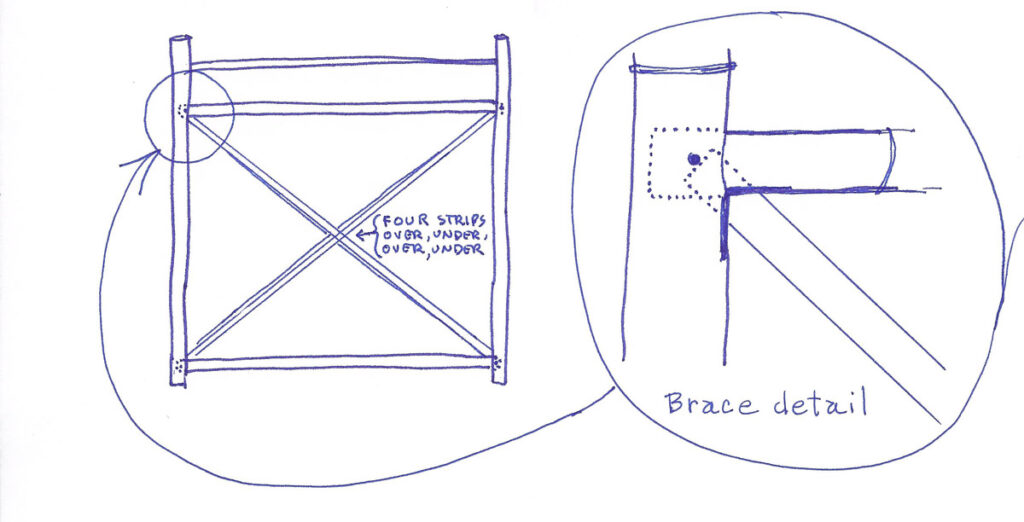
The following steps are done only in the four places indicated in Figure D.

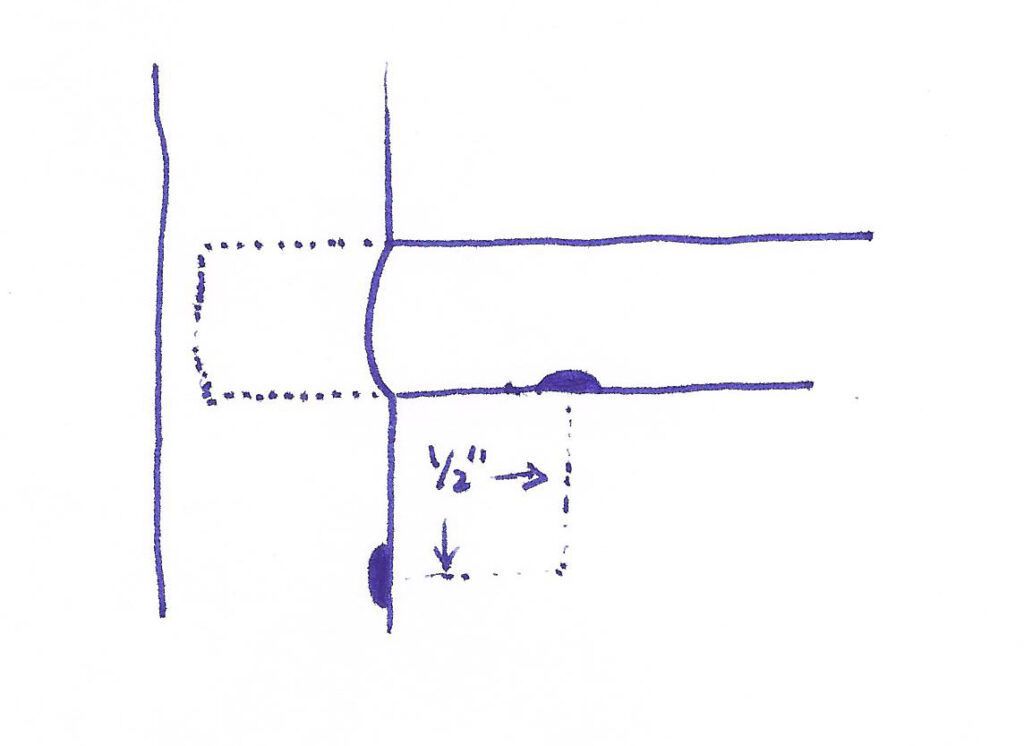
Figure E

Drill ¼” holes ½” away from where two poles join (Figure E).

Figure F

Then carve openings from each hole back to the joint, as shown in Figure F. These are the keyways for the structural X bracing.

4. Peg the Frame Joints

Figure G

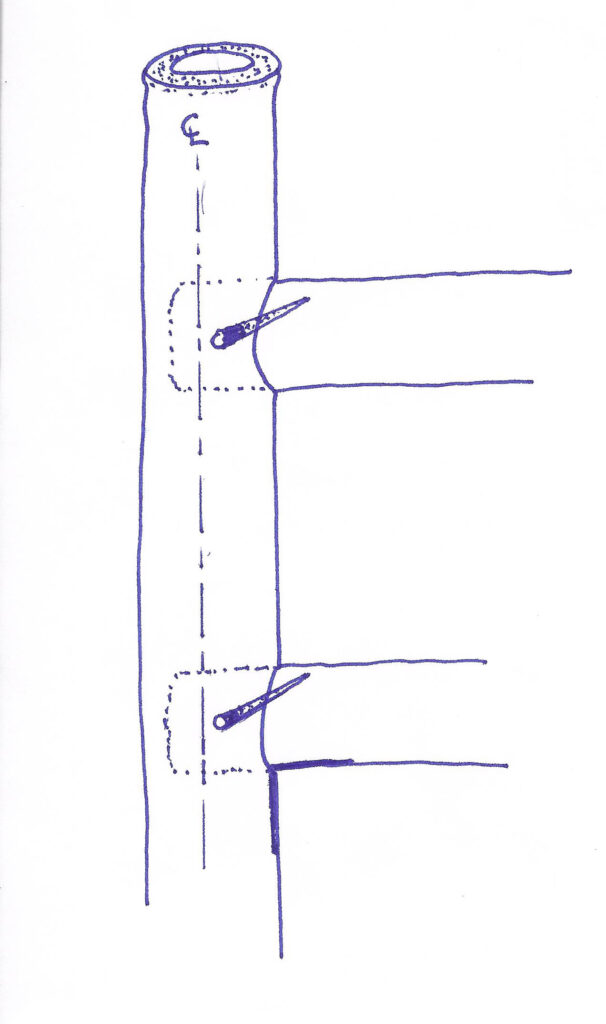
To pin the horizontal poles in place, drill 3/16″ holes 1/8″ inside the centerline of the vertical (Figure G). Use bamboo scraps to carve snug-fitting pegs. Taper the pegs slightly to ensure a tight fit.

Figure H

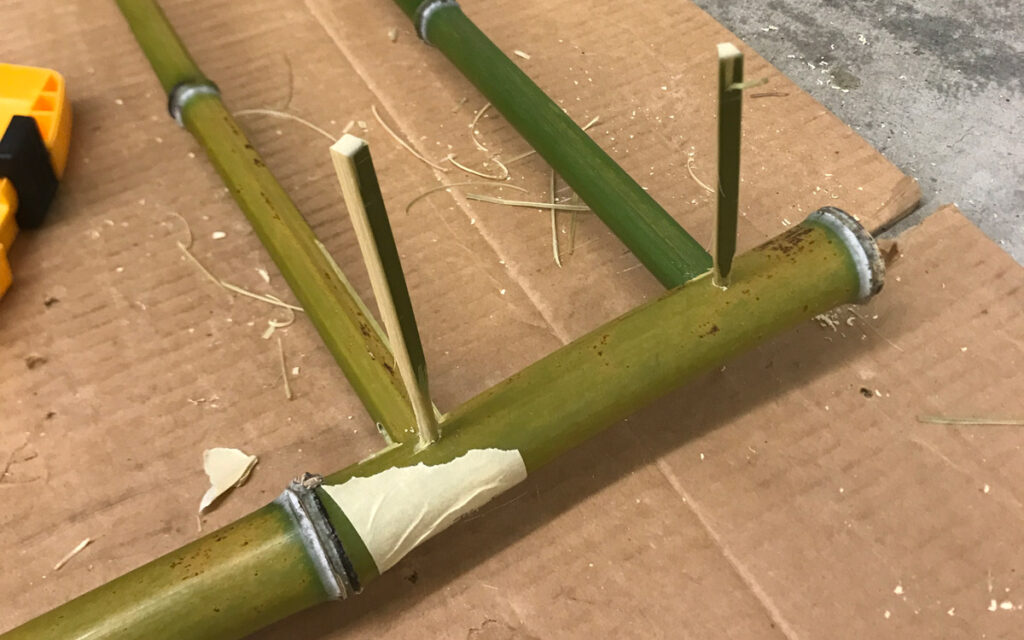
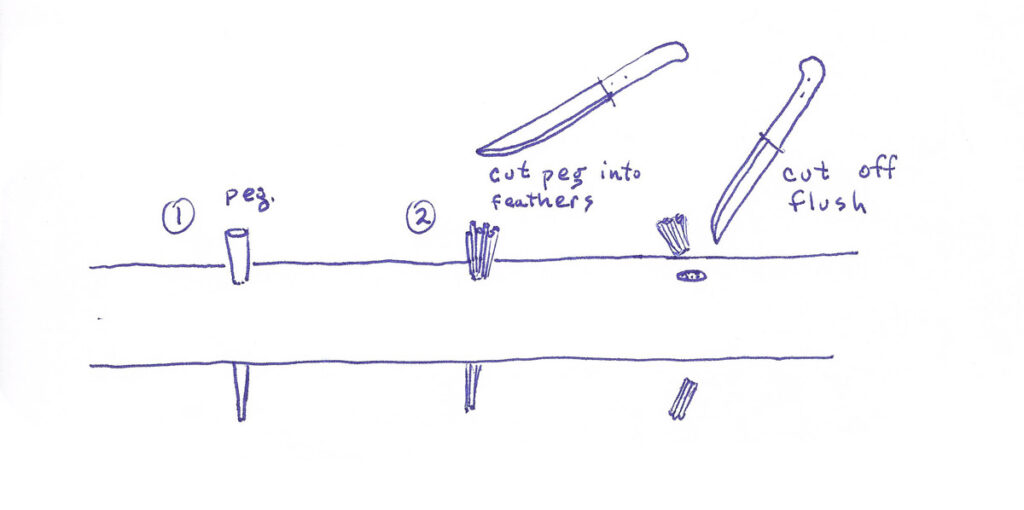
Lightly tap pegs in with a hammer (Figure H), leaving ¼” of peg protruding from both front and back. Then cut off pegs as shown in Figure I.

Figure I

5. Split Green Bamboo for Lattice

The remainder of the gate structure is built using strips of fresh “green” bamboo from 1½”–2″ diameter poles.

Figure J

Split the bamboo through the center axis for the first cut (Figure J), using your bamboo hatchet or similar tool. Be sure each pole is at least 12 feet long. The idea is to make at least six strips of bamboo that are 12′ long by ½” wide, because each loop in a three-loop gate takes two back-to-back strips. Add to that the four 4-foot strips for the X brace.

Splitting the green bamboo will be the most difficult part of building this gate. It takes some practice to get the hang of it. Split the bamboo from the top down; it’s easier. Much difficulty and time may be saved if your bamboo supplier will agree to split your 2″ diameter poles into 8 strips using a specialized bamboo splitter tool.

Bamboo strips are used back to back, in pairs, so a “finished” side always faces out. Soak the strips in water or wrap in wet newspaper until just before use.

Figure K

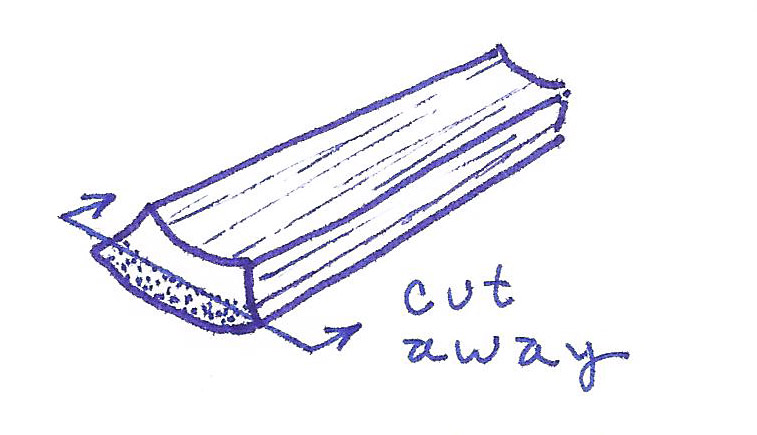
Use a sturdy and very sharp knife to rid each strip of pithy material from inside, leaving the woody, outer 1/3 of the strip (Figure K). The thinner the strips, the easier they’ll wrap around the gate frame without splitting or breaking. It is important to keep them wet to keep them pliable.

6. Fabricate the X Bracing

Figure L

The X bracing fits from peg to peg on the diagonal, to make the gate rigid and square (Figure L). Cut the bracing 1/8″ “too long” to ensure that it continually pushes against the pegs to hold the gate square. These X braces will tend to bow out now, but will be held down when the lattice work is finished and tied.

7. Weave the Lattice

Figure M

For the first loop, lay out a lattice strip so it’s parallel with an X brace and crosses the top rail at the ¼ point, then loop as shown in Figure M. Strips may crack if forced to bend too sharply, so handle them carefully and keep them wet. Avoid having nodes at the apex of sharp bends.

TIP: While weaving the lattice strips around the frame, I found it easier to keep them in position by using zip ties to temporarily secure them where they cross the other strips. When the lattice weaving was finished, one-by-one, I removed the zip ties and replaced them with the more decorative black twine for a final product that was strong and rigid.

Complete three loops using back-to-back strips (Figures N, O, and P). Always weave over-under-over-under wherever strips cross — except do not alternate strips over the top rail.

Begin and end strips in the bottom 1/3 of the lattice area. Tuck the beginning pair inside of the ending pair, overlapping the ends 12″. The overlap should extend through two intersections with the perpendicular strips. Cut the ends horizontally.

8. Tie the Knots

Figure Q

At all points where strips cross, tie them with the hemp/palm twine to strengthen and finish the gate (Figure Q). The traditional Japanese knot for this is the ibo musibi, the knot that’s used in the traditional yotsume-gaki bamboo fence. You can learn to tie it from YouTube videos such as youtu.be/Fva7A07Ioak or youtu.be/46lCdSS3yRw.

I started my knots as an ibo by crossing the twine in the back, but finished with an ordinary square knot in the front. In my opinion the square knot looks fine as a substitute for the ibo.

Soak the twine in water before tying and it will shrink when dried, making a tight knot.

Conclusion

YOU CAN SWING IT

Your finished shiorido gate is very light, less than 4 pounds, so the hardware can be light, too. In Japan, specialized hardware is available for this type of bamboo gate, but it’s not available in the United States. A very good substitute can be made using two eye bolts (such as Uxcell M5×40mm stainless eye bolts), with appropriate nuts, on the gate. For the gate post, use two #10 stainless wood screws, bent into an L shape, with the heads cut off.  The L’s point up, and the eye bolts simply slide over.

The traditional Japanese “latch” is a simple braided circle about 6″ diameter (made using three ¼” bamboo strips) that rests over both the gate post and the gate, on the opposite side from the hinges.

This gate looks good anywhere you’d like to hang it. I recommend one round gate post on each side of the gate, each 3″–4″ in diameter, stained black (or, traditionally, char-flamed with a torch until black).

If you’d like to learn to build a bamboo fence to go with it (a yotsume-gaki for example), YouTube would be a good place to start.