You merely need a basic knowledge of sewing to do this project. I’m a novice and if I can do it, so can you!

What will the next generation of Make: look like? We’re inviting you to shape the future by investing in Make:. By becoming an investor, you help decide what’s next. The future of Make: is in your hands. Learn More.

Project Steps

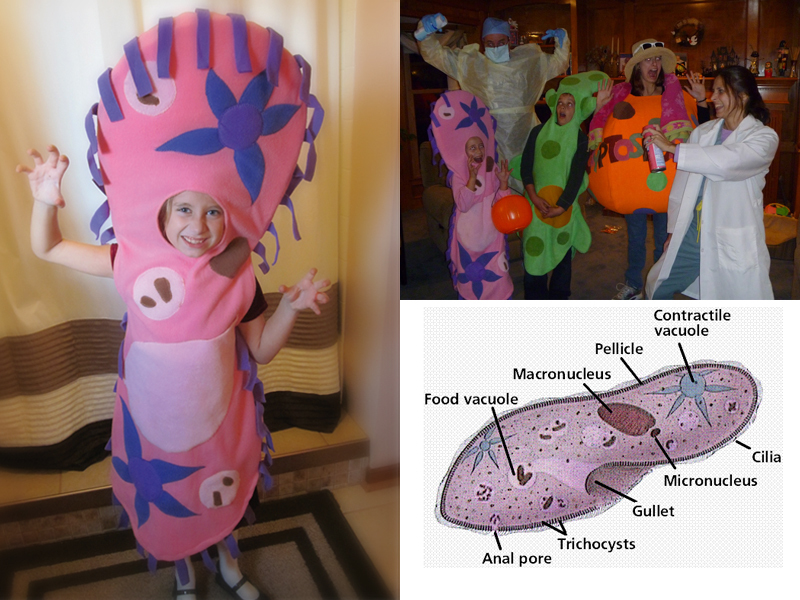
O.k., the kids wanted to be germs this year. One Paramecium, one Amoeba and one Chryptosporidium (the one that closed our pools early here in the mid-West.)

The Paramecium and the Amoeba are very similar so I’ll guide you through the construction of the dreaded Pink Paramecium.

First, I found this diagram online of the typical paramecium and used it as my guide.

Got the idea to place the face where the Macronucleus is and sew a pouch where the Gullet and Food Vacuole are for the treats!

Draw a pattern around the person who will be wearing the costume.

I used two white poster boards taped together for a nice stiff pattern.

Now sketch out the general shape of the paramecium marking where the face, arms and legs will be.

The legs will come through an opening at the bottom like a skirt. The arms will poke through slits in the sides.

The oval for the face should be just big enough for the chin and forehead to poke through. Experiment with scrap fleece to get the right shape.

Take your pattern and trace the outline on the back of the fleece.

Add about a half-inch all the way around.

Cut it out as shown.

Flip this piece (good side up) onto another piece of fleece (good side down) and trace out this shape ignoring the hole for the face. This will be the back half.

Cut out the back half and set it aside.

Before you sew the two halves together, cut out and sew in place the shapes on the front as seen in this picture of the finished costume.

I just used a zig-zag stitch to fasten these. It seemed to hold them in place OK (no pun intended).

Use whatever references you have for ideas. Luckily, the Contractile Vacuoles looked like flowers.

Make sure the Food Vacuole (sack for treats) is stiched in well. Those Fun Sizes add up!

Also, at this point fold inward the flaps around the face opening, pin and sew in place.

Cut out the strips for the Cilia (The purple “hairs” around the sides).

Ours are about an inch wide by around 5 inches long.

This next step gets a little tricky. Place the two halves together with the good side of the fleece on the inside.

Position the Cilia around the edge with about 1 3/4″ space between them.

They should be pointing inward with the outer edge flush with the edge of the body.

Once they are in place, pin all around to secure.

I didn’t put any Cilia where the arms would come out, and at this point don’t put them around the bottom opening.

Sew the two halves together. There will be three seams – one above the head and one along each side below the arms.
Hem up the lower opening, front and back.

Stitch in the rest of the Cilia.

Hem the arm openings.

If you haven’t already, turn the costume right-side out.

Finally, cut out a piece of 2″ thick foam to give shape and support to the top of the paramecium.

Cut an arch to rest on top of the wearer’s head.

I used some additional fluff to give it a little more shape.

Oh, also – bevel the edge (slice off the corners on the outer edge) so it doesn’t have such a squared edge.

I used a long blade (about 6″ long) of the kind that they use for scrapers. Cuts like buttah.

The foam doesn’t slide very well against the fleece, but if you work at it you can muscle it up in there.

Our Germ Team was complete as Mom and Dad sprayed his-and-hers Lysol cans.