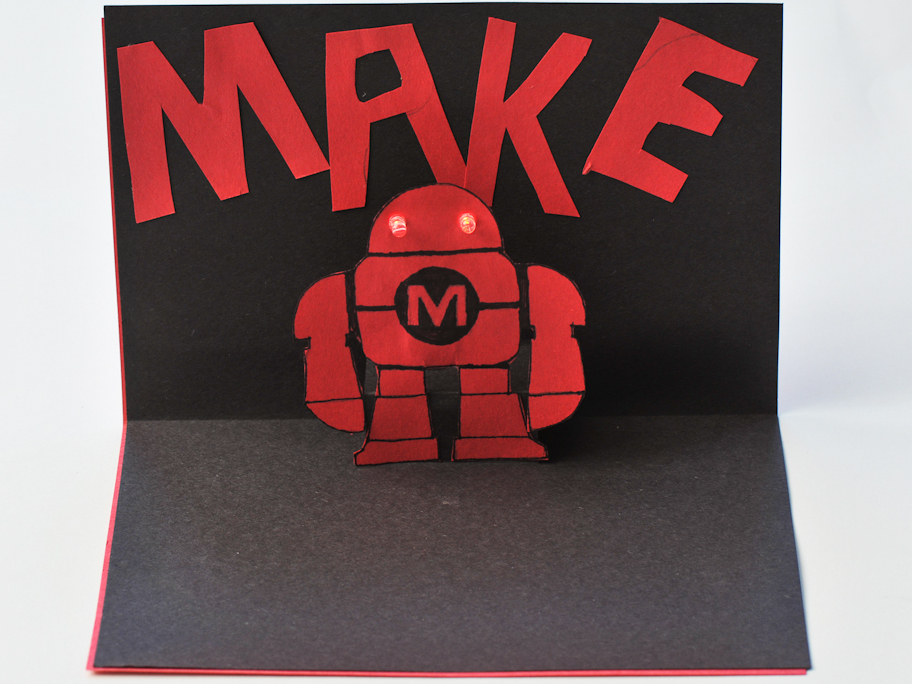
This project combines high-tech and low-tech materials to introduce the concept of “making” (technology on your time) to primary school students.

The project has two parts. The first is “engineering” the design of a pop-up card. The second is adding light-emitting diodes (LEDs) to the design with a simple, safe, 3 –Volt battery to power them.

What will the next generation of Make: look like? We’re inviting you to shape the future by investing in Make:. By becoming an investor, you help decide what’s next. The future of Make: is in your hands. Learn More.

Project Steps

Fold each piece of construction paper in half width-wise, and place one on top of the other.

Decide which piece will be the inside of the card.

On the inner card, make two sets of short, parallel cuts along the fold line, each set placed evenly along the paper.

To achieve the ultimate pop-up effect, unfold the inner card that was just cut, and push the flaps in toward the center section of your construction paper, so that two paper “squares” pop out. When you close your card, you will find empty places on the outside of the paper. Opening your card will then give you the beginnings of the pop-up effect.

Next, glue your second piece of construction paper to the back of the first, making sure the papers line up evenly. This second piece will cover the “empty” places that you just cut to create the pop-up effect. Once the gluing is complete, you can set the card to the side to dry.

On a third piece of construction paper, create your desired design to host your circuit and LED—and be the pop-up design. Your design can be anything you want: a Christmas tree, a fish, a house, a robot. The choice is totally up to you; just make sure it fits inside of the card when closed.

Note: There is really no wrong place to put your LED and circuit. If you wish to have the background of your card light up, you would enclose the circuit in between your two pieces of construction paper before gluing them together, instead of your cutout design. For this example, however, the LED and circuit are placed on the pop-out design.

When you are creating your enclosed, pop-up design, you will want to make sure that you don’t make it too big! You will need to note the distance between where the end of the pop-up tab begins and where the bottom of the card ends.

You can also make designs easier for students by making tracers or stencils. All you would need is cardstock, thick paper, or recycled office folders.

To add the LEDs, first choose where to place the LEDs on the design–it doesn’t matter where they go just as long as you have enough room to place your circuit on the back. Then poke the leads through the construction paper of the design.

To prevent the leads from touching, make a separate hole for each lead. Turn the design over and fold the leads down flat.

Make sure the positive lead (the long end) is separated from the negative lead, & make sure the negative doesn’t touch the positive & vice versa. If you have more than one LED in the circuit, group the positive & negative leads close to each other. If needed, add a piece of tape or mark the paper with a pencil where the positive lead is located.

Now create the circuit using copper tape. The positive and negative leads will need to reach each side of the battery. The copper tape serves to make that connection.

Place small strips of copper tape individually under each lead.

Use a longer piece of copper tape under the leads farther away from the battery. Make sure the positive leads and the negative leads are grouped together and on separate sides from each other.

Tape down the leads with more copper tape or regular Scotch tape so they lie flat.

In the next step, the negative and positive leads must connect to the negative and positive sides of the battery, respectively. For example, place the negative side of the battery down where the negative leads all meet so that the battery is touching them all.

Then, on the positive side of the battery (marked with the “+”), tape down a piece of copper tape facing down, hanging over the battery far enough to reach the group of positive leads.

Because the glue on the back of the copper tape works as an insulator instead of a conductor, you will need to turn a piece of copper tape upside down & tape the smooth, non-glued side down. In this picture example, you can see the copper tape being taped to the positive side. There is extra copper to make the connection to the positive lead.

Now tape down your battery to the respective leads and make all necessary connections.

If everything is positioned correctly and the correct sides are touching the correct group of leads, the LEDs will light up. If not, consult the “Paving Bumps in the Road” section below. If it works, tape the battery in place with Scotch tape.

Voila! Your card/design should now light up!

Glue your design (once it has been lit) to the inside of your card.

Decorate as you see fit! This step can come at any point during your process. The background may be easier to decorate without the pop-up glued to the inside.

Here are a few more examples!

When completing this project with students, it’s always a great idea to let them play with and explore how the materials work, on their own. For example, give the students the LEDs and batteries without any explanation and challenge them to make the LED light up.

Let students make mistakes in how to align their LED leads. Show them how to use the battery to test which lead is positive. The positive lead is the one that is touching the + side of the battery when the LED lights up, and it’s also the longer lead on the LED. If it doesn’t work, the leads may be reversed.

Conclusion

Hints:

• When completing this project with students, it’s always a great idea to let them play with and explore how the materials work, on their own. For example, give the students the LEDs and batteries and with out any explanation and challenge them to make the LED light up.

• Let students make mistakes in how to align their LED leads. Show them how to use the battery to test which lead is positive. The positive lead is the one that is touching the + side of the battery when the LED lights up, and also the longer lead on the LED. If that doesn’t work, the leads may be reversed.

• Challenge the students to prevent a “short circuit.” Tell them nothing from the positive side can EVER touch anything from the negative side. The tricky part is that this includes the battery, itself. When connecting the conductive copper tape to the top of the battery, it usually ends up touching the sides as well, leading to a short circuit unless an insulator is placed on the side to protect it. Hint: regular scotch tape can serve as both an insulator and a fastener to keep the battery attached to the card.

Paving bumps in the road:

So, when I decided to take on the task of creating an awesome pop-up Make Robot card, I came across a few bumps in the road. To make this project easy and simple for you, I am sharing those tricky spots with you in hopes that your project will go smoothly (especially if you are working with students).

• Making tracers for designing the inside of the card can give students more direction when trying to figure out what to make.

• With the design you have chosen, make sure that you aren’t making it too big! You will want to measure from your card’s bottom cut out (essentially from where you are gluing on your design to the edge of the bottom of your card).

• When creating your circuit, you should note that the adhesive on the bottom of your copper tape could potentially cause your circuit to not work at all. It is working as an insulator and not a conductor. You will know this is the case after you double check to make sure no cross connections have been created (positive and negative leads touching, for example). To resolve this dilemma, take a piece of your copper tape with the adhesive cover still connected, and flip it upside down. Then, take a piece of scotch tape and tape the copper onto the lead. The adhesive side should be facing you. Then tape the other side of the copper tape on the battery. That should do the trick!

The original inspiration for awesome LED-spangled cards is http://pdxyoungmakers.com. You will find the PDF project under the "How To" category. There are many websites and books available on how to design simple and complex pop-up cards. For other pop-up card ideas visit Enchanted Learning.