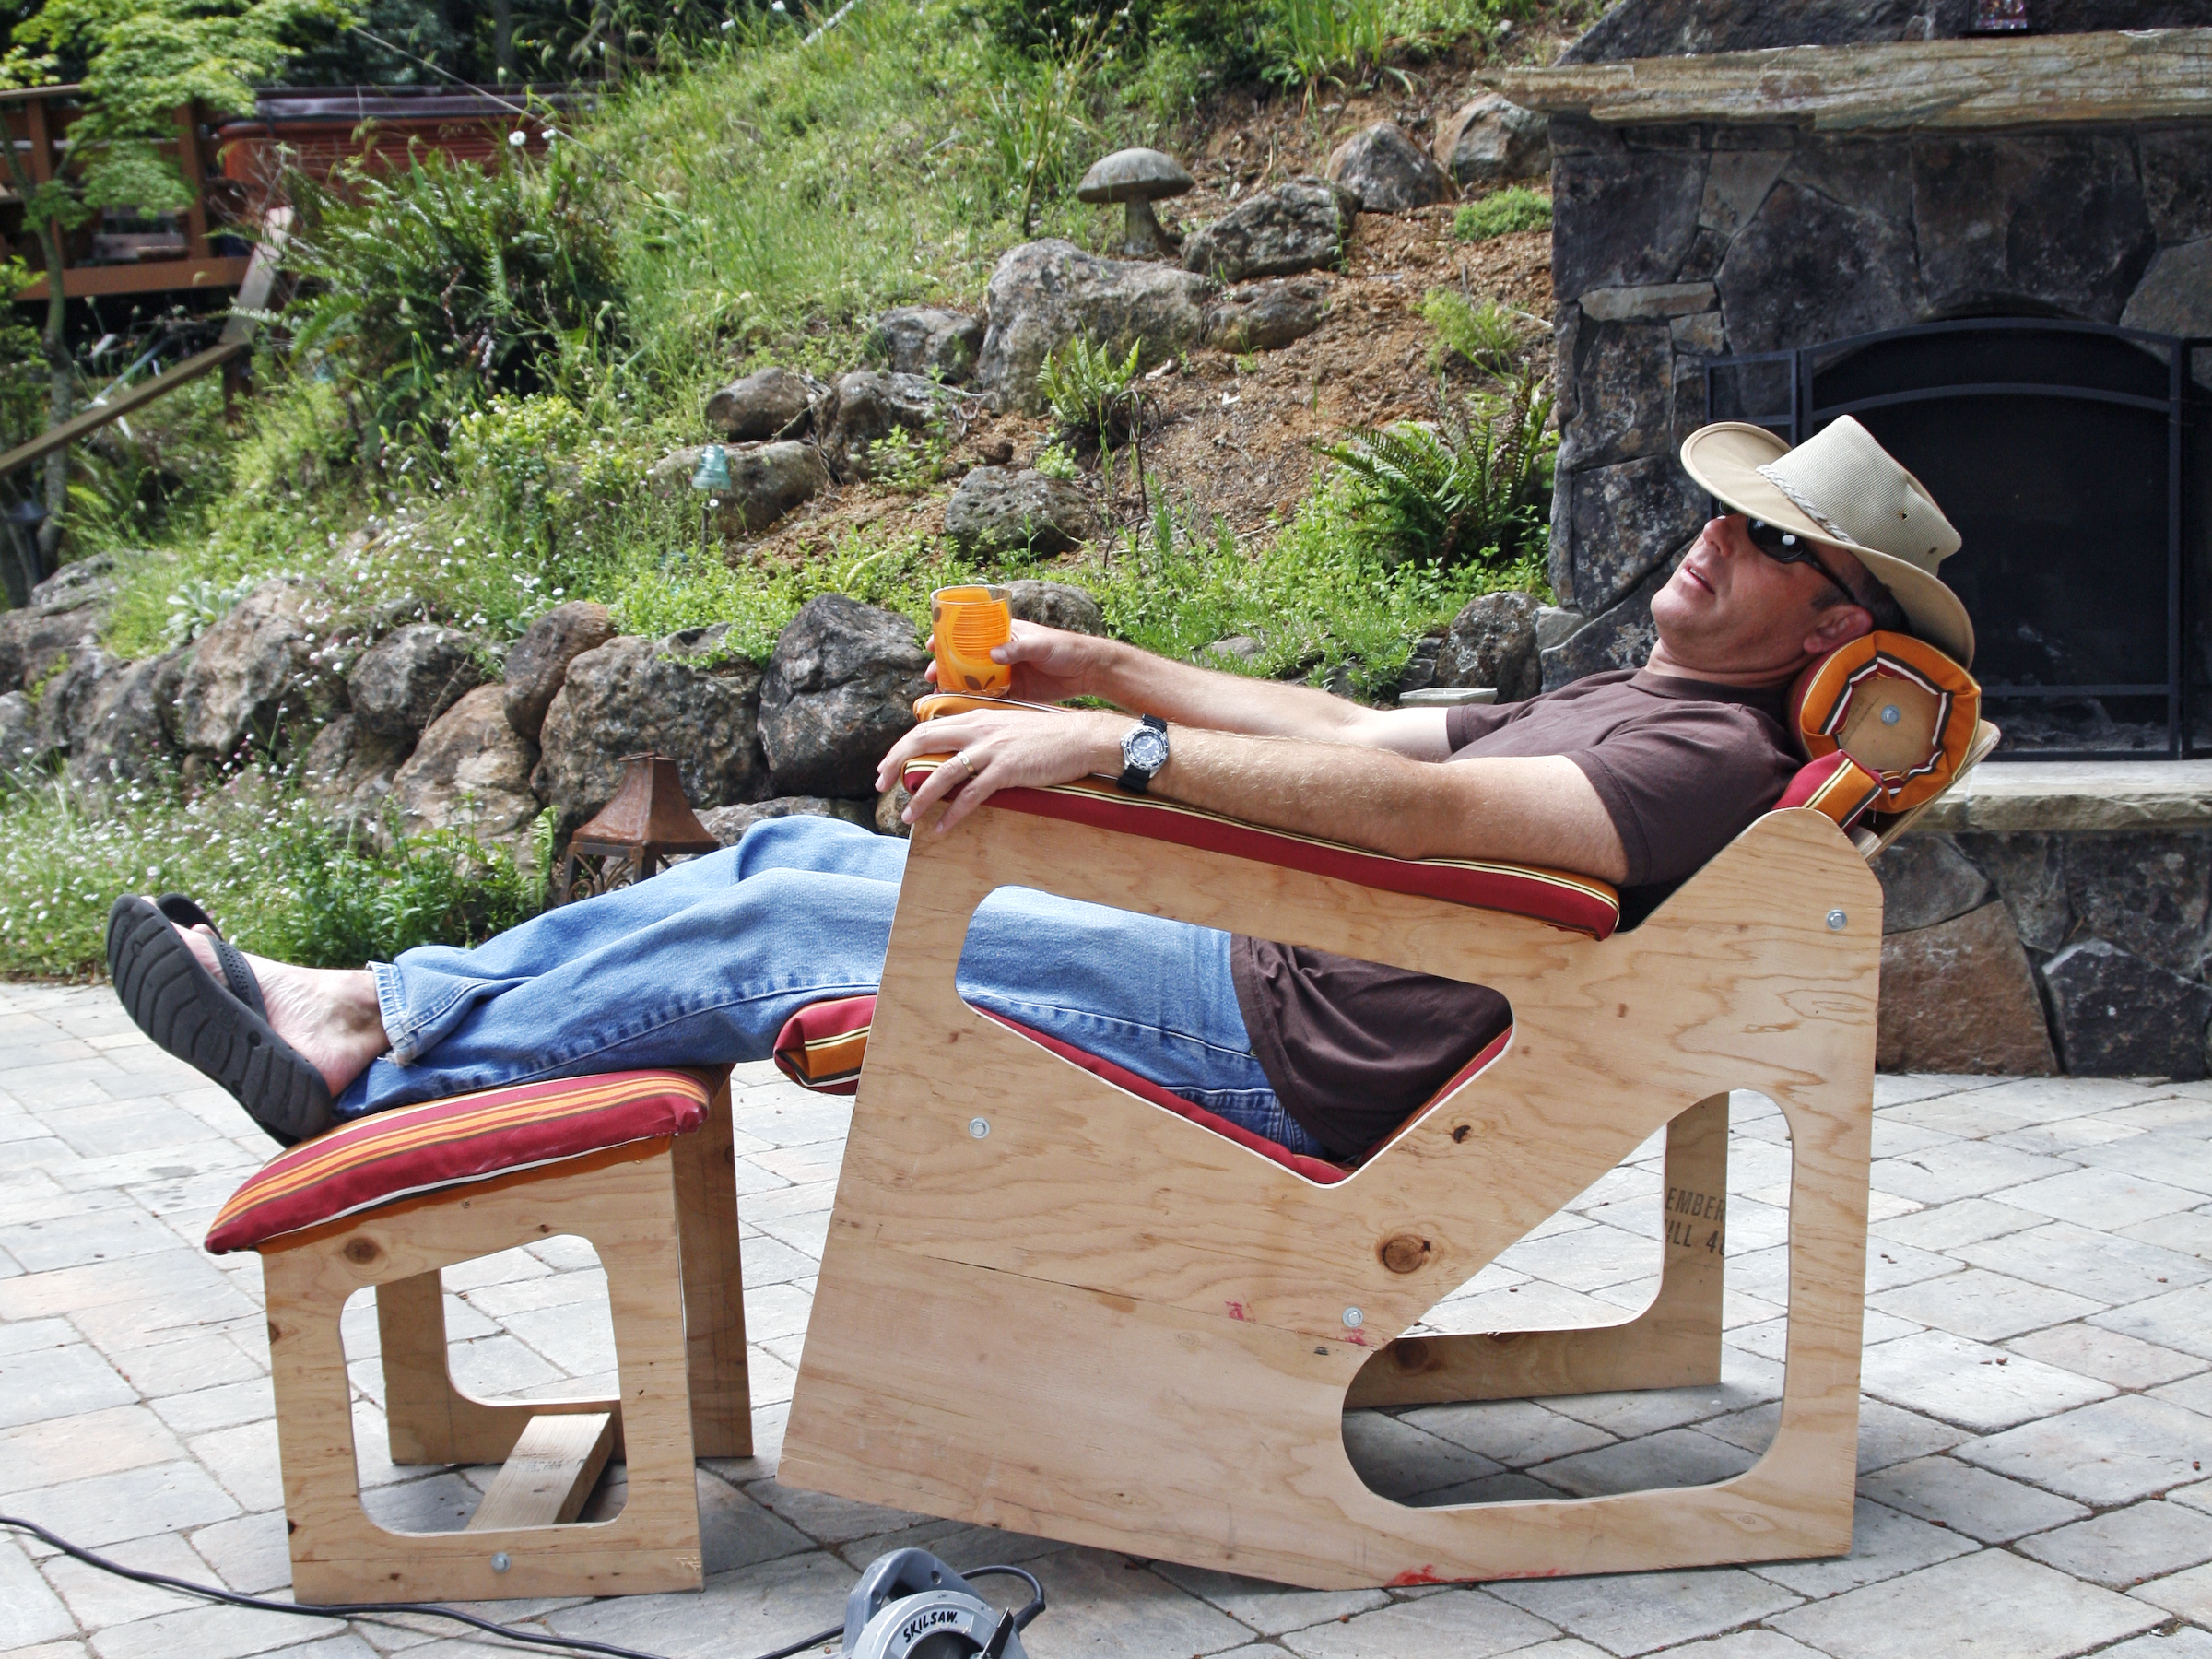
Like origami, single-sheet plywood projects transform a standard plane into countless 3D objects. Generations of designers have worked within this form, laying out cleverly fitted pieces that make furniture and toys with little or no wasted wood. But can a chair be comfortable, look good, recline, disassemble for compactness and portability, and still be made from just a single sheet of plywood?

With a determination borne of frustration and frugality, I set about designing a chair that would meet all my requirements. I began by making a crude study model, with all body-supporting surfaces adjustable: the seat, the back, armrests, headrest, footstool, the angle between the seat and back, even the overall size. The model’s only given: it would use a set of standard patio chair cushions and one sheet of plywood.

Somewhere in the middle of seemingly infinite adjustments, I discovered that recliners really are much more comfortable than upright chairs, so I threw reclinability into the mix as well. Finally I found a combination that fits — ergonomically, esthetically, and economically. It’s even been sleep-tested. I call it the Rok-Bak chair.

The Rok-Bak is very comfortable, easy and inexpensive to build, can be assembled or disassembled in a few minutes, and can be stored and moved about easily, taking up very little space.

If you’re really ambitious, you can upholster your own cushions (as I did with expert help from my brother Phil), as well as the headrest and footstool, for a perfectly matched set. The upholstery techniques are similar for most any fabric. You can cut the chair parts with a jigsaw and a circular saw. Fabric work can be limited to cutting with good scissors and making 1 long seam — with either a sewing machine or fabric bonding tape — then stapling in place.

You’ll also need additional hardware and staples. You should decide at the outset which configuration you like: basic or Rok-Bak. Keep in mind that the Rok-Bak is quite usable rocked forward. Once you cut the large bottom cutout, you can’t change the chair back to the basic configuration. However, you can later convert basic to Rok-Bak.

Since the A side of the plywood (the good side) faces outward on the chair and stool, the C side, with its knots and other imperfections, will be almost completely hidden.

What will the next generation of Make: look like? We’re inviting you to shape the future by investing in Make:. By becoming an investor, you help decide what’s next. The future of Make: is in your hands. Learn More.

Project Steps

1. Make the plywood pieces.

Start by using a pencil to lay out the plywood pieces on the C side of the plywood. Why? Because we’ll cut the parts out with a jigsaw (and possibly a circular saw), and we want to keep the A side (think “appearance” side) splinter-free. Both saws’ blades cut on the upstroke, so any splintering will be confined to the (mostly hidden) C side.


1a.

You should lay out only one side of the chair and footstool. Later you’ll use it to trace the other side, making sure they are mirror images, as shown in the layout drawing. Use a standard 15oz can as a radius (about 1½”) template for corners. A sharp jigsaw blade should have no trouble following that radius.

To conserve plywood, you can skip laying out the footstool top. It can be pieced together later from the chair-side cutouts.

You must cut the top corner radius of the chair side with a jigsaw; a circular saw would nick up the footstool side.

1b.

Suspend your plywood on a few supports. Scraps of 4×4 wood or even paint cans (if they’re the same height) make good supports. Position them, obviously, out of the projected path of the saw blade.

Cut 1 chair side and 1 stool side. Start by jigsawing out the cutout under the arm. Drill a 3/8″ starting hole from the C side — inside of, and close to (but not on), the layout line. Use a scrap of wood on the exit side of the hole to prevent splintering. Then insert the jigsaw blade into this hole and cut as usual.

Both chair configurations begin with cutting out the sides as shown on the layout drawing. They can be used as-is for the basic chair. If you’ve decided to build the Rok-Bak, we’ll cut the V-shaped bottom edges and bottom cutouts later.

It’s a good idea to use a circular saw on the straight cuts, for speed, accuracy, and to minimize sanding. Notice that the gap between plywood pieces on the layout is at least 1/8″. Thus one cut serves 2 pieces.

You can minimize jigsaw splintering by using a splinter guard that snaps into the saw’s footplate. Also, use new blades designed specifically to cut plywood, and if your jigsaw has multiple modes, set it to straight up-and-down rather than orbit mode. The cutting will go slower, but you’ll get far fewer splinters.

1c.

After cutting one each of the chair and stool sides, sand all the edges smooth. Use a sanding drum accessory in your drill if you have one; it will ensure nice, accurate, rounded corners that blend smoothly into the straight edges.

Now trace around the finished sides onto the plywood sheet, as shown in the layout drawing and photos. Once more: you must lay out mirror images so that the good side of the plywood will face out on the finished chair. Cut out the remaining sides.

Lay the chair sides face to face with the bad surfaces out, and drill the three ¼” holes for attaching the sides to the cross braces. To minimize splintering, place scraps of wood under the side where the bit will exit. Repeat this process for the mounting holes in the stool sides.

Cut the chair’s seat and back 22″ wide to accommodate standard-sized patio chair cushions. For narrower cushions, adjust the widths accordingly. Add 3 countersunk holes to the back, following the layout.

Cut out the footstool top and the headrest support, backstop, and disks.

2. Make the cross braces.

Next cut three 22″ lengths of 2×4 for the chair. These will be cross braces A, B, and C. You’ll modify A and B to accommodate the headrest and backstop. (Again, if your cushions are less than 22″ wide, adjust the length of the 2×4s to match the width of the seat and back.)

After cutting, draw an X on all the ends of the 2×4s, corner-to-corner. At the center of each X, drill a 5/32″ hole at least 2″ deep.

Cross brace A: If you plan to make a headrest, you need to shape a mounting surface for the headrest support piece. Using a hand or power plane, create a smooth, flat 1½”-wide surface, at least 10″ long, at approximately the angles shown. (Easier would be to cut it on an adjustable-table band saw, for the entire 22″ length of the brace.) The 53° and 37° angles ensure that the headrest support is vertical before the chair is rocked back.

Cross brace B: Attach the backstop, a 22″×1¼”×½” strip of plywood that will support both seat and back pieces. This extra piece of plywood catches the bottom of the back, which then stops the seat. Use three #8×1½” wood screws, spaced approximately 8″ apart.

Cross brace D: For the footstool, cut a 15″ length of 2×4 and drill holes in the ends as you did on the other braces. We’ll make the other miscellaneous parts after test-assembling the chair.

3. Assemble the basic chair.

Prop the sides apart while you fasten the cross braces between them using the lag bolts and washers.

Don’t scrimp on the size of these bolts, or your chair and/or stool could disassemble itself dramatically! Before you add the seat and back pieces to the chair, check for smoothness of all surfaces and edges. This is not only an appearance issue, but an obvious comfort issue as well.

Drop the back (3 screw holes up) and seat (any orientation) into their respective positions. Notice that the bottom of the back fits between the rear edge of the seat and the backstop on cross brace B. Do not sit yet!

With the seat and back pieces flush with the wide side of all 3 cross braces, fasten the back to cross brace A with three #8×1½” flathead wood screws. These screws prevent braces A and B from rotating; your weight will keep brace C fixed.

Now throw in a patio chair cushion set and give your chair a test-sit. The back cushion should rest on top of the seat cushion, whether they’re a stitched assembly or separate cushions. I’m 5’11”, 150lbs, and the chair fits me perfectly. If you’re shorter, you can trim the sides along the bottom so that your feet will be well supported when you sit in the chair.

If you’re sure you want to build only the basic configuration, you can make the large bottom cutouts in the sides. However, if you’re building the Rok-Bak version, leave the sides solid for now.

Don’t be tempted to make cutouts in the sides under the seat. This will almost certainly make the chair too weak and wobbly.

4. Make and attach the arms.

The only thing tricky about adding arms to the chair is the mounting itself. Each side of the chair will be taking 5 screws 5″ apart, exactly centered in the top edge, which is ½” wide. If these holes aren’t drilled properly, the drill bit could break out the side.

You can control your drill bit better if you make a drill bit guide. It can be a piece of sheet metal, bent at a right angle or attached to a wood block. In any case, drill a 1/8″ guide hole so that when using the guide, the guide hole will be exactly in the center of the plywood edge.

Draw lines on the top edge of the chair sides, then using the drill-bit guide, drill 5 holes straight down into each side.

Make the arms from 1×4 fir or pine. If you plan to pad and cover the arms, this wood doesn’t need to be the best quality, but if you’ll leave it exposed, choose decent pieces of solid wood.

Now position an arm with the front of it overhanging the front of the chair side by ½”. This overhang is necessary for stapling the fabric if you pad the arms. Mark the bottom surface of the arm to line up with the holes drilled in the top of the side. Drill the screw clearance holes from the bottom, which should ensure that the screw holes line up exactly. Repeat for the other arm.

Countersink the screw holes from the topside of the arms so the screws will be slightly sub-flush. Mount each arm with five #8×1½” flathead wood screws.

If you don’t want to pad the arms, you could round the top-front corners of the arms with a ¼”-radius router bit, or just sand something close. If you do want to pad the arms — highly recommended for comfort and appearance — that will be the very last step in building the chair.

5. Make the footstool assembly.

If you’re making just the basic chair configuration, you can survive without a footstool. But for extra comfort, especially with the Rok-Bak, you’ll need one.

Cut the parts and assemble the sides and cross brace D. You can make the top as 1 piece or piece it together from cutout material. Assemble the top and the 2×2 runners.

You can throw a pillow on the stool and help it stay in position with velcro, but covered padding looks more professional. Either way, the pillow or covering fabric should match your chair’s cushions (if they’re striped, you might choose a solid that’s one of the stripe colors).

If you’re padding, cut 1½”-thick foam to match the top exactly. A band saw or electric knife works well. Cut the fabric about 4″ oversize on all sides, pull it reasonably tight (the foam should compress slightly), and staple it in place. Miter the corners. Use a minimum of staples at first, then add more as necessary to keep the fabric evenly taut, the foam reasonably compressed, and the corners neat. Trim as shown.

6. Make the headrest.

A well-padded headrest is key to a comfortable chair. Cover it with the same fabric you used for the footstool. For attaching the finished headrest to its support, you’ll sew on velcro at least 1″ wide. Adhesive velcro doesn’t stick well enough to fabric.

Cut the fabric to 22″×22″. Secure the seam and velcro strip. You have a choice of sewing or using fabric bonding tape. Use a sewing machine if you can. However, I found that Stitch Witchery tape makes a surprisingly strong seam, at least on denim.

If you’re sewing, sew an 8″ velcro strip to the visible side of the fabric, about 1″ from one edge, centered. Sew all the way around the velcro.

Fold the fabric in half, wrong side out, and sew a 22″ straight seam about ½” from the open edges. Turn the fabric sleeve right side out. It should be about 7″ in diameter.

If you’re taping, fold the fabric in half, wrong side out, and place a 22″ length of Stitch Witchery tape between the open edges. Follow the instructions on the package; the operative words are hot and damp. The joint must be steamed to be strong (don’t forget the damp cloth). Let it cool before testing.

Turn the fabric sleeve right side out. It should be about 7″ in diameter. Place the 8″ velcro strip adjacent to the seam (on the outside of the sleeve), with one or more strips of bonding tape between the velcro and the fabric. Iron the fabric side, not the velcro side. This means you must put the iron in the sleeve.

6a.

Cut a piece of 1½” foam 19″×12″. Tightly roll up the foam from the short end, insert it into the fabric sleeve, and let it unroll. About 5″ of the sleeve (22″ – 12″ = 10″/2 = 5″) will overhang each end. The 2 ends of the foam should butt together inside and be “circularizing” the sleeve.

On one end, poke the surplus fabric over the foam and into the center hole. Cut the wood dowel and drill both ends as shown. Attach one 4¼” disk to the end of the dowel with a 2½” lag bolt and washer.

Press the dowel-disk assembly, dowel first, into one end of the cylinder. Gather the material as you press, and space the folds neatly around the inside circle. Stop pressing when the outside face of the disk is about 1½” from the end.

From the other end, stuff at least 4oz of Holofil or other stuffing between the dowel and the inside wall of the cylinder. Hold the other disk to keep it from being pushed out the end. Try to fill all voids, keeping the dowel in the center. The more stuffing you can push in, the more comfortable your headrest will be.

Fold the surplus material over the foam at the other end.

6b.

Put a lag bolt and washer through the hole in the second disk, then push the tip of the bolt into the hole in the end of the dowel. Tip the disk inward and press it into the foam core, keeping the fabric as neat as you can. You can press the other end’s disk in a little farther to make it easier.

Tighten the second lag bolt with a ratchet wrench, while holding the first bolt with pliers. Neaten your fabric folds at both ends.

Staple 2 small strips of velcro to the headrest support near the top, so their outside edges are 8″ apart.

Mount the support to the bevel on cross brace A, exactly in the center, with three #8×1½” screws. Temporarily stick the headrest to the velcro strips on the support and give the chair another test-sit.

Optional: Convert to Rok-Bak chair.

To allow the chair to rock back, the bottoms of the sides must be cut into shallow Vs. The tipping point of the V is critical. Your Rok-Bak chair must:

  • be completely stable when rocked backward; do not exceed the 5½” rocker dimension on the drawing.
  • stop, with a small thump, in the reclined position.
  • not lean prematurely; it should require a light push with your feet, but not be difficult to rock backward.

Temporarily disassemble the chair so that you can make identical, accurate cuts (preferably with a circular saw) on the bottom of each side. Make it a shallow V, and if you’re about the same height and weight as me, you can make the bottom cuts as dimensioned here.

7a.

If you’re of a different build, you should make a few trial cuts and reassemblies, taking longer and longer cuts until you arrive at the right balance.

You must not exceed the 5½” rocker dimension for safety and stability! After each pair of cuts, reassemble the chair — with cushions, headrest, and arms — and try it. You’ll get pretty good at loosening and tightening lag bolts. (Use a 7/16″ hex driver in your drill to speed things up.)

All is not lost if you cut too much off; you can always take a little off the front legs of the Vs to make them longer.

Once you get the tipping point right, you can finally make the bottom cutouts in the sides. This will cause the chair to be slightly more stable in the forward position, which may turn out to be a good thing.

Draw the cutouts (on the C side, remember?) of both chair sides, using the 15oz can as a radius guide. For strength, it’s important to keep the bottom of the cutouts at least 2¾” from the bottom edge of the chair. Carefully make the cutouts with a jigsaw.

8. Finish the wood and pad the arms.

Remove the cushions, headrest, seat, and back. You don’t have to disassemble the chair. Sand all exposed surfaces down to about 120-grit paper, then spray (or brush, if you must) with varnish or clear polyurethane, such as Deft. Several coats, lightly sanded between each, usually yield a nice finish.

Finally, to pad the arms, cut ¾”-thick foam to the size of the arms (you can also use 1″, or you can rip 1½” in half with a band saw), and lightly mount it with spray adhesive or double-sided mounting tape. Cover the arms with fabric that matches the footrest and headrest. Trim the underside neatly.

Use it!

Now drop in your cushions, stick the headrest on, and pull up the footstool. Take a seat and make yourself comfortable.

As you would with any rocking chair, watch out for the cat’s tail, then rock back and dream of your next project: adding speakers to the headrest.

Conclusion

This project first appeared in MAKE Volume 19, page 88.