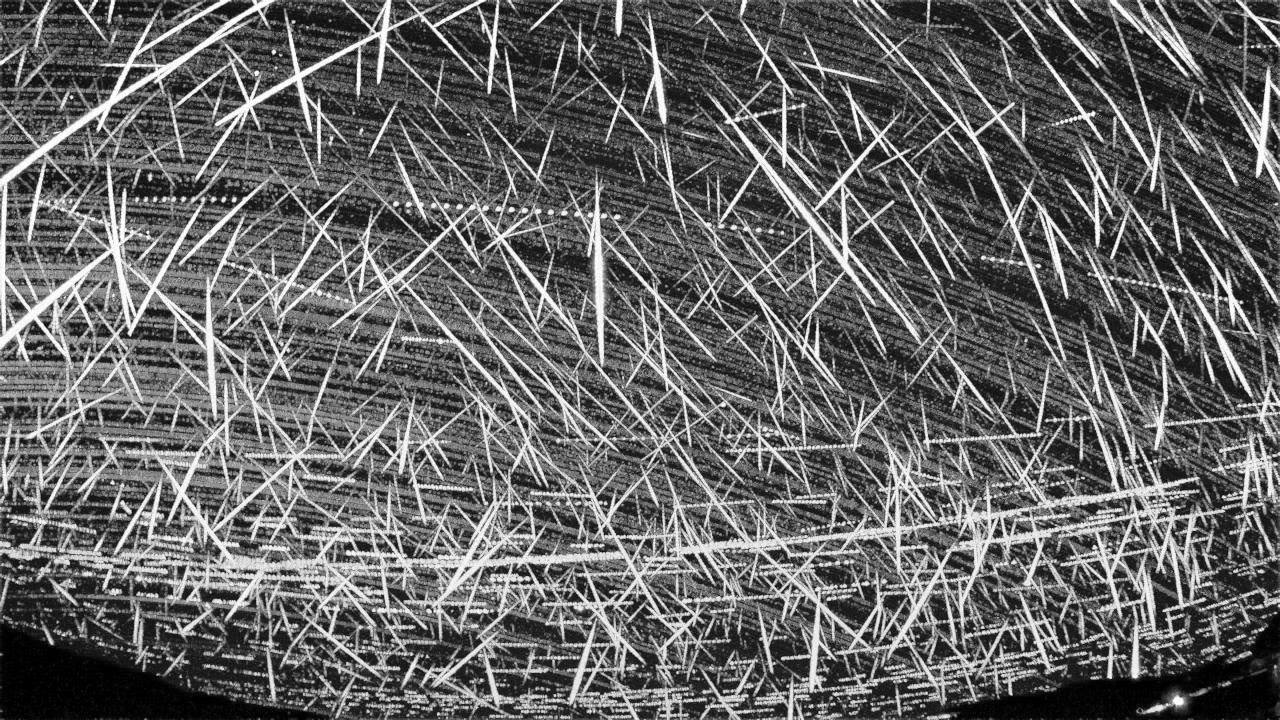
A single-station stack of nearly 1,670 meteors observed on a single night of the 2020 Geminid meteor shower.
This article appeared in Make: Vol. 77. Subscribe today to get more great projects delivered to your mailbox.

Every day, about 40 tons of extraterrestrial material enters the Earth’s atmosphere to produce meteors that we see in the night sky. These “shooting stars” often appear as faint streaks of light, but occasionally produce brilliant light shows that can momentarily turn night into day. Although they may look close enough to touch, meteors typically occur at heights of 70–110km. And since they’re travelling at hypersonic speeds of 11–72 kilometers per second, even if you could touch them, it would be a bad idea.

So how can we learn more about the origins of the billions of meteoroids hitting our atmosphere each day? Well, two of the most basic techniques are radar and optical observations. Setting up a meteor orbit radar costs millions of dollars, so it’s not feasible for the average citizen-scientist. Good optical observations, however, can be made cheaply with a few common pieces of off-the-shelf equipment.

Don’t let the low cost fool you — what we describe here is a project that will help you build a globally connected meteor camera that can collect science-grade data suitable not only for orbit determination, but also for helping mitigate satellite impact risks, predicting meteor storms, and recovering meteorites.


What will the next generation of Make: look like? We’re inviting you to shape the future by investing in Make:. By becoming an investor, you help decide what’s next. The future of Make: is in your hands. Learn More.

Project Steps

The Global Meteor Network

For meteor scientists, video observation is one of the easiest and most cost-effective ways to gain a better understanding of the evolution of material in the Solar System. Direct asteroid sampling missions such as Hayabusa-2 and OSIRIS-REx are very expensive, while meteorite recovery is biased and represents only a tiny fraction of the material in the Solar System. Video meteor observations, on the other hand, have an entry barrier so low that nearly anyone can produce high-quality data

Even so, most recent meteor camera networks have been expensive, geographically limited, and fragmented, with little communication between them. To solve these problems, the Global Meteor Network (GMN) was born.

There are now more than 300 Raspberry Pi Meteor Stations (RMS) operated by citizen scientists in 22 countries around the world, connected through the GMN with the long-term goal of characterizing the apparent point of origin in the sky (the radiant), total number, and size distribution of meteors entering our atmosphere. Hundreds of thousands of meteor orbits have already been logged through the work of citizen scientists and, thanks to their dedicated work, it won’t be long before we’re talking about millions of orbits!

Hardware

Although the hardware required for imaging meteors is fairly basic, there are a few things to keep in mind when making a meteor camera.

First, meteors are typically faint and barely visible with the naked eye, so the camera sensor needs to be sensitive to very low light levels and paired with a fast lens. Our favorite IP camera modules, at the moment, use Sony’s 1/3″ IMX291 and IMX307 sensors. Although these can be bought for $35–$50, be aware that a current shortage of certain HiVision SoC chips means that prices fluctuate.

Lens-wise, a focal length of between 4 and 8mm gives good sky coverage while speeds faster than f/1.0 allow faint meteors to be captured. Choosing the best lens starts by calculating the field-of-view for your sensor:

FOV = 57.3 / focal_length * binned_pixel_size_mm * # pixels

and considering any obstructions (trees, buildings, etc.) in your preferred pointing direction.

A 4mm lens, for example, paired with an IMX291 sensor (running at 1280×720) will have a field of view of about 80°×45°. In practice, however, you’ll find that some nominal 4mm lenses are actually 3.6mm and you’ll get a larger field (88°×47°). Other possible lenses and their properties are given in Table 1.

Table 1

Commonly available lenses tested with the RMS running at 720p

FOV refers to the field-of-view

The pixel scale is calculated at 720p resolution

m @100km refers to the spatial resolution at a distance of 100km

M*limit is the limiting stellar magnitude

The Raspberry Pi 4B with a good SD card is a must. For our installations we typically use plastic or aluminum enclosures with a fan to keep the CPU cool. You can also 3D print your own RMS enclosure, but don’t forget the fan! Or, you can use an aluminum case which acts like a passive heatsink and has no fan. Apart from that, the rest of the design is flexible with the best choices often being the parts that are currently available at the best price.

Software

Written in Python, the RMS software is open source and provides a (nearly) complete toolkit for running a modern, professional meteor camera. Each night, RMS automatically starts up a half hour before astronomical twilight and turns off a half hour after dawn. The H.264 video from the camera is decoded and streamed through a real-time fireball detector and compressed into what is known as a Four-frame Temporal Pixel (FTP) file. This clever format saves blocks of 256 video frames as a set of four images: pixel maximum, maximum pixel frame number, pixel average, and the standard deviation.

Star and meteor detection then run on the average and standard deviation frames until the queue of FTP files has been fully processed. Afterward, the extracted stars are used to automatically update the image scale solution and absolute brightness corrections for each image set so that the meteor detections can be properly calibrated. And then, once the results have been finalized, they’re uploaded to the GMN server at Western University in Ontario where they’re correlated with other nearby stations so that meteor orbits can be computed.

The RMS software is open, portable, and extensible. It should work with any IP camera that works with GStreamer, giving you a lot of opportunity to experiment. And if you ever need help, an active GMN forum is full of experienced RMS operators who likely have answers to your questions.

Build Your Raspberry Pi Meteor Station

Assembling your camera is straightforward and should only take an hour or two. Here’s an overview; for more details see our complete build instructions at makezine.com/go/RMS-build.

a. Remove the IR filter

If your lens mount has an IR filter, you can push the filter out with a blunt object. Take care to protect your eyes as it will likely shatter

b. Mount the Camera

Attach the lens mount and lens to the camera module and then mount the camera assembly inside the weatherproof enclosure.

c. Connect the Cable

Run the CAT5 cable through the cable gland, wire up the connectors, and plug them into the camera module.

TIP: A pointy pin comes in handy after you inevitably assemble the cable connectors incorrectly and need to take them apart.

d. Configure the Camera

The camera is ready for focusing and setup with a PC. Using CMS security cam software (hasecurity.com) or Internet Explorer (there’s a blast from the past!), you’ll turn off anything that automatically adjusts gain, exposure, and dynamic range.

Before you do this, though, you should focus the camera on a distant object. Then manually set your resolution to 720p (the Pi can’t handle higher resolutions), your frame rate to 25fps, and your gain and exposure time.

Next, the camera’s IP address needs to be set to 192.168.42.10.

e. Set Up the Raspberry Pi

Flash your SD card with one of the pre-built RMS images from makezine.com/go/RMS-images, or install the RMS code from scratch on an existing Raspbian installation, from github.com/CroatianMeteorNetwork/RMS.

Then boot the Pi, set up Wi-Fi, and answer the questions that appear in the RMS_FirstRun terminal window. Once you’ve done this, you’ll make the necessary changes to the configuration file (see READ-RPi4_note.txt on the Desktop).

Finally, plug your camera into the POE injector and from there into the network port on the Pi. Give the camera a minute to boot and then check to see if it’s visible with a ping 192.168.42.10 or an arp -a command.

Reboot the Pi, and RMS will start up and wait for its run to begin automatically just before dusk. Easy peasy, lemon squeezy!

Shooting Shooting Stars

What can you do with your Raspberry Pi Meteor Station? As much or as little as you want! For complete instructions on aiming and using your RMS camera, read the Quick Start Guide.

Hands-off:

In hands-off operation, the software takes care of collecting, processing, and uploading data to the GMN server where it is correlated with nearby stations to compute meteor orbits. And it automatically produces eye-catching meteor stacks, fireball files, and observation reports which you can share on social media.

On Tammo Jan Dijkema’s GMN meteor visualization tool you can also see all trajectories computed from your observations.

Hands-on:

For a more hands-on approach, you might try extending the software to observe satellites, sprites, aurorae, and other atmospheric phenomena.

Or maybe you’ll just use the data from bright fireball events to plan meteorite hunting trips.
Either way, running an RMS is a fun and exciting way to get involved with cutting-edge meteor research.

Conclusion

Learn more at globalmeteornetwork.org, contribute at github.com/CroatianMeteorNetwork/RMS, and share your build at makeprojects.com/project/build-a-raspberry-pi-meteor-camera.