finishedboard_largecp

Milling PCBs has historically been a bit of a trial, with long wait times and expensive board manufacturers. We here at Other Machine Co. like to think we have solved this prototyping problem by producing the Othermill, a tiny 3-axis mill that fits on a desktop and is perfect for PCB milling (among other things!). It’s easy to use and comes with its own free motion planning software, Otherplan.

Here’s a tiny project for a tiny mill. This project will show you the basics of manipulating a file in Otherplan and cutting it out on an Othermill. The same basic process applies to any other board you might want to make.

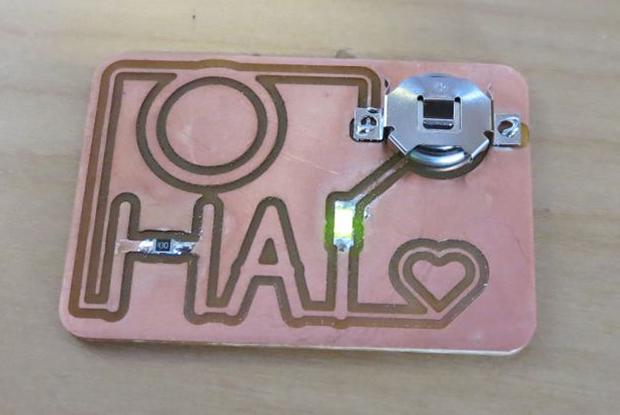
The traditional first project for something like this usually contains a phrase like “Hello World.” This one is so small, however, we couldn’t get “Hello World” to fit in the board, so we call this project “O HAI.”

Simone Davalos is the Project and Support Engineer at Other Machine Co. She has a long history of playing with machines for fun and education, and enjoys breaking things in order to learn about them. Contact her at simone@othermachine.co.

What will the next generation of Make: look like? We’re inviting you to shape the future by investing in Make:. By becoming an investor, you help decide what’s next. The future of Make: is in your hands. Learn More.

Project Steps

Design Your Board

In the CAD program of your choice (we use EagleCAD pretty heavily), lay out your board and components.

Make your board the way you like it, then save it as an EagleCAD .brd file. (or you can download our Eagle files).

There are many nifty tutorials for how to do this available online, see:

Download Otherplan and Import Your File

Otherplan is the free motion planner for the Othermill.

Get familiar with the layout, then import your file. You can use our example file or make your own

Under the plans panel, click on “Import Files”. Your .brd file will render on the machine bed in Otherplan.

Assemble Your Materials

Assemble all the tools in the Tools list to the right.

Make sure Otherplan is launched and has your imported file displaying on the machine bed.

Home the Machine

Make sure the Othermill is powered on and connected to the computer to which you downloaded Otherplan.

Once the Othermill connects with Otherplan, a dialog box will pop up letting you know that the machine needs to be homed. Homing is the term for telling the machine where it is in relation to a certain point on the bed, so it can cut the project accurately.

Click on the glowing “Start Homing” button. The machine will adjust itself so the tool is directly above the lower left hand corner of the machine bed.

Setup Material

Next, in the “Configure” panel, click on “Setup Material…” The “Set The Material Properties” box will appear. Select the material you are using (in this case “Single-Sided FR1”).

With the calipers, measure the length, width and thickness of the board, and insert the dimensions as your X, Y and Z axes. Otherplan will help you keep track of which is which.

Click “Continue”, and then “Done”.

Select Tooling

Directly underneath the “Setup Material” pane, select “Change” in the tool panel. The machine will lower the tool so you can insert or change the tool. The Othermill comes with twin spindle wrenches for swapping out tooling. Insert the 1/32″ end mill. Watch your fingers, the tool is sharp!

Choose “1/32in flat end mill” in the Otherplan drop-down and click on “Continue”.

Verify Tool Height

The Othermill will ask you to verify the tool height. Make sure the tip of your tool is above the bottom of the Z-block, the part of the machine that moves the spindle up and down.

Once you’ve made sure the tool is clear, click on “Locate”. The tool will automatically travel to an unoccupied spot on the bed. Double check that there’s nothing beneath the tool (move it with the jogging keys if you need to), the click “Locate”. The tool will touch off on the bed automatically, and return to home.

Adhere FR1 to Machine Bed

Now that you’ve gotten your machine set, take your FR1 blank and apply some double sided sticky tape to the back.

In Otherplan, in the Move By panel, click on “Unload Material”. This will bring the bed forward.

When the bed is in position, square up the FR1 board to the corner of the bed, and press it down firmly.

Click on “Load Material” and the bed will move back to home.

Mill Your Board

Once the bed is in place, click on “Cut Traces” The Othermill will ask you if you’re sure. Now is a really good time to make sure you have everything you need to hang out for a bit, because you should never leave your running mill unattended.

If you’re all set and ready to cut, click on “Cut Traces” again. The machine will whirr happily and start cutting your traces.

When the machine has cut the traces, make sure everything looks good, and click on “Cut Outline.” This will free your board from the rest of the material.

In the “Move By” panel, click on “Unload Material” and the bed will come forward.

Pop your board off the bed with the cheese knife, and dust it off.

Place Your Components

Now that you’ve milled your board, you’re ready to light it up.

Get our your SMD components. They will be *incredibly* tiny, so don’t sneeze.

Also get out your coin cell battery holder.

Make sure the LED is in the proper position or polarity. In this case, the negative side (anode) has a green stripe. It should point toward the top of the “I”.

The battery holder should be placed on the battery pads, as shown.

Lay everything out on the board with the resistor bridging the gap in the “H”, and the LED forming the dot for the “I” in “Hai”.

Solder Your Components

Once you know how they will be laid out, take the components off the board.

With your solder paste syringe, carefully squirt a tiny bit of solder paste on to your pads (the spots on the board where you laid out your components in the previous step).

With the tweezers, carefully place the components the way you had them before, being very careful not to smear the solder paste (this could cause solder bridges, which is solder in the wrong place.

If you do smear your paste, carefully clean it up with the tips of the tweezers, and wash your hands!).

Heat up your hot plate (you can also use a toaster oven), and when it’s hot (refer to your soldering paste instructions for temperature) carefully place your board on it.

The solder paste will melt. When every spot of solder paste you laid down is *really* shiny, take your board off and let it cool down.

Light Up Your Board!

Once the board is nice and cool, slide your battery into the holder. It should light up the led, and show the world a cheery message.