You must have finished assembling the main frame before you install the soil loading system.

What will the next generation of Make: look like? We’re inviting you to shape the future by investing in Make:. By becoming an investor, you help decide what’s next. The future of Make: is in your hands. Learn More.

Project Steps

Torch the holes for the hopper mounting plate

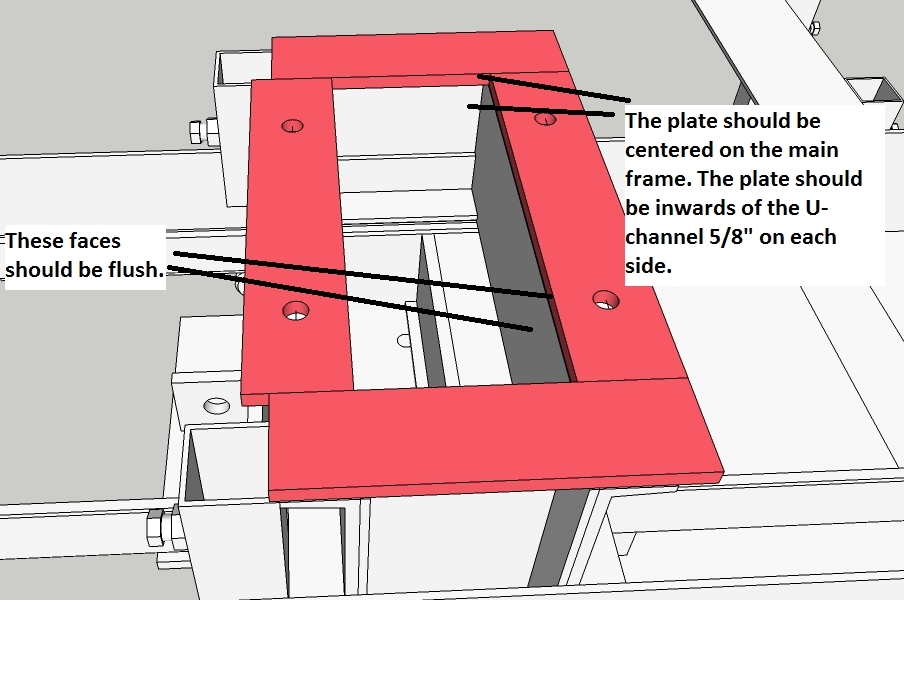
Clamp the hopper mounting plate to the top of the main frame, positioned as shown, with the cutaways positioned by the leg holders.

Clamp it so that the side you grinded down the welds on is touching the main frame.

Torch the holes thru to the main frame.

Check that the fit is good by putting bolts in all the holes.

Grind away all the slag.

Bolt the mount to the frame.

Install hopper supports and prepare shaker mount.

Install the hopper supports into the leg holders.

Make sure you put the support with bolts on it on the correct side (refer to your shaker motor and look where you marked it.)

Their bottom side should be flush with the bottom of the leg holders on the frame.

Make sure they are orientated correctly. See photo.

On the side of the shaker motor that you didn’t weld bolts for, put a bolt (3/4″x1.5″) thru both holes and tighten nuts onto them.

The nut should be on the side of the mount that the motor will be installed to. (see photo)

Tack shaker bolts to hopper support

Place the shaker onto the bolts already welded to the hopper supports.

Clamp the other side to the hopper support.

Use a square to make sure the shaker mount is square with the hopper supports.

Tighten nuts onto the side with the welded bolts.

Tack the bolts to the hopper support.

Make sure you tack them to the hopper support, NOT the shaker mount.

Tack as much as you can from this position.

Weld shaker bolts.

Loosen all the nuts and remove the shaker.

Protect the threads on the bolts.

Weld all the way around the bolt to the hopper supports.

Don’t remount the shaker yet.

Clamp the hopper back to supports and torch holes

Clamp the 34″ tall hopper back to the hopper supports.

It should be centered horizontally between them, and touching the supports all the way down to the hopper mounting plate.

Torch through the holes circled in the diagram, so you torch through the hopper sheet metal.

Torch through it on each side, just enough so you have 2 small holes.

Un-clamp the sheet metal and torch 1/2″ holes for the bolt.

Remount the first plate, and prepare to weld

Grind off the slag from the torching.

Mount the first plate back to the hopper supports.

Use a 1/2″x3″ bolt and a nut with washers on each side.

Lift the side pieces and clamp them to the first plate via the hinge plates.

Minimize the gap between them as much as you can by pushing them together tightly.

Weld the hinge plates to the back piece

Weld it about 50%, as no more is necessary.

Weld in 3-4 inch sections.

Clamp and weld the front piece

Clamp the final piece in place to the other side of the side pieces.

Yet again, minimize the gap between the two.

You may need somebody to get inside of the hopper and push out so you can clamp it well.

Weld the last piece like you welded the first one.

Place the grate and bolt it to the hopper supports

Get a friend or two and lift the grate on top of the hopper.

The front end (with the slots) should be as shown, and the grate should be inside of the hopper on the other side (the side with the nuts).

Have your friend hold the grate in place for the next step, or use C-Clamps to clamp the grate to the supports.

Bolt the grate to the hopper supports (1/2″x 2.5″ bolt and lock nut). Bolt both loosely, and then tighten them.

You’ll need 2 washers on each side, as the holes are slots and a 1/2″ washer will be too small to prevent the washer from warping. Use a 3/4″ washer as the other one.

You may want to use a large nut in place of a washer on the hopper support side. (see photo)
Install the grate supports

Loosely bolt the grate supports to the primary arms

Bolt (3/4″x2.5″ bolt) The grate mounts through the hopper to the grate.

Use a 3/4″ washer where the bolt goes thru the grate support.

Tighten all bolts

Re-install the shaker

Install the motor on the shaker motor mount if you haven’t already.

Place it on the bolts on the hopper supports.

If for some reason it doesn’t fit, torch away whatever metal is preventing it.

Tighten nuts onto it.

Install the Dirt Deflector Plate

Bolt it to the grate.