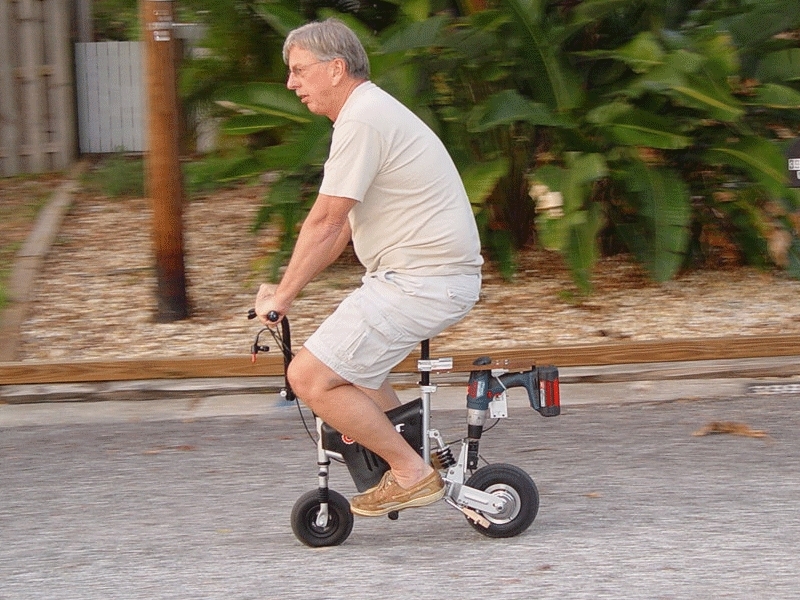
I have a 25′ cruising tugboat in Florida, and I wanted a small, lightweight ride that I could keep on-board for making beer and ice runs when I pull into a marina. After seeing a short segment on TV about a cordless-drill-powered bike at a hardware convention, I decided to build my own.

Behold the result: the Drill Rod. Equipped with a 36-volt drill, this brute accelerates from 0 to 10mph in just 2 seconds and is responsive enough to do tricks like standing on its back wheel.

As for styling, it’s been said that when I’m on my Drill Rod, I look like a circus bear on a tricycle (duly note the photo in Step 1). You will not attract potential romantic partners when riding this. Trust me.

When I started the project, I contacted the company that made the bike I saw on TV and asked if they could just sell me the right-angle gearbox that enables the center-mounted drill to drive the rear wheel. But they refused; they would only sell a finished bike.

I continued looking for ways to build my own. At a flea market, I found a tiny battery-powered bike for kids called the Electric Punk, made by Razor. I bought it for $60 and took it home. With its small battery and motor, I knew it was underpowered for what I needed, and its 7″ rear wheel looked too small to support the weight of an adult.

On flat pavement, the Electric Punk only went 5mph, and it couldn’t even pull me up my driveway slope. But its small frame was perfect for the project.

For the engine, I used a 36V Bosch Litheon drill, which was the most powerful cordless I could find. I bought it reconditioned through Amazon for $219. I also found a nice, small right-angle gearbox (1:1 ratio) made by Torque Transmission, model #RAB-1, which was rated at 1/3HP at the drill’s maximum speed of 1,800rpm.

What will the next generation of Make: look like? We’re inviting you to shape the future by investing in Make:. By becoming an investor, you help decide what’s next. The future of Make: is in your hands. Learn More.

Project Steps

Beef up the rear wheel.

I took the Electric Punk apart and went to work. I stripped the plastic shells, the battery, the motor, and the motor thumb trigger on the right handlebar. I threw the useless little motor in the trash.

First I replaced the 7″ rear wheel with a larger rear wheel and sprocket assembly for the Razor Mini Chopper, which takes a 9″ tire. This would carry weight more comfortably. I don’t know if this was strictly necessary, but I knew I wanted it to make the bike look cooler.

To fit the 9″ wheel onto the bike, I needed to relocate the axle farther back on the swing arm, so I drilled new axle holes about ¾” behind the original ones, and then moved the brake pads back to match.

Mount the right-angle gearbox.

Next came the gearbox. I screwed an 18-tooth sprocket to the right side of the gearbox, and then mounted the box where the bike’s original motor attached.

The original mount was a plate that slid up and down for adjusting the chain’s tension, which meant that I couldn’t just drill holes through and bolt the gearbox on with nuts on the other side. So I made my own mounting plate that screwed into the original motor’s holes, with blind-tapped holes for the gearbox mounting screws to sink into.

I used Google SketchUp (http://sketchup.google.com) to design the mounting plate, as well as the throttle mechanism and seat post hinge mechanisms that I added later. Download the designs here.

I used a straightedge to make sure the gearbox sprocket lined up accurately with the wheel sprocket. This is important because if the sprockets don’t line up, the chain may slip off. Then I cut the chain to length and connected the 2 ends with a connecting link.

The larger wheel makes the bike’s kickstand too short, so I made an extension out of scrap oak. To secure it, I chiseled out a groove that fit the curved lower part of the original kickstand, then drilled the wood and strapped it on with heavy-duty nylon zip ties.

Mount the throttle.

I attached the drill to the gearbox shaft directly, just the way you would put a drill bit in it. The problem was, the drill had so much torque that the chuck just slipped around the shaft and quickly chewed it up. I found this out the hard way, so I had to make a replacement shaft.

The original gearbox shaft was ⅜” in diameter, but I made the new one ½” thick and then machined 3 equally spaced flats around its sides, giving it a rounded triangle shape. The resulting shaft was beefier and easier for the drill chuck to clamp down on.

The Razor came with a thumb-operated switch that simply turned the motor full on or off. I replaced this with a motorcycle-style handlebar twist grip that pulls a throttle cable.

This was easy; you just take off the old hand grip, slip the new one over the handlebar, and tighten the screws. The throttle cable’s other end attaches to a small lever that pulls the drill’s trigger, just like you would with your finger. This speed control method is about as basic as it can get, but it works!

I machined the throttle mechanism out of aluminum. The small lever that pulls the drill’s trigger pivots around a 3″ threaded ball plunger pin, where it passes through a hole in the middle of a 6″ vertical plate (Figure J). The plate, in turn, extends down from the platform that holds the back of the drill.

At the bottom of the plate, a smaller plate has a guide hole that carries the throttle cable to the opposite end of the trigger lever. I filed the lever end round so its edges wouldn’t mar the plastic trigger.

Mount the drill.

The bike’s rear wheel has a spring shock absorber, so I needed to mount the drill in a way that would allow it to move up and down along with the bike’s swing arm. (The alternative would be to tighten the rear shock spring all the way down, disabling it — but this would make the ride extremely uncomfortable.)

To accomplish this, I designed a hinged platform that connects to the bike’s seat post. Designing and making this flexible connection was the hardest part of the project.

The platform has 2 parts: a front bracket that clamps to the seat post, and the main platform that holds the drill. The bracket has a flat slot in back, and the platform has an axle that passes through the slot.

The rod is contained by the slot but is free to move inside, creating a combination slip joint and hinge. This supports the platform while giving it 2 degrees of freedom: up-down tilt (pitch) and forward-back translation (surge).

I machined the front bracket out of aluminum stock using my Smithy and made the axle out of some 3/8″ rod, turning the ends with a threaded die and screwing matching knobs onto each end.

I pieced together the platform out of some scrap teak wood from a paper towel holder that I dumpster-dove at a marina. See design sketches for the hinge and platform in the zip file you downloaded earlier.

The rear part of the platform has a metal tongue for the bottom of the drill to hook onto, and 2 pegs that cradle the drill on either side. The pegs are small lengths of dowel that I beveled with a file and glued into holes.

A separate curved piece of teak fits on top of the platform and swings around to cradle the back end of the drill, where it protrudes through the hole in the platform.

A support pillar connects the main platform down to the motor mounting plate. It’s a 16″ length of threaded rod tucked inside a slightly shorter length of square aluminum U-channel. At the top, the U-channel butts up against the underside of the platform.

The rod sticks up through holes in the platform and swing piece, and then threads through the washer, nut, and wing nut that tighten it down.

I attached the bottom of the support pillar to the gearbox mounting plate using 2 U-shaped clamps that I cut out of steel.

The clamps fit around the plate and U-channel, with a socket head cap screw to tighten them down together. The bottom end of the threaded rod rests on the topside of the bike’s swing arm.

Ride the drill rod.

One last modification: the seat that comes on the E-Punk is very small, so I installed a larger, spring-loaded seat. The Drill Rod was complete, ready to rev up and ride.

The Drill Rod’s speed is determined by the speed of its drill, the size of its rear wheel, and its gear ratio. I made a spreadsheet that let me see the results, in miles per hour, of changing each of these variables. My calculations:

Gear ratio = wheel sprocket teeth / gearbox sprocket teeth = 66/18

Wheel rpm = drill rpm / gear ratio = 1,800rpm / (66/18) = 463.6rpm

Wheel circumference = wheel diameter * Π = 9″ * Π = 30.73″

Speed = wheel rpm * wheel circumference = 14,245″ per minute / (63,360″/mile) * (60 minutes/hour) = 13.49mph

This speed is the absolute best case with no weight. With an adult rider, the bike’s speed is closer to 10mph. You can use a bigger gearbox sprocket to make it faster, but 10mph is plenty fast for me on something this small.

Note that keeping the E-Punk’s original 7″ back wheel would have made the bike’s top speed only 10.49mph (although the increased torque would mean less speed reduction from weight).

Note also that the original Electric Punk bike was made for kids, and is officially rated at 120lbs maximum weight for the rider.

I weigh 230lbs, and the Drill Rod handles my weight just fine. My son, who weighs more than I, also rides it successfully (his weight is being withheld for my safety and well-being).

Conclusion

So how does it handle? I have cruised with the Drill Rod several miles so far, and it works just fine. Several friends have also tried it, and it always puts a big smile on their faces. I like to think this is because they’re having fun, but perhaps embarrassment is involved. My son and son-in-law also both love riding the Drill Rod. Like me, they have no shame.

One day I was cutting tree limbs hanging over a fence on my property, and a limb fell onto the neighbor’s side of the fence. The way our homes are configured, I had to go halfway around the block to get to where I could pick up the limb, and I decided to ride the Drill Rod. On the way back home, I passed a city maintenance truck. The guy inside just stared and shook his head as if to say, “You know that people can see you, don’t you?”

The Drill Rod weighs 37lbs, including the weight of an extra battery, which fits easily in the frame where the original battery pack went. The little bike takes me 2 miles per fully charged battery. If you carry extra batteries, you increase your range 2 miles per battery. I did the math.

Admittedly, the brakes that come on the E-Punk are terrible, and are inadequate for the Drill Rod. But between using the brakes and dragging your feet, you can get stopped. That being said, if you build one and run it into a tree, consider yourself forewarned.

Meanwhile, I’m thinking about building a drill-powered dinghy.

This project first appeared in MAKE Volume 21.