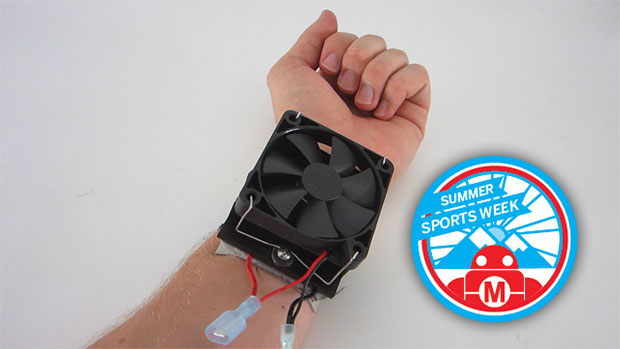
Summer is hot, especially if you are being active outdoors. So to avoid getting overheated, I made a simple thermoelectric cooling unit that attaches to your wrist. This is able to rapidly cool your entire body.

You can use this to cool down after a workout or between plays. The unit is small and easily portable. All you need is access to electricity, such as a 12-volt battery.

[youtube:http://youtu.be/BeLa72oSf3c]

See the project on Instructables: www.instructables.com/id/Wrist-Cooling-System/

Project Steps

How This System Works

This system uses a thermoelectric cooler (or a Peltier cooler), a miniature refrigerator that uses the Peltier effect: When a circuit is made using two different types of conductors, the junctions where those conductors meet experience a change in temperature. One junction will get hotter and the other junction will get colder. In a thermoelectric cooler, a large number of these junctions are connected together. They are arranged so that all the cold junctions are on one side and all the hot junctions are on the other side. These units can act as coolers or heaters, depending on which direction the electrical current is moving. In this application we are attaching the cold side to a person’s wrist in an attempt to help cool the body.

This cooler is attached to the person’s wrist right next to the radial artery, where a large amount of blood flows near the surface. By cooling this area, the body’s circulatory system helps to distribute the cooling effect throughout the entire body.

Cut the Aluminum Plate to Fit the Cooler

Start by measuring the thermoelectric cooling unit. You want the aluminum plate to stick out past the cooler by about 1/2″ on each side. In my case, the cooling unit was 40mm x 40mm (about 1 5/8″ x 1 5/8″), so I wanted the plate to be at least 2 5/8″ on each side. I rounded this up to 2 3/4″ so that the plate would be the same width as the heat sink.

I marked the plate with a pencil. Then I cut it out with a pair of tin snips.

Drill and Tap Holes For the Heat Sink Screws

The heat sink is attached to the plate with two machine screws. Place the heat sink onto the aluminum plate and mark the locations of the holes, then use a drill bit that is slightly smaller than the machine screws to drill a hole at each location.

Next you need to tap the holes (that is, add threads for the screws). If you do not have a screw tap of the appropriate size, you can just use several additional screws as impromptu taps. Find few extra machine screws that are the same size as a the screws for the heat sink. Press one of the screws firmly into the hole and slowly turn it so that it screws itself into the hole. As it does this, it will carve the threads into the sides of the hole. Of course, this will destroy the screw in the process, so you will want to have several extra screws on hand. This trick only works if the plate is softer than the screw and is fairly thin. When you are done, the holes should be reasonably well threaded and you will be able to attach the machine screws from the heat sink.

Bend the Sides of the Plate to Match Your Wrist

The aluminum plate serves as a conductor between the thermoelectric cooler and your wrist, so you want it to be in contact with your wrist over a large surface area. To accomplish this, I bent the sides of the plate up so that it follows that contour of my wrist.

The bend doesn’t need to exactly match the shape of your wrist because your wrist will also change shape when it is pressed against the plate. So to make a rough bend in the plate I used a pair of pliers. You may also want to use a vice. Hammers can also be used to shape the plate but they can be very loud.

When bending the plate, I recommend using something to prevent too much scratching. If the plate doesn’t already have a protective film, you can use a small piece of cardboard or folded paper to help protect the metal.

Make a Foam Cover For the Thermoelectric Unit

The hot side of the thermoelectric unit can cause burns if you touch it, so I used a small piece of foam to help insulate it. Make sure that you use a foam that can handle high temperatures without melting.

I took a block of foam and traced the outline of the thermoelectric unit on one side. Then I cut the outline and trimmed it so that it was about 1/4″ thick and had about 1/2″ of foam on each side of the thermoelectric unit.

Attach the Plate, the Cooler, the Foam and the Heat Sink

Before assembling anything, apply a thin layer of thermal paste/compound to both sides of the thermoelectric unit. This paste fills in any air gaps and improves the conductivity between the two plates. Press the thermoelectric unit firmly against the heat sink. Then place the foam around the thermoelectric unit. Then press on the aluminum plate. Insert the mounting screws through the heat sink and screw them into the aluminum plate. Trim any excess foam that sticks out around the sides.

Attach the Cooling Fan

The cooling unit works more efficiently if it has a fan blowing over the heat sink. I found a small 12V PC fan that was about the same size as the heat sink. To attach the fan to the heat sink, I used a pair of bent paper clips.

First, straighten the paper clips. Then bend a small loop in the center that would fit around the heat sink screw. Then bend the two sides up where they line up with the mounting holes on the fan and bend a hook that fits into each hole. This was enough to keep the fan securely in place, but you can use any method that you find convenient.

Add Connectors to the Thermoelectric Unit and the Fan

To make it easier to connect the cooling unit to the power source, I added insulated quick disconnects. First I soldered the wires of the fan to the wires of the thermoelectric unit. Then I crimped on the connectors.

Cut Fabric for the Wrist Strap

To attach the cooler to a person’s wrist, I decided to use a simple strap of fabric. I cut several inches of material from the shoulder strap of an old bag.

Drill and Tap Holes For the Wrist Strap Screws

I decided that the easiest way to attach the strap to the plate was with a couple of machine screws. So I marked the outline of where the strap would be, then drilled holes near each end on both sides of the plate. Then I used some spare machine screws to tap the threads into each hole just as I did for the heat sink mounting screws.

Then I pressed the screws through the fabric straps and screwed them into each hole.

Attach Velcro to the Straps

To close the straps around the wrist, I added velcro. This can be sewn, glued, or melted in place, depending on the kind of velcro you are using.

The Control Circuit

If you would like to make your cooling unit adjustable, you can add a simple control circuit. I chose to use a simple 555 timer circuit to turn the cooler on and off at a set frequency. The arrangement of the components is slightly different from a typical 555 timer circuit. R2 is a 100kohm potentiometer (variable resistor). R1 is a 220kohm fixed resistor. C is a 47 microfarad electrolytic capacitor.

This timer circuit controls the cooler with a relay driver. The timer sends a signal to a IRF510 power MOSFET, which switches the relay on and off. The relay connects and disconnects power to the cooling unit.

Solder the Control Circuit onto a Circuit Board

After testing the circuit on a breadboard, I soldered the components onto a printed circuit board.

Trim the Board So That it Can Fit Inside the Housing

I used a dremel with a cutting wheel to trim the sides of the circuit board so that it could fit inside the housing.

Cut Holes in the Housing

Next I cut holes in the side of the housing to accommodate the wires and the potentiometer.

Add an Indicator Light (optional)

To indicate when the cooling unit is on, I decided to add an indicator light. I used a simple 12V LED indicator. I drilled another hole for the LED and connected it to the output of the relay so that the light will turn on any time that the cooling unit is on.

Cut the Knob of the Potentiometer

The knob of the potentiometer sticks out quick a ways past the side of the housing, so I used a hack saw to cut it shorter. Then I attached a large knob cover with an indicator arrow.

Power the Cooling Unit

Now all you need to do is hook up power to your cooling unit. This thermoelectric cooler requires 12V and 2.5 Amps to operate at full capacity. The simplest power source is a large 12-volt battery, such as a car battery. You can also use a large power supply such as the one that I built in my project on how to convert a computer power supply into a bench power supply.

Whatever you use, you should carefully monitor all the parts to make sure that they don’t overheat.

Enjoy Your Personal Cooling System

This cooling unit is able to quickly cool down your body temperature. This can be really useful when dealing with outdoor sports in the middle of summer. Or you can just use it to make yourself more comfortable without having to air condition the whole building. Why not build one for yourself and stay cool this summer?