
Gardeners everywhere are enjoying the best of summer’s blooms. For those of us who lack a green thumb — or a garden — paper artist Jeffery Rudell has a book of paper flowers projects that mimic the real thing. Best of all, these blossoms don’t wilt, so you can have access to gorgeous flowers, year round. You can make a fun flower headdress, or a simple arrangement in a vase.
Jeffery was kind enough to share a tutorial from his new book, Paper Blooms. Here are instructions to make your very own Paper Poppy.
_______________

Paper Poppy Tutorial
Tools:
- Scissors or Craft Knife
- Hot Glue Gun and Glue Sticks
Materials:
- Red Glassine Paper (Two 6 1/2″ (16.5 cm) Disks Per Flower*
- White Craft Glue
- Strip of Pale Green Paper
- Strip of Black Paper
- White Correction Liquid (or White Paint)
- Floral Wire
- Green Floral Tape
* Glassine is a wonderful paper to work with as it is both thin and strong, and responds well to crumpling and creasing. It is available at many art supply stores as well as online and it is very inexpensive.

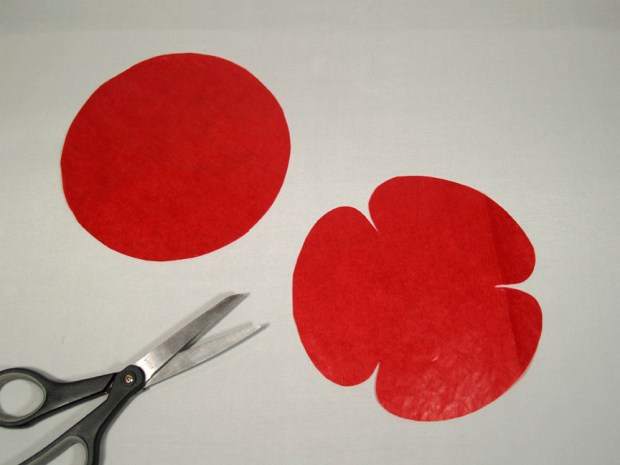
Step 1: Cut two 6 1/2 inch (16.5 cm) circles out of red glassine. Roughly divide each circle in thirds by making a small, tapered cut, as shown (or see template here).
_______________

Step 2: Place a finger in the middle of a disk and press it into the fist of your other hand, bringing the edges of the disk together and creating a cup shape.
_______________

Step 3: Tightly and repeatedly, squeeze the paper in your fist to create as many creases as possible.
_______________

Step 4: Carefully open the disk, turn it inside out, and recollapse it into a cup shape as in step 2 and crease it again.
_______________

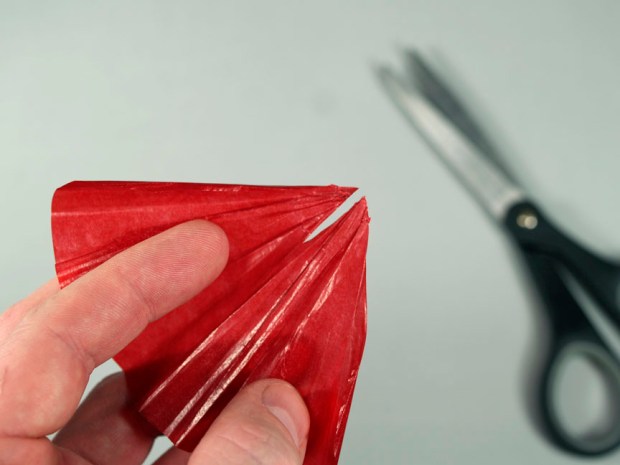
Step 5: Repeat Step 3, squeezing the paper in your fist for additional creases. The result should be a piece of paper that has many sharp creases radiating from the center of the disk.
_______________

Step 6: Carefully open the paper about halfway, being careful not to flatten it completely in the process.
_______________

Step 7: Use scissors to separate the disk into three separate sections, cutting it apart at the notches created in Step 1. Repeat steps 2 through 7 for the second disk.
_______________

Step 8: Use scissors to make a small 1/2-inch (1.3 cm) incision in the pointed tip of each petal.
_______________

Step 9: Add a small dot of white craft glue to one side of the incision.
_______________

Step 10: Fold the two sides of the incision together at a 90º angle and hold in placed until the glue dries.
_______________

Step 11: The result will be a slightly curved petal with a flat bottom.
_______________

Step 12: Repeat with the remaining five petals.
_______________

Step 13: Attach to petals to each other by their centers with a dot of white craft glue. Slightly overlap the edges of the first and second petals.
_______________

Step 14: Attach the third petal, overlapping its edges slightly with the previous two petals.
_______________

Step 15: Continue gluing the remaining three petals around the outside of the first three until you have a fully formed blossom.
_______________

Step 16: To create the center of the poppy, make a loose scroll using a 1 x 5 1/2-inch (2.4 x 14 cm) strip of pale green paper. Use a strip of black paper and a pair of scissors to create a strip of fringed paper.
_______________

Step 17: Glue the fringed black paper around the green scroll. Be sure to position the black paper so that the fringe extends above the top of the scroll. Shape the fringe with your fingers.
_______________

Step 18: Use white correction liquid or a small amount of white paint to apply highlights to the ends of the fringe.
_______________

Step 19: Attach the flower center to the middle of the glassine petals with a generous dot of hot glue. Hod in place until dry. Poppy leaves are elaborately shaped and can be time consuming to create. Luckily, these flowers are bold enough to stand on their own without added foliage.
_______________

Step 20: To finish, hot glue a sinuous stem to the bottom of the flower and arrange in groups of three or five stems.
_______________


Buy Jeffery Rudell’s book Paper Blooms here.
ADVERTISEMENT


