If you’re a maker ready to scale up to commercial production, soon you’ll be asking questions about how to manage the process of sourcing parts, ordering raw materials, describing the fabrication process, and scheduling access to equipment.
Software tools that help you plan and operate your manufacturing business are often called “enterprise resource planning” systems, or ERP for short. ERP systems generally include tools for managing inventory, scheduling materials and resources for production, ordering new materials when needed, and accounting systems to keep track of your expenses and revenues.
ERP systems help you understand your material costs, compute what your inventory is worth, tally the actual costs of making your products, and ultimately help you plan your investment and production decisions so your business can thrive.
ERP systems have been around for several decades, but for much of that time they have been shockingly expensive, often in the millions of dollars. Luckily, the open source community has come forward with a number of options that are hacker friendly and scaled for small and medium size businesses. If there was ever a time for automation in a new start up hardware business, this is it.
I’m a consultant for one of these open source offerings: OpenERP. I think it fits well with the “maker” personality. It’s easy to tinker with, it can be configured quickly, and it has commercial support to back it up. There are over 2,700 modules users have have built to extend it, and it offers sales/CRM and E-commerce integration, project management tools, fleet management, and a plethora of other options.
I have been working on an Ardiuno project to keep track of our pet door. It’s a simple “electric eye” that uses a photo transistor and an IR LED to keep track of when the door opens. I’ll use it as a basis to demonstrate how a maker might use OpenERP.
As with any project, we need to stop for a moment and think about what resources we’ll need:
- 8 parts: An Arduino, a case, a resistor, a display, an IR LED, a phototransistor, and a regular transistor, and some wires.
- A location for assembly.
- A few minutes to put it together.
- A test location.
- A few minutes to test and adjust the sensors.
These factors seem a bit like a recipe. In manufacturing, this list of materials and how they are assembled are referred to as a “bill of materials,” or BOM.
Defining a Product
The pet door sensor will cost approximately $60 to make, and if you are going into business, you will want to sell it for a price that covers your costs and makes a profit. You may need to order the parts and want to know how long it will take for new components to show up at your door. You will also want to keep track of how many parts you ordered, where you store the parts, and how many you have on hand. You also may want to reorder parts when your inventory gets below a certain level so you can always keep up with demand.
These factors translate to:
- Cost price and sales price.
- Suppliers and lead times.
- Inventory and locations.
- Stockage rules.
We will use all of these factors to define a product. The final road map of the product looks like this:

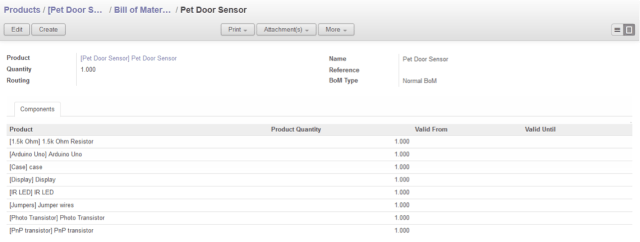
Here, you can see the components that go into making the pet door sensor:

For each product, the definition includes the name of the product, whether it’s produced or purchased, the cost and sale price, the parts that make it up (bill of material, again), how many in inventory, when to reorder it, and the accounting information for purchasing or selling it.

To define the bill of material, we will describe the components used to make it.
The labor or machine stations where your product is assembled are known as “work centers.” In this case, we have defined two different work centers. At the first, you are putting together your sensor and at the second location installing and testing it.

Now, we can add time to assemble the sensor at these stations and define the order in which to do the work. In the “routing” of your work, you are defining the location, time or machine effort, and the order of assembly. Here, we have defined a “cycle” of work as 30 minutes.

What we have done is to build a complete model of the assembly system. This model will monitor your assembly processes and keep track of your progress, assembly time and costs, and raw materials.
If you want to experiement with other assembly approaches, (perhaps faster machinery, pieces coming to you preassembled, or more staff), you can make a copy of this model, change the relevant factors, and use this copy as a simulation. By changing one thing at a time, you can run multiple scenarios, and see how a new tool might save time or a new procedure saves money in the assembly.
Tracking the Build
Now let’s make the Arduino pet door sensor!
First, we go to “manufacturing>manufacturing orders” and we can “create” a new manufacturing order (MO for short).

We have to enter the product (“pet door sensor”) and the system will assign the pieces and processes needed to create the sensor. You can see that it has picked the eight components based on the bill of materials we set up.
To see how long we have calculated to do the work, we can click over to the third tab (labeled “work orders”) and see the time scheduled for construction. Remember, we are assuming that each work “cycle” is 30 minutes, so 1 cycle in this example equals 30 minutes.

Everything looks good, so let’s click on the button marked “produce” to kick off the work. If you were standing in your assembly station, this is the button you would click when you started the assembly of the sensor. After you finish, you will want to let the system know that are done. Click on the “confirm” button in this pop up window.

When you click confirm, you are telling the system the work is done, that you used the reserved materials, and that you produced one new sensor.
Now, when you look at this manufacturing order, you will see a few things have changed.

The raw materials have been “consumed” to make a new product. If we click over to “finished products,” we will see we now have a “produced product.”

If you have machine tools that can communicate their status ( G-code or otherwise), these processes can be automated. The machines could communicate product counts, inventory on board the “pick and place” machine, error conditions, or other important information. OpenERP has an open API for these sorts of integrations.
We are done! We have not just built the Arduino sensor, but accounted for the changes in inventory, tracked assembly time, and labor or machine costs, and made life in a start up a little bit easier.
To get more information about OpenERP please go here. If you’d like to give the software a spin please click here.
ADVERTISEMENT
Join Make: Community Today