white_chocolate_skulls

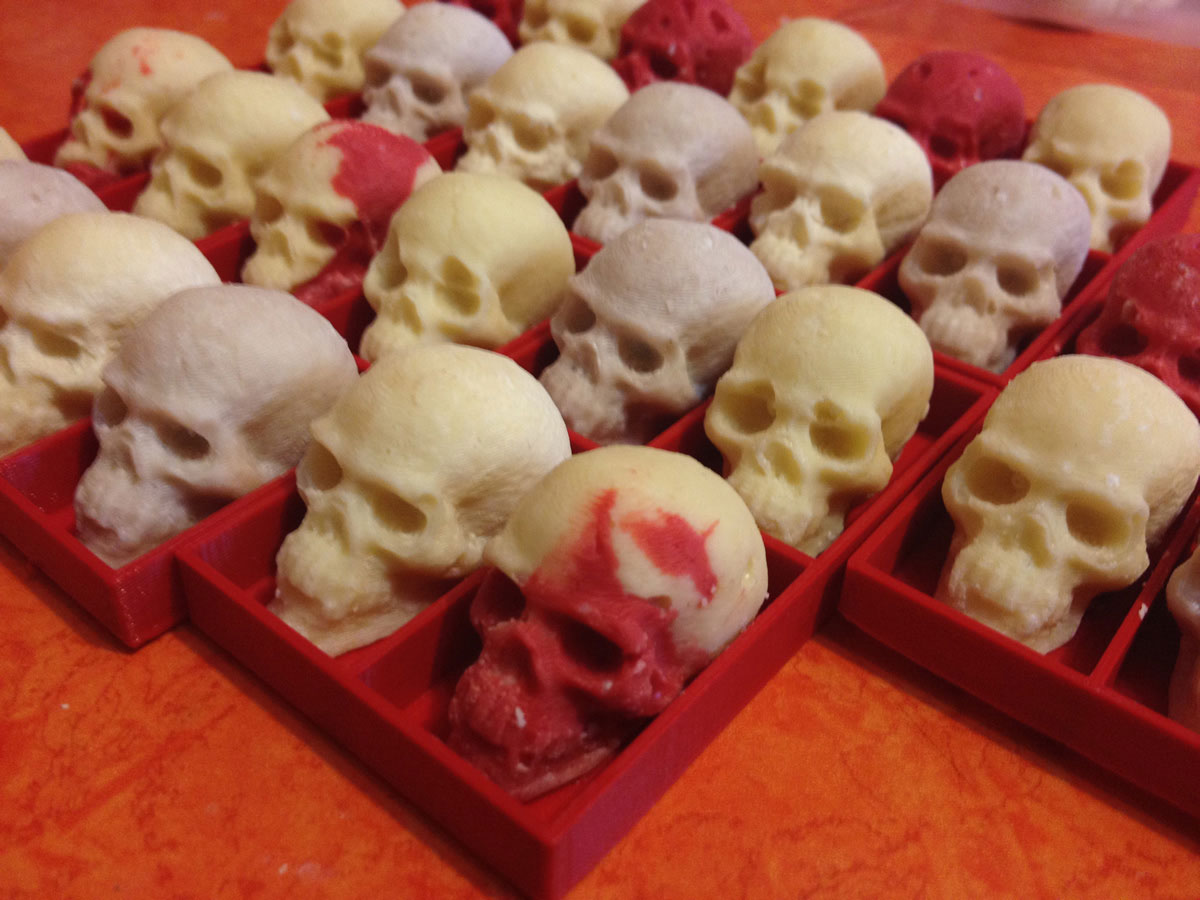
Every Halloween I make treats to give away. I don a costume and distribute them to everyone I meet during my Halloween travels. I call it “reverse trick-o-treating.” During October of 2012, I created a 3D-printed chocolate mold maker so I could create multiple batches of chocolates and individual trays in which to place the chocolates before bagging them. To cast the chocolates, I used food-safe silicone to make the final chocolate mold from the 3D-printed mold maker.

I had scanned the skull a few months earlier using 123D Catch and had already created a 3D printed necklace with it for my Kali Halloween costume, which I wore when I handed out the chocolates.

I used an OpenSCAD script to make a mashup of a parametric box (by Thingiverse user acker) and my skull to create the mold maker. The trays for the chocolates were created using the same parametric box script.

m3dp
This tutorial originally appeared in Make: 3D Printing. Check it out for more unique additive fabrication projects.

The candy trays were originally printed in PLA, and were only used for presenting (not molding) the food. If you’re worried, use a layer of parchment or wax paper to separate the skulls from the tray . Or skip the PLA all together and use a FDA approved polymers for direct food contact/containers like Taulman t-glase (PETT), which I’m now recommending instead of PLA.

Here are the files you’ll need:

My chocolate casting supplies

Design Your Own Mold in OpenSCAD

If you want to design your own mold instead of using the skull mold file included with the Chocolate Skull Mold Maker (thingiverse.com/thing:33432), you can edit skullCandyMold.scad to use your own object.

I designed this mold using a mashup of an OpenSCAD parametric box (by Thingiverse user acker) and my scanned skull.

Before you make any changes, I suggest that you play around with the mold code as is. For that to work, make sure the vampireSkull_0.2.stl is located in the same directory as the OpenSCAD file.

Once you’re sure it’s working, you can substitute your own STL for the mold: just change the “filename” variable to the name of your STL. Make sure your STL is in the same directory as the .scad file.

Here’s a render of the mold maker in OpenSCAD:

Render-in-OpenSCAD

Project Steps

Print the Mold Maker on a 3D Printer

I’ve provided two versions of the Chocolate Mold Maker STL file, one with thin walls (1.3 mm) and one with thicker walls (2.3mm). I recommend you print the thin wall version, it’s easier to destroy when removing the mold.


Shown here printed in black t-glase and white PLA on the Ultimaker2.

Mix and Pour the Smooth-Sil 940

Take the Smooth On Smooth-Sil 940 food-safe silicone rubber and mix it according to the proportions on the package. Pour it into the 3D-printed chocolate mold maker.


Fill the mold so that it covers the skulls by about a half inch, or close to the top of the mold.

I don’t have access to a vacuum degasser (yet), so to help prevent bubbles from forming in the mold, I placed it on a subwoofer while music with heavy bass was playing (second photo). I also used an electric toothbrush without the brush head attached to vibrate the bottom and sides of the outside of the mold to get bubbles to come to the top.

I don’t know how effective these measures are, but I did not have any problems with bubbles or the mold material losing detail. Let the poured mold set for 24 hours and follow the heat curing instructions. Read the datasheet.

NOTE: I covered the bottom of the thinner walled-mold with black liquid tape (liquid rubber). At the time (in 2012), I was worried that the print was not completely watertight, but the Smooth-Sil 940 was so thick that it wouldn’t have leaked out before setting up anyway.

Demold

In order to remove the silicone mold from the 3D-printed mold form, you will probably have to destroy the 3D-printed form completely. I tore mine completely apart. Some of the skulls had to be removed one by one. Overall it was pretty easy to demold, once I accepted that I was going to destroy the mold maker.

Wash the mold with soap and water in the sink, and I let it dry completely before attempting to cast chocolate. Water does bad things to chocolate when you are casting it.

Add Slits to the Mold

Cut notches in the mold with a razor blade at the base of the skulls. This will make it much easier to demold the chocolates.

I came across this by accident. After demolding many rounds of chocolates, the base of one of the skulls started to split a little from flexing the mold. It had no impact on the quality of the chocolates coming out of the mold and made the process easier.

Extract the Soy Lecithin from the Softgels

The soy lecithin will help with the demolding and has other benefits, such as acting as an emulsifier, when used in molding chocolate. I used Whole Foods soy lecithin softgels, which were available in the supplements isle.

I cut the softgels open and squeezed the oil out. I not very precisely used around two small handfuls of unmelted chocolate to the oil contained in four lecithin pills. Discard the softgels after squeezing out the oil.

Melt the Chocolate

I used white chocolate melts that do not require tempering. You could temper your own chocolate, but it is an extensive process in its own right and it is not covered here.

Heated chocolate melts in a double boiler. (If you have one, otherwise follow the alternate suggestions at the end of this section.)

Keep in mind that temperature is very important. While the chocolate melts, use a thermometer to measure the temperature. Heat to between 100-105°F. Do not overheat the chocolate or you will ruin it for casting!

While melting the chocolate, add the small amount of lecithin that we obtained in the last step. I used two small handfuls of chocolate (I have small hands) to the oil obtained from four lecithin softgels. Gently stir the chocolate until it is consistently melted.

I also found that a tiny bit of cocoa powder can give the chocolate a more balanced taste. Just add a sprinkle to the batch.

Bamboo Steamer + Glass Bowl

Fill a tall pot about halfway with water and place a bamboo steamer basket on top of the pot. Put a small glass mixing bowl on top of the bamboo steamer basket. Place your chocolate melts into the mixing bowl (Melting chocolate in a glass bowl and a bamboo steamer.). I find it is best to do small batches. Add paper towels to the top of the steamer basket where it meets the glass bowl so that steam and chocolate do not mix.

NOTE: Avoid getting water in the melted chocolate; it will dilute the mixture and it will not set properly when you try to cast it.

Bamboo Steamer + Squeeze Bottle (Best Way)

After experimenting for an afternoon and melting several batches of chocolate, I found the following method to be the easiest to manage.

I kept the tall pot and the bamboo steamer set up, but switched from using a glass bowl to a chocolate squeeze bottle. I wrapped a dish towel around the bottle to block the rising steam.

The squeeze bottle method made the process easier in two ways:

  1. It was easy to fill the individual skulls in the mold and was much less messy than the other methods I tried.
  2. After I filled the mold, I could put the squeeze bottle aside and it was easy to reheat later on top of the bamboo steamer. This eliminated messy and wasteful chocolate transfers using multiple containers and cut down on the dishes I needed to wash.

Let the Chocolate Cool

Before pouring the chocolate into the mold, you need to let the chocolate cool (keep an eye on the thermometer!). The chocolate needs to cool down to about 96-98° F before you should start working with it. This will probably take longer than you think.

Keep an eye on your thermometer and have your mold and tools ready. It pays to stand by the chocolate and wait until it cools; otherwise you may miss your window and it may cool too much to pour into the mold.

If you are going to pour the chocolate into a squeeze bottle or chocolate funnel, do it while it is cooling. Keep the thermometer in the chocolate so you can tell when it has cooled down enough to pour into the mold.

NOTE: I tried a chocolate funnel before I settled on the squeeze bottle method.

Pour the Chocolate into the Mold

Once the chocolate cools, you need to pour the chocolate into the mold. I recommend the squeeze bottle method, but you could also use a chocolate funnel or carefully pour the chocolate from a small bowl into the holes in the mold.

After you pour the chocolate into the mold, use a spatula or butter knife to smooth out the top of the chocolate. Remove any excess on the top of the mold by scraping across the top.

Put the Mold in the Refrigerator

Put the silicone mold containing the chocolate into the refrigerator until the chocolate solidifies. This will take about 20 minutes for small chocolates. It could take longer if you are casting a larger piece.

While Waiting, Start Printing the Candy Trays

While you are waiting for the chocolate to set in the fridge, you can start printing your candy trays. If you don’t have a 3D printer, you will need to plan for this or do with out the trays. Print the trays using PLA filament.

Here is the link to my candy tray files with four dividers: thingiverse.com/thing:33432. This parametric tray code was written by acker, who derived it from hippiegunnut. I modified the parametric script to create a tray that would fit four of my chocolates perfectly.

Carefully Demold the Chocolate

The skull chocolates are a little difficult to get out of the mold. Wear candymaker’s cotton gloves to avoid marking the chocolate with your fingers.

Twist the rubber mold to loosen the chocolate. It will help to have small hands (I do and I am able to remove the chocolates without destroying them). I found that after loosening the chocolate by twisting the mold, it is easiest to twist out the face and rotate it out of the mold. Then grab the face and pull to remove the rest of the skull from the mold. You may smear the teeth a little, but overall it seems to work the best. I have made many batches so far and I managed to get all of the chocolates out of the mold without destroying any of them.

Repeat Casting Process

Keep casting until you have a whole pile of little white chocolate skulls.

Place Chocolate In Trays

Lay down your skulls in their final resting place.

Bag Up and Hand Out!

Bone appétit!