Photography by Larry Cotton.

Lots of folks think that quaffing a cup of coffee from boutique beans comes close to nirvana, but roasting your own beans will bring you even closer. That’s why I call this roaster the Nirvana Machine.

I didn’t drink coffee for most of my life, and I even survived without it in the Navy. But when my son introduced me to a cup of legendary West Coast java (OK, Peet’s), I began to understand what all the fuss was about. Soon, I too became fussy about excellent coffee.

Beans lose flavor after they’re roasted because all of those delicious but volatile aromatic compounds dissipate and break down. Roasting your own beans guarantees ultimate freshness, putting all the flavor into the cup; you will not drink fresher, more satisfying coffee!

Home roasting is easy and inexpensive. Top-quality green beans cost less than roasted beans and have a much longer shelf life. You can have fun fine-tuning your roast’s darkness and developing your own blends. Indeed, a growing selection of countertop roasting appliances are now sold, but they’re pricey, non-portable, and very noisy.

Illustrations by Tim Lillis.

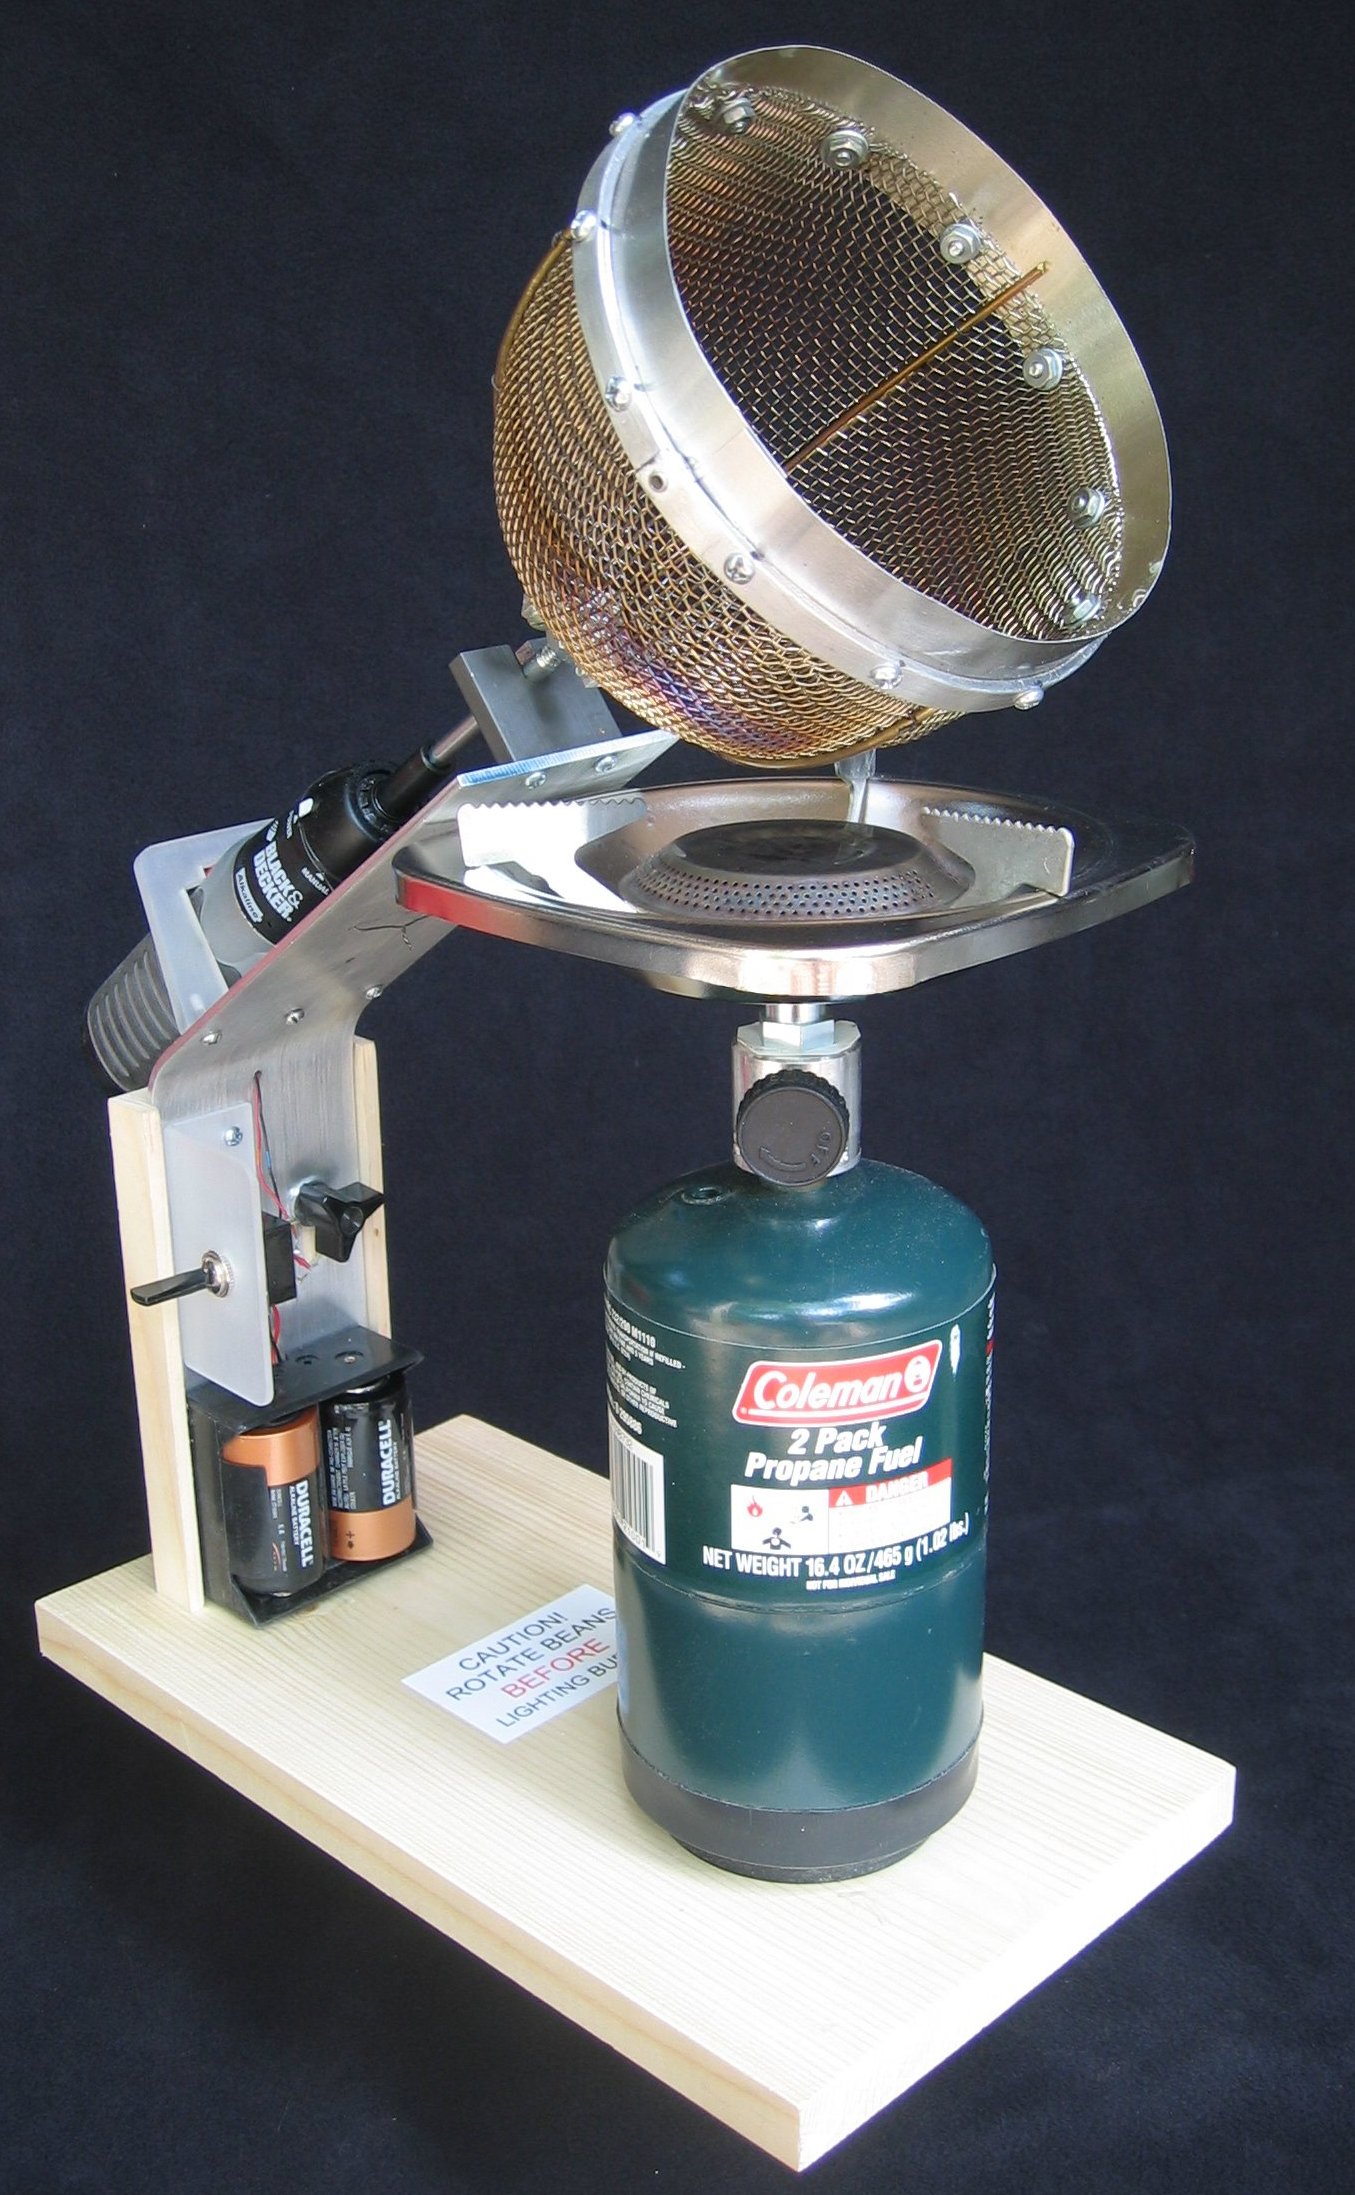
The Nirvana Machine uses a battery screwdriver to tumble beans over a camp stove. Unlike commercial machines, the basket is tilted and open-ended, which makes it easier to load the beans and to see and smell their progress during roasting.

When you roast coffee, sugars caramelize, water vaporizes and makes the beans expand, and aromatic compounds are produced, including the ones shown above. The compounds develop at different rates, so varying the roasting time and temperature lets you balance which you want more or less of, to determine the resulting flavor.

The Version 1 basket was a cheap strainer, but the beans broke through that and caused a fire!

Project Steps

Print off the blueprints

Start by downloading and printing off all of the blueprints, from here. Then you can easily follow along and make the metal parts, the wood and plastic parts, and the bean basket.

Make the support plate

For the support plate, saw a 14-1/8″
piece off of the 3′ aluminum bar and drill and tap 12 holes as shown in the Support Plate blueprint. File the cut surface smooth after this and all other cuts.

Clamp the plate in the vise between two 2×4s and use the C-clamp to bend it widthwise, 6-7/8″ from the bottom, to an angle of about 127°.

NOTE: You could also start by making the basket (Step 11). That’s the hard part, and then you can go back and make the other parts to fit afterwards.

To cut the height adjustment slot, drill four or five ¼″ or 5/16″ holes as close together as possible, then saw or file the slot until it’s even.

Make the drive shaft bearing

To make the drive shaft bearing, drill a ¼″ hole in one end of 1½″×¼″ aluminum bar, then saw or drill and file the slot in from the end. Now saw the piece off the bar to measure 1¼″ — it′s easier to machine the slot before trimming the bearing down to final size.

File the cut end smooth, and drill and tap two 6-32 holes as shown in the Bearing blueprint.

Make the triangle connector

The trickiest bit of metalwork is the triangle piece, which connects the basket to the driveshaft. To start, I drew a paper template with the dimensions shown on the Triangle blueprint, and taped it to the leftover ¼″-thick aluminum bar.

NOTE: Refer to the triangle blueprint.

Drill 4 holes in the aluminum, tap the large one, and saw the 3 slots to the small holes before cutting the triangle to shape. This piece is small and fairly precise, so go slowly and be safe. Then saw the triangle shape, file smooth, and put it in a vise to drill and tap the 3 clamping-screw holes.

Thread 3 screws into the part and check its clamping action on small pieces of the brazing rod. It should hold the rods parallel and tight.

NOTE: Hold the triangle in a vise for drilling and tapping.

Make the reinforcing ring

For the reinforcing ring, draw a 5¼” circle as a template. Cut a strip of the 1″ aluminum bar, about 2″ wide and 19″ long, and slowly hand-bend it into a circle, comparing against the template as you go.

NOTE: Use a vise to get a good grip for bending the very ends.

Saw or file an overlapping joint at the ends, then drill a ⅛” hole and use a pop rivet tool and a short rivet to join the ends together.

Using a compass, mark at least 6 evenly spaced hole locations in the reinforcing ring. Drill the holes to 9/64″.

Make the appearance ring

For the appearance ring, use metal snips to cut a strip of the aluminum flashing about 20″ long and 1″ wide, or wider to make the basket hold more beans.

Mark the strip to match the locations of the holes on the reinforcing ring, and snip pairs of ¼″ notches to flank each hole. Bend the metal back and forth in the notches until the tabs break out.

Make the wood parts

For the base, cut a 13″ length of the 1×8 board and drill and countersink two 3/16″ holes 2½″ apart and 1⅛” from one end, with one hole 1-13/16″ from one side, as shown on the Base blueprint.

For the height adjustment block, cut down another piece of the 1×8 to 6 ⅝”×3 ½”. Use a table saw or router to cut a 3″ channel ¼″ deep down the block, to just fit around the support plate, as shown on the Height Adjustment Block blueprint.

Nest the support plate in the height adjustment block, stand them up together on their bottom ends, and mark the very top of the slot on the block by tracing through plate. Drill a ¼″ hole through the block at this mark, for the height adjustment bolt.

Make the plastic parts

On a piece of ¼″ thick plastic, trace the screwdriver hold-down shape from the Hold-Down blueprint, and saw it down to shape. The interior dimensions are fairly critical, to securely hold the screwdriver. Clamp it in a vise, and drill and tap two 6-32 holes matching the pair of holes at the top of the aluminum support plate.

For the switch bracket, cut a 3″×3″ square of ⅛” thick plastic. Saw or file 2 edges round, and drill two 5/32″ holes matching the holes near the slot on the support plate as shown on the Switch Bracket blueprint, and a larger hole on the other side to fit your switch.

To shape the bracket, wrap foil around the plastic to shield all but a ⅛ ” or 3/16″ wide bend-line. Holding the plastic with a gloved hand, heat it gradually over a stove. Press on it periodically, and when it’s soft enough, remove it from the heat, bend and hold it at a right angle, then run cold water over the bend to harden the plastic again.

Hack the power screwdriver

Remove the battery chamber of the powered screwdriver and drill a clearance hole in the end, angled to miss all internal parts. Thread two 1′ lengths of insulated wire through the hole and solder one to each battery contact.

Note the polarity of the wires and replace the battery chamber. Test the connections by touching the wires to one or two 1.5V batteries in series and switching the screwdriver on.

Cut the drive shaft bolt

For the drive shaft, carefully mark the edges of the bolt’s head with a marker, then use a grinding or cutting wheel to cut it down so that it fits the chuck of the screwdriver, about ¼″ across. The new hex-head must be concentric with the shank of the bolt.

Build the basket forming tools

Make the pressing ring tool using the same circular template you used for the reinforcing ring. Cut a 5¼″ diameter circle out of plywood by drilling in the center and then sawing out. File the inside edge of the ring on one side to make it round and smooth.

Then make a round form out of a wood block, 5″ diameter and approximately spherical or hemispherical. You can turn the form on a lathe, but the shape doesn′t have to be perfect, so you could also just cut down and shape it with a saw and a coarse rasp.

NOTE: The form also needs something in the bottom that you can clamp in a vise. I epoxied a ¼″ dowel into the hole in its flat face.

Draw an X in the exact center of the 1′ square wire cloth. Mark the front tip of the form, then drill a hole and screw the center of the cloth to the tip of the form with a ½″ #6 wood screw.

Form the bean basket

Center the pressing ring, rounded edge down, above the form and wire cloth square. Apply downward pressure until the cloth looks like a bean basket. This is easier said than done, Gradually push a little, guide a little, and compress the wire cloth a little below the ring to help it go down.

NOTE: The square holes in the wire cloth will deform into diamonds of various size and shape; this is as it should be.

Towards the end of pressing the wire cloth, it will help to have a friend drive more small #6 screws in along the way, to hold the screen against the form. It also helps to cut off some of the excess material at the bottom with metal snips, but leave about 1″ all around, past the flat end of the form.

Now take a break!

Attach the basket reinforcing ring

Remove all the shape-holding screws, leaving just the one at the tip. It′s OK if your basket is distorted at this point; the reinforcing ring will circularize it. Lay the pressing ring and reinforcing ring on top of wide-open vise jaws.

Flip the form and wire cloth assembly upside down and re-press it through the rings. Attach the reinforcing ring to the bean basket with 6-32×⅜” machine screws, washers, and nuts.

For each attachment point, wedge a piece of scrap wood between the form and the basket and drill a 9/64″ hole through both the reinforcing ring and the basket before installing the screws. The basket should be a minimum of 4″ deep, tip to ring.

NOTE: With all screws tight, trim the excess wire cloth as close as possible to the ring.

Attach the basket reinforcing ribs

Cut and bend the 3/32″ brazing rod into 3 pairs of ribs that reinforce the basket, extending out from its center point inside and out. On the 3 outer pieces, leave an extra bend as shown in the Brazing Rod blueprint, to fit into the aluminum triangle piece.

Attach the rod pairs to the basket and each other by twist-tying them together with short lengths of uninsulated wire. Use at least 3 wire loops per pair. The pairs should converge close to the center inside and out, forming three 120° angles.

Push the 3 outside pieces into the triangle, and tighten the 3 clamping screws securely. Make sure the bean basket assembly cannot be pulled off! Cut and file the ends of the rods flush with the face of the triangle.

Attach drive shaft and appearance ring

Thread the ¼″ nut onto the drive-shaft bolt until at least ¼″ of thread protrudes. Using pliers to keep the nut from turning, thread the triangle onto the driveshaft until it jams tightly against the nut.

Loosen (but do not remove) all the reinforcing ring screws, and insert the appearance ring between the reinforcing ring and the raw edge of the wire-cloth. You may need to shorten it first. Re-tighten the screws.

Final assembly

Stain, paint, or varnish the base as you wish, then attach 4 small feet cut from adhesive foam weatherstripping under the corners.

Make a caution label (or print out the one shown here), and glue it to the base.

Screw the height adjustment block to the base with two #10, ½″-long flathead wood screws.

Attach the D-cell battery holder, wires pointing upward, to the bottom end of the support plate with two ¼″ machine screws. You may have to enlarge the holder’s mounting screws.

Mount the switch in the switch bracket, and mount the bracket to the support plate with two ¼″ machine screws.

File off any screw threads that protrude from the back of the support plate.

Mount the bearing to the support plate with two ⅜” machine screws.

Attach the support plate assembly to the height adjustment block with the carriage bolt, washer, and knob.

Thread the 2 screwdriver wires through the hole in the support plate’s bend. Use the hold-down and two ⅜” screws to mount the screwdriver to the plate, with its chuck pointing up. Make sure the sleeve adjacent to the screwdriver chuck is set to “Power” position.

Thread a ⅜” screw into the bottom of the support plate, under the screwdriver’s central switch button. Tighten it enough to fully depress the button. This screw keeps the screwdriver switched on internally, and helps hold the tool. Briefly touch the 2 screwdriver’s power wires to a battery to make sure that it runs.

Slide the bean basket’s shaft through the slot in the bearing and into the screwdriver chuck until it stops. You may have to adjust the bearing’s position slightly so the shaft doesn’t bind.

Thread a piece of uninsulated wire through the support plate and wrap it around the screwdriver near the chuck. There’s even a convenient groove for this. Finger-twist and trim the wire ends. Avoid over-tightening, which would put an extra load on the motor.

Lean the assembly on its back and, noting the wires’ polarity, solder the switch in series with the battery holder and the screwdriver wires.

Put 2 fresh D-cell alkaline batteries in the holder.

Make sure the camp stove is off, then screw it onto a standard 16.4oz disposable propane cylinder and center it onto the base with one of the burner’s flat sides toward the support plate. Position the propane flow-control knob so you can reach it easily.

Flip the switch on, and check that the bean basket rotates freely, doesn’t wobble, and seems sturdy and safe. Use the height adjustment knob to position the basket at 1″ above the burner. Your Nirvana Machine is ready to roast!

Proper Nirvana procedure for roasting

Take the Nirvana Machine to a well-ventilated place, preferably outdoors.

Make sure the batteries are fresh, and put a drop of oil on the shaft bearing.

Load up to ½ cup of green coffee beans into the bean basket.

With the burner off, switch the screwdriver on and observe the beans’ rotation pattern. The 3 ribs inside should cause the beans to tumble nicely. The bulk of the tumbling beans should be centered above the burner. Green beans expand as they roast, so they should stay well away from the opening, to leave room for expansion.

If the beans tumble properly, light the propane burner and set the gas-flow knob on low. The beans should begin to yellow in a couple of minutes, and should roast in 10 to 15 minutes.

NOTE: Never roast coffee unattended, keep kids at a safe distance, and use plain old common sense.

Conclusion

Roast Your Coffee Beans

As the beans darken, they will make cracking sounds and shed thin, parchment-like chaff, which drifts out of the opening, making somewhat of a mess. To me, this just adds charm to the experience, but your significant other′s opinion may vary.

If you roast outdoors in cool or breezy weather, you may have to crank up the heat, reduce the clearance between the flame and the basket or shield the basket from the elements. I’ve used aluminum flashing, but any windbreak should do.

As the beans turn even darker, you’ll hear lighter crackling. This is about when I think the beans are perfectly roasted. If you keep going, the beans smoke more, caused by the oil which seeps from the beans (this oil also makes the beans shinier). The smoke may smell great to you, but the odor can linger, which is another good reason for ventilation. Be careful not to scorch the beans!

When the beans are done to your liking, turn the screwdriver off and remove the burner. Beans like to be cooled fairly rapidly, so let them continue to rotate for a few minutes in the cooler air.

Dump the beans into a container and seal it. Purists say to wait anywhere from 4 to 24 hours before grinding the coffee. You will be amazed at how good it is. Good luck!

Resources

Green bean sources: sweetmarias, burmancoffee

Coffee and home roasting information: coffeegeek, thecoffeefaq, homeroaster, ineedcoffee

Roasting color guide: sweetmarias

This article appeared in Make: Volume 08, page 110.