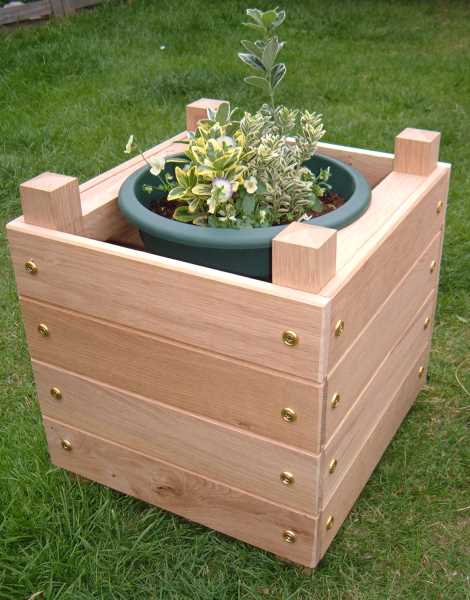
Wooden Planter with Plant Pot

This is a simple guide for making a fun wooden planter. It’s a basic project, but the end result is something to be proud of. Even if you’re not making this for your own plants, it would make for a nice gift for somebody.

There are no complex woodworking joints in this guide! I’m using European oak for my planter as I’ve had offcuts lying around my wooden garage doors workshop – you can use whatever timber you wish.

You should be able to source the timber from a local saw mill or timber merchants, as the majority carry a stock of tongue and groove boarding in both hardwood and softwood versions; you may struggle to find oak, however, pre-machined.

The sizes listed are required sizes, so if shopping for timber, remember to allow a bit extra for waste.

Quick tip: if you can lay your hands on some hardwood, then your new planter will last longer!

2

Cutting List

  • Vertical Uprights (Known as Uprights from here on in) = 4 at 430mm x 45mm x 45mm
  • Horizontal rails (Known as Rails from here on in) = 4 at 290mm x 45mm x 45mm
  • Tongue and groove boarding to clad = 16 at 382mm long
    (the boarding I’m using is 95mm overall wide, thickness is to an extent unimportant, my boarding is 16mm thick)
  • Tongue & groove boarding (inner base) = 2 at 350mm

What will the next generation of Make: look like? We’re inviting you to shape the future by investing in Make:. By becoming an investor, you help decide what’s next. The future of Make: is in your hands. Learn More.

Project Steps

Prepare uprights, rails & boarding

Vertical Uprights (known as uprights from here on in) = 4 at 430mm x 45mm x 45mm

Horizontal rails (known as rails from here on in) = 4 at 290mm x 45mm x 45mm

Tongue and groove boarding to clad = 16 at 382mm long (the boarding I’m using is 95mm overall wide, thickness is to an extent unimportant, my boarding is 16mm thick)

Tongue & groove boarding (inner base) = 2 at 350mm

Once you’ve got everything cut to the sizes listed above, you have one more cut to do.

It involves cutting a 15 degree angle four ways, on each of the four vertical uprights; if you’ve got one handy, then a mitre saw is great for this. Don’t have a mitre saw? Then you’ve got a choice of leaving the tops square, or cutting them by hand.

Preparing the cladding

Now, grab four of the tongue and groove boards for the cladding and remove the tongues. These boards will then become the top row of boarding around the planter.

To remove these, you can use either a handsaw (in the event of not owning a table saw or knowing anybody that does) or a hand plane. This part is really easier than it sounds, you simply just need to cut off or plane down the tongue.

One option is to take four of the cladding boards and remove the groove; this is slightly more difficult, but can be skipped if you don’t fancy the extra work. As before, remove this with either a hand saw or hand plane. These four boards will then become the bottom row of cladding on the finished Planter. I’ve done this on the Planter pictured.

Marking

You need to mark out the uprights first so holes can be pre-drilled for screws.

Start from the bottom of the uprights and mark a line 45mm up (from the bottom) and another line 90mm from the bottom. Square both these lines fully across on the side of the timber that is facing you. Between these two lines is where the bottom rail will sit.

To mark the position of the top rail, you need to know how tall the area of cladding is. Our cladding here is four boards high, so we need to grab a bottom board, a top board and two centre boards and join then up, as they will be sitting on the planters.

Simply push them all together in the correct order and measure the overall distance from the bottom of the bottom board to the top of the top board. In my case, this is 344mm. The reason I am mentioning this is on the off-chance that your board widths differ to mine (in which case you’ll have to make allowances on your measurements).

The total combined board width is 344mm, so from the very bottom of the upright, mark a line at 389mm (344mm plus the 45mm gap under the bottom rail) and then 434mm (389 plus the 45mm rail thickness). This then gives the position of the top rail.

Mark all the uprights as listed above. Once this is done, you will need to start to pre-drill holes to take the screws that hold the framework together.

Drilling the holes

I’m assuming you’ve not every tool available from the perfect woodworking kit, so we’re just going to drill using a cordless drill and 8mm bit. First, mark a centre point for each of the rail positions marked out earlier – these don’t have to be 100 per cent accurate as they won’t be seen once the planter is completed.

Simply take your drill and drill one hole for each of the rails, these holes should go all the way through the uprights. To avoid drilling through into your workbench, have a piece of scrap timber underneath the upright you’re working on!

One final thing before you start to put the Planter together: drill a countersink hole so the head of the screws you will be using don’t protrude – you can do this using either a dedicated countersink bit or use a dill bit slightly bigger than the 8mm hole, say 12 or 14mm should do the trick.

Again, do this for all the holes.

Putting it all together

To put the framework together, you’ll need a bit of clear space on a flat workbench; don’t use your best table for this as you may have some glue running out.

For the next part, you can start with either a bottom rail or a top rail; it doesn’t really matter – I’m starting with the bottom rail of the first framework.

Grab an upright and a bottom rail and position the rail against the upright between the two lines that you marked out previously.

With the rail in the correct position, get your drill and 8mm drill bit and place the drill bit into the pre-drilled hole you prepared earlier and drill into the rail. This makes it a bit easier to drive the screws home and will stop the rail from splitting.

With this done, add a touch of glue to the end of the rail, reposition and fire your screw home (100mm screws). It can come in handy to have two drills for this so you’re not swapping drill bits and screwdriver bits over. You can, if you prefer, do this process for all the rails and then drop back and glue up – don’t mix your rails up though!

Repeat the process for the top rail (on the same upright), before moving onto the the upright on the other side of the rails. Once you’ve completed the first frame, wipe away any glue that has leaked out and move on to putting the second and final frame together.

Cladding the planters

Cladding the planters is probably the easiest part. Lie one of the frames already put together down on a bench and run some glue on both the rails and where the boarding will be in contact with the uprights.

I’ve pre-drilled my boards before starting this; you just need one hole on each side of each board. For this, I’ve used a 6mm drill bit and come in 25mm from the end of each board and drilled in the centre across the width of the boards. Do this for all your boards.

Grab four of your boards: one top board (with tongue removed), one bottom board (with groove removed) and two centre boards (depending on whether you’ve followed me like for like or not – if not, and you’ve not removed a groove on the bottom boards, then substitute ‘bottom board’ for a normal un-modified/cut board)

At this point, it’s handy to have your cordless screwdriver ready and a supply of screws (40mm) already waiting with the cups already on them; it speeds everything up somewhat.

We’re boarding the planters horizontally so position the top board first so that the ends are flush with the sides of the planter framework. Also, make sure when this board is positioned, the groove is facing down, to the bottom of the planter, and that the top edge of the board is flush with the top of the top rail.

Place a screw into the holes already prepared on either side of the top board. Hold the board in position and screw home; do this for both screws. You can, as well if you like, drill starter holes through the boards into the uprights.

Place the remaining boards into place. This can be done either one board at a time, or place the remaining three boards onto the planter before drilling and screwing them up. The only thing to remember here is to make sure the boards are flush with the uprights.

Once you’ve completed boarding the first framework up, move on to the second, remembering to start with the top board first*

(We start with the top board first to ensure that the most visible part of the boarding is the same height all the way around; if you’re using mass-produced boarding, you can, and will, get slight variations in board sizes which could otherwise show up!)

Joining both frameworks

Once the two frames of the planters have been boarded, you just need to join them together. To do this, as it’s only a small Planter, I’m using the boarding. For larger planters, you will need to add additional rails between the two frames we’ve just made; in this instance, you can adapt what I’ve done to guide you.

Place the two frames you’ve made and boarded onto your bench. Position them so that the tops of both frames are facing in the same direction and the boarded parts are facing outwards (i.e. the left section’s boarding is facing to the left and the right section’s boarding is facing to the right) and the frames are sitting on the bench, edge on.

Run a line of glue down the first upright where the end of the board will sit. Position the top board so it sits flush on the edge of the already boarded side and the top is in line with the top board that is already fixed. Pre-drill and screw down. Repeat this process on the other side and then position all boards as before; again, pre-drill and then screw home making sure the boarding is flush at either end of the Planters.

Once you’ve done on this side of the planter, spin over and repeat.

Adding the planter base

All that’s left to do now is to add the base to the Planters. For this, all I’ve done is add two boards to the bottom that sit inside the Planter on the bottom rails; these are just screwed in.

Completing the planter

The chunky wooden planter I’ve made is just going to be used to house a plant pot – if you’re intending to fill it with soil, then it pays to line the planter with plastic. You can staple the plastic to the planter inside so it doesn’t move around whilst filling with compost etc – just remember to cut a couple of holes for drainage in the bottom of the liner.