nvidia_sponsorbuggrey

Photo by Hep Svadja
Read articles from the magazine right here on Make:. Don’t have a subscription yet? Get one today.

If you’re reading about artificial intelligence (AI), deep learning, and neural networks, but not quite getting it, you’re not alone. It’s all so high-powered and supercomputer-y, it seems beyond the scope of our ordinary desktop computing experience, let alone the little embedded computers that makers like to build into their smart gadgets.

But Nvidia has set out to change that by providing massive computational power on a small, low-power development board that’s ripe for makers to experiment with — the Jetson TX1. Based on Nvidia’s popular GPUs made for high-speed video graphics, the Jetson boards are focused on visual computing, Nvidia’s term for everything they do. What that means for makers is the ability to capture and analyze hundreds of images per second — for applications like face recognition and security; autonomous navigation of cars and drones; 3D mapping; advanced robotic behaviors; and projects no one has yet dreamed of.

For more information on the Nvidia Jetson TX1 Developer Kit, please visit this site.

Get student discounts on Nvidia Jetson here.

IMG_20160829_161411 copy

IMG_20160829_161429 copy

IMG_20160829_161435 copy

IMG_20160829_161441 copy
Nvidia wants to see what kind of projects makers will dream up to take advantage of this mini supercomputer, so they’ve provided Make: with the Jetson TX1 Developer Kit and challenged us to explore what it can do.

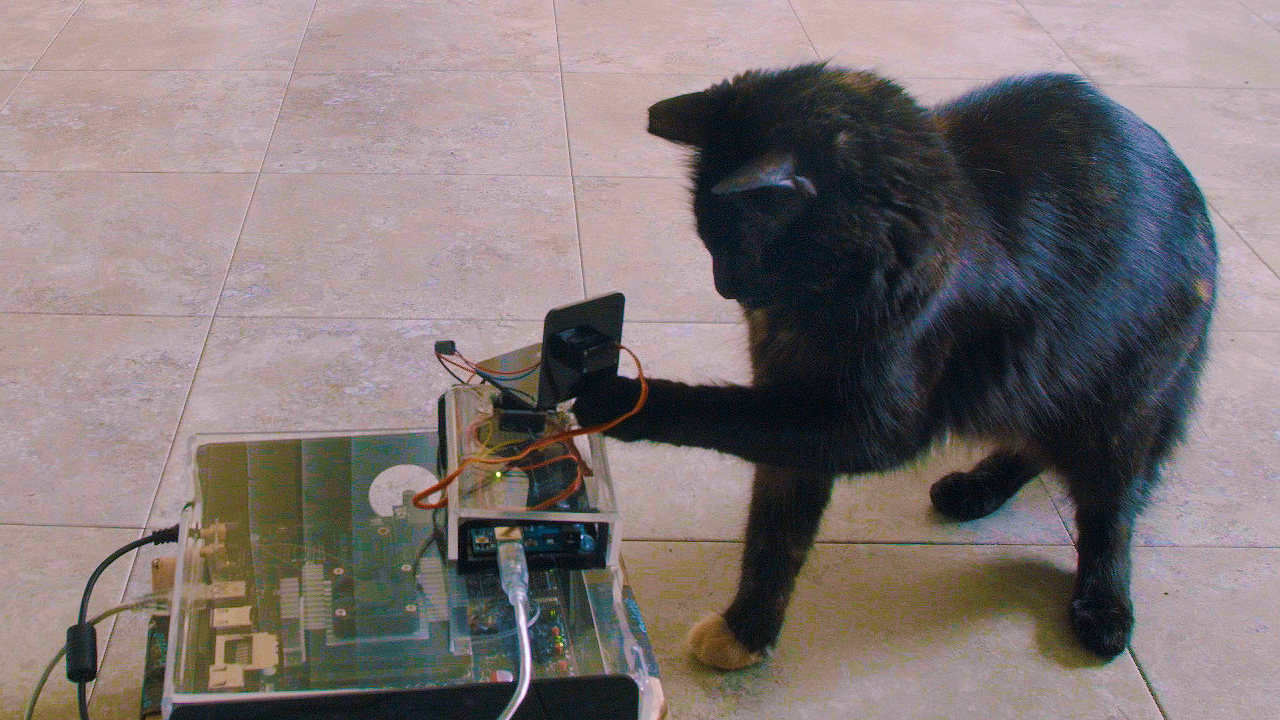
Our first project, by Sam Brown, shows off the Jetson’s ultrafast image processing and “neural network” learning abilities: It’s a cat-teasing laser pointer that actually recognizes cats and only activates when a cat is present — not a person, only a cat! This Cat Spotter truly understands what cats look like, thanks to the Jetson’s huge computing power, neural network software, and a massive library of images we’ve used to train the neural network. It’s like training a student with flash cards (“CAT” or “NOT CAT’) except the Jetson can learn thousands of flash cards in minutes. Once trained, the Jetson can correctly recognize an image from its built-in camera in milliseconds — thousands of times faster than ordinary computers.

Based on Nvidia’s popular GPUs made for high-speed video graphics, the Jetson TX1 is the second generation of their boards aimed at makers and other development projects. It’s capable of massive, multitasking computation and deep learning, and it’s what enables this project to identify whether a cat is present, before activating the laser.

Follow the instructions below to build your own Jetson TX1 Cat Spotter. And tell us — what else would you like to see us build? Let us know how you’d use the Jetson TX1 in your projects in the comments below!

—Keith Hammond, Projects Editor

BUILD A CAT-SPOTTING LASER TEASER WITH JETSON TX1

Project by Sam Brown

To jump-start you into this project, we’ve prepared a complete software install on the Jetson, with the Cat Spotter running from the moment it turns on.

The software that updates the Jetson only runs on Ubuntu Linux, so we’ll start by making a flash drive that lets any computer boot up as an Ubuntu computer. We used the utility UNetbootin to make this bootable USB stick for us.

We’ll also need the hard drive image that we’re going to clone onto a second flash drive. (Download here.)

Both of these downloads: Ubuntu for UNetbootin and the Jetson drive image, are many gigs large, and will take a while to download. Let’s construct the Arduino laser controller while we wait.

Project Steps

CONNECT THE HARDWARE

The hardware is simple: a bare laser diode you can buy cheap online, two standard mini servos mounted in pan-tilt brackets, and an Arduino microcontroller to control them. Finally, we add an NPN transistor to let the Arduino switch the 3.3V power on and off.

jetson_schematic_web

1.

To build a simple pan-tilt laser cat teaser, connect the two servos and the laser diode to the Arduino as shown in the wiring diagram. The laser is connected to the +3.3V pin; the servos are connected to the 5V pin.

nVidia_Cat_Laser_Toy-11

2.

Mount the servos to a 90° bracket and the top of your Arduino enclosure, as shown here. Then mount the laser to the bracket as well, pointing straight ahead level. After you’ve gotten the system working, you’ll want to tilt the laser to the floor or another surface your cats can reach.

You can download our Illustrator files to cut the bracket and Arduino enclosure from acrylic or metal and bend them yourself, or download a pan-tilt mount for 3D printing from Thingiverse, or improvise your own solution. You can also download our Jetson enclosure files (for .ai files click here and for .pdf files click here) for acrylic or metal. (The Jetson enclosure files were cut from flat acrylic, then I used a strip heater to put the bends in them. The enclosure. The .pdf files for the enclosure have increased line weights. Many models of laser cutters decide how to cut a line based on its weight, so the users may need to change them before cutting.)

nVidia_Cat_Laser_Toy-9

3.

Download the Arduino sketch from https://github.com/baudot/cat_play_jetson_triggered. Open it in the Arduino IDE on your computer and then Upload it to your Arduino board.

4.

Connect the Arduino to the Jetson via USB.

Your laser teaser hardware is complete — now you just need to program your Jetson to be a Cat Spotter: to recognize cats and initiate the laser teaser whenever it finds a feline.

SET UP THE CAT-SPOTTING SOFTWARE, 1.

To get the Jetson ready to recognize cats, you’ll use a pre-made neural network that’s already been trained. We’ve included this program in the drive image you started downloading before working on the laser.

2.

Partition the second USB thumb drive with the ExFAT file system. Most USB sticks use the older FAT file system, which won’t accept files over 4GB, such as our 10GB image download.

3.

Copy the downloaded file (laser_cat.tgz) to the second thumb drive.

4.

Reboot your computer with the first thumb drive, the one prepped with UNetbootin, to launch Ubuntu Linux on your computer. The NVIDIA software tool, JetPack, is written for Ubuntu Linux.

5.

Add support for ExFAT drives to that Ubuntu system by opening a terminal window and entering these commands, in order:
sudo add-apt-repository universe
sudo apt-get update
sudo apt-get install exfat-utils exfat-fuse

6.

Plug the second flash drive into the Ubuntu computer, which should now recognize it.

7.

Copy the laser_cat.tgz file to the Ubuntu system. This copy could take several minutes.

8.

Open a terminal, and cd to the directory where you dropped the copy of laser_cat.tgz. Unzip the file with the command:
tar -xvzf laser_cat.tgz
This unzip could take several minutes.

9.

After the file has been unzipped and untarred, run the command:
cd bootloader
to enter the freshly unzipped directory.

10.

Attach the Jetson to your computer running Ubuntu, using the USB to micro-USB adapter cable, with its micro-USB side plugged into the back of the Jetson.

nVidia_Cat_Laser_Toy-5


11.

Power down your Jetson. Power it back up, immediately holding down the Update button after releasing the power button. While continuing to hold down the Update button, briefly tap the Reset button, wait 2 full seconds, and then release the Update button.

The Power button is the rightmost button, if the buttons are turned to the front of the Jetson (with the Wi-Fi antenna at the back). The Update button is second from the right. The Reset button is furthest left.

12.

Confirm that your computer running Ubuntu can see the Jetson attached to it, by running the lsusb command in a terminal window. If you see “NVIDIA” in the list that appears, you’ve confirmed that your computer can connect to the Jetson to update it.

13.

You’re still in the bootloader directory on your Ubuntu machine? Good. Now load our pre-made laser-cat software from the Ubuntu computer onto the Jetson by typing:

sudo ./tegraflash.py --bl cboot.bin --applet nvtboot_recovery.bin --chip 0x21 --cmd "write APP laser_cat_APP.img"

Allow this command to run to completion (about 15–20 minutes) and then you’re done. You’ve copied over a complete clone of our working Jetson system, which has the pre-trained neural network.

Disconnect your laptop from the Jetson, and reboot the Jetson. Make sure its camera has a clear view through the enclosure. It should immediately start looking for cats!

nVidia_Cat_Laser_Toy-6

nVidia_Cat_Laser_Toy-3

For debugging, you can see what your Cat Spotter sees by launching the program from a terminal window on the Jetson. The program lives at ~/Desktop/workspace/cat-spotter/build/aarch64/bin/imagenet-camera. You’ll need to cd to its actual directory to run it. When you run the program in user mode, it brings up a video window showing what it sees, and whether it’s recognizing a cat at the instant or not. You’ll also likely want to tilt the pan-tilt unit so that it always points at the floor, or modify the Arduino code to achieve the same effect.

Your new cat toy recognizes felines using a neural network, and with the Jetson TX1 it can run a new image through that network in milliseconds rather than seconds. Image recognition that runs in fractions of a second opens up new options for robots that need to keep up with the real world and dodge obstacles.

There’s quite a bit going on behind the scenes to make your Cat Spotter run, and all these parts are ready for you to explore on your Jetson, installed at the same time Cat Spotter was. Some parts of the system you might want to look into are:

  • Caffe – the neural net we’re using to recognize felines is one of the examples included with Caffe, a package for building new neural nets. It’s particularly good for visual recognition.
  • Digits — another way to set up and explore neural nets, no coding required.
  • CUDA unlocks the power of the Jetson to run many, many tasks simultaneously, such as …
  • cuDNN, the software that taps into CUDA to run neural networks with exceptional speed.

We really want to thank Nvidia for making the tools available to us to make this video. Thanks for watching, and we’ll see you in the next weekend project!