Concrete, LED lights, and a built-in beverage cooler. What more can a guy ask for? Well, a cold beverage in that cooler I’d suppose! Check out this step-by-step tutorial and video to see exactly how you can create your own LED-lit concrete table to jazz up your patio.

bozeman-city-lights
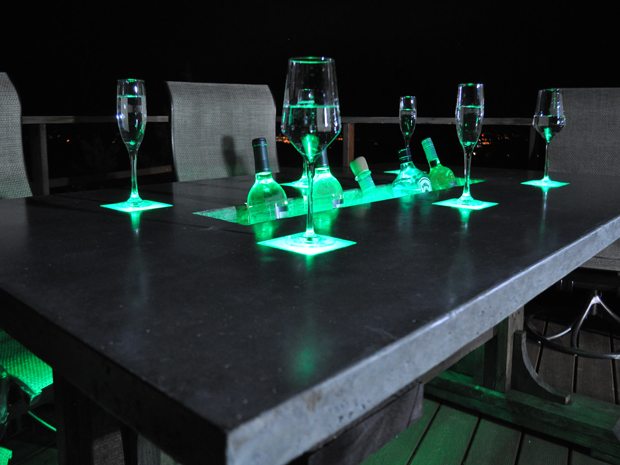
This concrete-topped table features an integrated concrete trough for beverages and built-in acrylic coasters to set your drink on. LED strip lighting from BirdDog Distributing shoots through each coaster and runs through the trough too, to light up glass bottles, pint glasses, and wine glasses. The lighting changes colors and is waterproof, so it’s the perfect solution to light this concrete table.

led-concrete-tableThe cost to build the concrete top with the LED lights was $244. The base was made out of construction grade pine and sealed with spar varnish for about $75. Total cost for the table from start to finish was $319. This is a 2- to 3-week project due to the time needed for the concrete to cure.

The trough measures 36 inches long, 6 inches wide, and 7 inches deep. You’ll be able to chill plenty of beverages!

concrete-trough-coolerThe table is very heavy, due to the fairly large slab of concrete and the extra weight of the trough. I built the trough out of concrete because I thought it would be neat to have the whole thing in one piece, and I had a tough time finding a nice-looking metal trough that was affordable — and I didn’t want to settle for a plastic planter box from the home and garden store. It’s built similar to the high-end concrete sinks you see at fancy restaurants, where the counter is all one piece.

Complete step-by-step instructions are detailed below. You can watch the complete video tutorial as well. Other helpful concrete table videos can be found on the DIY Projects with Pete website.

COMPLETE VIDEO TUTORIAL

YouTube player

SAFETY NOTES

Eye protection is recommended throughout all steps.
Rubber gloves should be worn while mixing, pouring, troweling, polishing, and sealing the concrete.
Hearing protection should be worn while using the miter saw and table saws, and during the polishing process.
A dust mask or respirator should be used during the mixing process.

Project Steps

Construct the table mold.

Use a circular saw or table saw to cut a 4’x8′ sheet of ¾” melamine down to the size you’d like your table. I cut mine to 68″x40″. This is a pretty standard outdoor patio table size built to seat 6 people. Melamine is essentially plywood coated with a smooth white waterproof coating. This makes it easy to create a smooth surface and allows the concrete to release from the mold with ease.

Cut the side strips for your table mold. For a 1½”-thick top you’ll want to cut strips that are 2¼” wide to accommodate the ¾” melamine. You’ll cut 2 strips to 40″ long and the other 2 to 69½” long.

Attach the strips to the base of the mold using 1½” screws. Make sure to pre-drill so you don’t split the wood.

Build the trough mold.

Here’s a diagram of the overall layout of the mold. It’s designed so the coaster is always on the person’s left. The trough is in the center of the table and measures 36″ long, 6″ wide, and 7″ deep.

I built a box out of ¾” melamine and tacked it together using a trim nailer. Use this photo as the reference to see how the pieces fit together for the trough box.

The second diagram shows the measurements for the trough box. The side walls are all 6¼” tall plus the ¾” piece. Look at the photo to see how everything is pieced together. My 3D diagram skills still have a lot of room for improvement.

Create the outside walls for the trough.

The measurements provided will make the trough 1½” thick on the sides and bottom.

Construct the outer shell of the mold using melamine. Pre-drill and use 1½” screws to connect the pieces.

Plan the layout for the trough and coasters to best suit your needs.

Make coasters.

For the built-in coasters, I bought a 24″×12″ sheet of ¼”-thick acrylic and cut 6 coasters in 4″×4″ squares. Acrylic is super durable, cheap, easy to find, and will not shatter if it gets hailed on.

Use an orbital sander with 120-grit paper to scuff the acrylic and give it a frosted glass type finish. This will help disperse the LED lighting and give it a classy look.

Lay out the coasters and trace around them once in place. Use the diagram in Step 2 to see the layout I used.

Cut reinforcement to size.

Lay a 4’×8′ sheet of square mesh reinforcement over the mold. Use a bolt cutter to cut the reinforcement down to size so that it fits inside the mold with about an inch to spare between the reenforcement and the sides of the mold.

Cut openings in the mesh for the trough and coasters. I traced around each coaster and the trough in the previous step so I knew where the openings needed to be cut.

The last photo in this step is of the final layout.

Seal the mold seams.

Use 100% silicone caulk to seal each seam of the mold. Run a thin bead along the underside of the trough mold to fasten it to the tabletop mold as well.

After running a bead of caulk along the seams, use a caulk rounding tool to give it a nice edge. You could run your index finger over the bead if you don’t have a rounding tool. Make sure to have plenty of paper towels to wipe up the excess silicone.

Attach the 4″×4″ acrylic coasters to the mold with a very thin layer of silicone caulk.

Add knockouts.

Knockouts are needed underneath the acrylic coasters to enable light to shine through from underneath. Cut 6 knockouts from 1½” insulation foam, in 3½”×3½” squares. This is slightly smaller than the acrylic, which gives the coasters a lip to sit on and some concrete to bond to. Cut the foam using a miter saw or hand saw. I shaved the thickness of each piece down from 1½” to 1¼” to make it flush with the concrete once it was poured.

Use a thin layer of silicone caulk to attach each foam piece to the acrylic coaster.

Use a miter saw to cut 4 knockouts 1½” long out of 1″-diameter PVC pipe. Wrap each knockout with tape and spray them with cooking spray to help them release from the mold more easily. Silicone each PVC piece to the bottom of the trough mold as shown. The 2 inside knockouts are used as drains and the outside knockouts will be used to thread the LED lights through.

Mix and pour concrete.

Gather 6 or 7 bags of concrete mix. I like to use Quikrete 5000 for the majority of my projects. I bought one bag of Quikrete Pro Finish to use for the trough because it has fibers mixed in which provide more reinforcement.

Mix 1 to 2 bags of concrete at a time. I used a plastic mixing tub from Home Depot and mixed up the concrete using a shovel. Mix it until it is about a cookie-dough consistency.

Scoop the concrete from the mixing tub into the mold using an ice cream bucket. Then pack the concrete into each corner and throughout the mold. Fill the main part of the mold about halfway.

Add the reinforcement mesh once the mold has been filled about halfway with concrete. Make sure the wire mesh is as flat as possible.

Continue filling the entire main part of the mold with concrete until it is full.

Make the trough, screed, and vibrate.

Place the outer shell for the trough mold around the box, so that it rests on the 1½”-thick concrete you’ve already poured. Add wire mesh reinforcement on each side and the bottom. You can also place ¼” rebar in for added reinforcement. Then use the fiber-reinforced concrete mix to fill the trough mold. When filling, blend the concrete into the 1½”-thick tabletop by using a stick of rebar to mix it into it. This way it will all become one and the trough won’t split from the top.

Use a scrap board such as a 2×4 to screed the concrete. This will level out your concrete piece and give it a flat bottom side.

Take a rubber mallet and hit the sides of your mold to release air bubbles. You can also shake the entire table up and down to help remove additional bubbles in the surface of the concrete. A vibrating table or concrete vibrator works great if you have one.

Trowel and let cure.

Trowel the concrete to help level the bottom of the table. It needs to be flat so your tabletop will sit evenly on the base.

Let the concrete cure for 3 to 4 days before de-molding the trough and sides of the table. Wait a full 7 days prior to flipping the table. This is a little longer than I normally wait, but will help ensure the trough has had enough time to cure.

Here’s a look at the concrete after 4 days curing out in the garage.

De-mold.

Remove the sidewalls from your mold by first removing the screws. Then use a flat chisel to slowly work the sidewall loose. Make sure to always pry against the wood and not the concrete. Otherwise you’re likely to chip the “green” or “fresh” concrete.

Remove the foam knockouts with a flat chisel. They’ll pop out pretty easily. Next, use a shop vac to clean up all the concrete dust and foam remnants.

The underside of the acrylic is going to have dried silicone caulk on it. Remove the silicone with a razor blade.

You can tap out the PVC trough knockouts at this time if you’d like.

Smooth edges and flip the table.

Smooth the edges of the concrete using a hand polishing concrete pad or 120 grit sandpaper. This will prevent the edges from chipping easily. Always work the pad away from the corner so you don’t blow out or chip away the corner.

Find 3 to 4 strong people to flip the table once you’ve de-molded it. Place towels or foam underneath the area where you’ll flip the concrete, to prevent the sides from chipping. Slowly lower the concrete onto a cart or open-top table for the finishing phase.

I built a cart out of 4×4s and 2×4s so I could easily wheel the table outside to polish it. The top is open so the trough has room below it.

Remove trough, polish, and fill voids.

Remove the inside of the trough mold. I pin-nailed this box together and so it wasn’t the easiest to get out. I was able to slowly remove each part of the mold using a pry bar. Take your time.

Use a wet polisher to do the first round of polishing. I used a 400-grit pad and went over the entire surface. The initial polish will open up air holes that you’ll need to fill in after polishing.

Mix some Portland cement with either water or acrylic fortifier to create a slurry, then use it to fill in all of the voids, including the larger voids that may have formed in the trough. This process is similar to filling holes in a wall with spackle.

Polish and seal.

Polish the concrete with a wet polisher for a super smooth and finished look. The wet polisher will remove the excess paste or slurry mixture. Start with the 400 grit and finish with 800 for a nice sheen. Use a hand pad to smooth the inside of the trough.. After the final polish you can fill additional holes if needed and then use a green scour pad to clean up excess paste prior to sealing.

I used a water-based, high-gloss concrete sealer made by Quikrete. I diluted it about 50/50 so it would go on thinner and more evenly. Do about 4 to 5 thin coats of the sealer.

Let the final coat of sealer dry for 1–2 hours prior to moving. This particular sealer tends to dry very quickly.

Attach to a base.

To make a wood table base for this project, I used free plans from Ana-White.com and modified them to make the base strong enough to support the concrete top. The side supports are made from a combination of 2×8s and 2×6s. The horizontal span is a 2×10 and a couple 2×4s run across on the top.

You can build whatever type of base you’d like. Make sure to leave room on the underside for the trough and for the LED lights to run underneath each coaster.

Get at least 4 strong people when moving this table. I rounded up a great crew and we grilled some burgers and had the first cold beverage at the new table once the moving was done.

Run a wide bead of silicone along the top of the base. This will help prevent the concrete from shifting on the base. Although it is so heavy that it would take a lot to move it.

Add the LED lights.

While searching for lights to create this project I came across a great online company named BirdDog Distributing. They supplied a 16′ strip of LED lights. The lights change colors and have all sorts of modes. I’d recommend ordering their 16′ LED RGB kit for this project.

Thanks to Josh, Alisha, Tiffanie, and Hagan for providing all the help in getting the LED lights set up for this project!

The 16′ strip makes it easy to light the trough and coasters in one swoop. First, thread the strip through one of the outside trough holes.

Secure lighting.

Secure the waterproof LED strip to the trough using clear silicone. Run it out of the other outside trough hole and then under each coaster.

Use duct tape to temporarily secure the LED strip in place.

Use clear silicone to glue the strip lights to the concrete. Keep the duct tape in place until all silicone has dried. Silicone is a nice option because you can easily remove the lighting if needed.

Fill holes and install drain caps.

The LED strip will sit at the bottom of the trough. Fill in the 2 outside holes with clear silicone to seal the holes.

Use PVC fittings in the 2 inside holes and attach caps for an easy way to drain the trough. The PVC fitting can be secured first with Liquid Nails or similar adhesive. Then seal it all around using clear silicone.

Add ice and enjoy.

Add ice to the trough and start chilling your beverages!

You can add a cover over the trough / cooler by cutting 2 pieces of clear acrylic. I cut one piece 38″×8″. Next, I glued another piece to it that was slightly smaller than the trough opening. This was cut to 35½”×5½”. The lip keeps the cover in place.

Host a barbecue!

Your guests will be amazed by your new concrete patio table. Set the mood with any color lighting you choose. Or turn on the music and start the dance party!

Conclusion

I hope this tutorial inspires you to create this fun, affordable, and eye-catching table out of concrete. Good luck, have fun, and cheers from Montana!