YouTube player

Holonomic robots are cool. They move in any direction, they rotate on the spot, they even move while rotating. These unique capabilities of holonomic robots make them very well suited for operating in tight spaces. But holonomic robots are also fun to play with and look at as they move gracefully over your floor like a figure skater on an olympic skating rink.

In this project you’ll build your own holonomic robot from Lego using an EV3 brick as its brains. You’ll be explained the basics of controlling a holonomic robot so that you can program your robot. Or you can omit the math and download some Java code to get you started right away.

What is a holonomic robot?

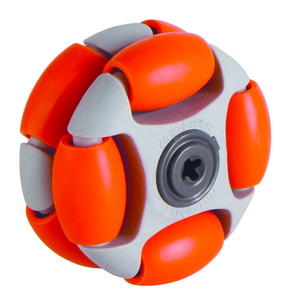
Omniwheel from Rotacaster

A holonomic robot uses special wheels, called omni wheels. Like conventional wheels they have grip in forward direction. Unlike normal wheels they can slide sideways without much friction. This is possible due to the rollers that make up the tread. One cannot control the sideways movement of a single omni wheel. A holonomic robot however uses three wheels mounted rigidly in different directions giving it full control over the direction it is going.

The most common geometry of a holonomic platform is triangular, as three is the minimum number of wheels to get a stable and controllable robot. Also our robot uses this geometry.

Agilis

Agilis, a lego holonomic robot

The robot we are going to build is called Agilis. It is agile like any holonomic robot. It is also quite fast for a lego robot. The wheels are geared up 2 to 1 giving it a maximum speed of about 50 cm a second. Agilis is powerfull with its three motors and strong thanks to its triangular shape. The batteries are easily replaced and all the motor and sensor ports are accessible.

No sensors are used in the build as we will concentrate on the drive system. However, the robot has three sensors docks. Once you have built this robot you can easily add some sensors to it and use these to add functions to your robot. Use the IR sensor or the Ultrasonic sensor for object avoidance or make a remote controlled robot using the IR sensor and the IR beacon.


What will the next generation of Make: look like? We’re inviting you to shape the future by investing in Make:. By becoming an investor, you help decide what’s next. The future of Make: is in your hands. Learn More.

Project Steps

Gather all the parts

First you should make sure you have all the parts for the robot. If you are missing some parts you can order them from BrickLink or Pick-A-Brick in the lego shop.

The wheels aren’t official lego parts, they are made by a company called Rotacaster. They sell the wheels directly to you online. But you can also buy them via Hitechnic. I advise to buy the grey wheels.

Both EV3 sets come with just two large motors. You have the option to buy one extra or to modify one of the robots legs to support the medium motor. If you choose to use the medium motor bare in mind that no gearing is necessary as this motor has a higher maximum speed.

Build the robot

Here you see the first three pages of the building instructions. Download the complete building instructions. Print them if you want to and build the robot.

Choose your software

The robot won’t do much without some software. There are two options. The first is to use a ready made package that runs in Java. The second option is to write the program yourself.

If you choose to use the ready made program you will have to have LeJOS on your brick. LeJOS is very powerful but it also has a steep learning curve. If you never used LeJOS before then you should first make sure that you have some idea about LeJOS before choosing this option.

If you choose to write your own program then the next step will provide you the formulas to calculate the speed of the individual wheels given the desired speed and direction of the robot.

Understanding the mathematics

Given the speed and direction of the robot you want to calculate the speed of each of the wheels.

The speed of a holonomic robot has two components. Its linear speed determines how fast it moves and in which direction it moves. Its rotational speed determines how fast it rotates around its center.

Linear speed of the robot has both speed and direction. Alternatively this can also be expressed as speed along two axes, the X and Y axis.

Vrx = Vlinear * cos(direction)

Vry = Vlinear * sin(direction)

Once you have calculated the speed of the robot along the two axes you can calculate the speed of a wheel. For this you need to know under what angle the wheel is mounted on the robot.

Vwx = Vrx * cos(wheelAngle)

Vwy = Vry * – sin(wheelAngle)

The robot can also have an angular speed. This speed adds to the speed. Lets call this Vangular.

We now have calculated three speed components for the wheel, the X and Y speed and the angular speed. These components can be added together to get the wheel speed.

Vw = Vlinear * ( cos(direction) * cos(wheelAngle) – sin(direction) * sin(wheelAngle) ) + Vangular

Bare in mind that the wheel angle is a constant. You therefore need to calculate cos(wheelAngle) only once. Doing so makes your program more efficient. The same applies to sin(wheelAngle).

Optonal: Install LeJOS

If you choose to use the supplied program you will have to install the LeJOS environment. LeJOS is not supplied by the Lego company and is not installed on your brick. You will have to do this yourself.

One word of caution. LeJOS brings the Java environment to the EV3. Java is an industry grade language. This means it is very robust and powerful. It also means that it can be rather complex for the novice user. Also the tools you use with java are professional tools. They too are powerful but have a steep learning curve. So unless you are already familiar with Java you have to ask yourself whether you want to take the effort to invest your time in Java and LeJOS.

Installing LeJOS on your EV3 does not alter it at all. LeJOS is installed on a SD-card. The original firmware stays on the brick unaltered. Booting the brick with the SD card inserted will bring you in the LeJOS environment. Booting the EV3 without the SD card will bring you in the original environment that came with the brick.

Follow the instructions on the LeJOS website to install Lejos on an SD card and on your computer.

Optional: Install and run the demo program

Download the EV3Pilot demo program.

Import this demo program into eclipse using File > Import > LeJOS EV3 sample programs and templates.

Convert the freshly created project into an EV3 project using the contect menu LeJOS EV3.

Run Square from the samples package using Run as > LeJOS EV3 Program from the context menu.

Understanding the demo program

The demo program makes the robot drive three different squares.

A square is constructed from 4 different linear moves. Each move is a line. All lines have equal length defined by the variable side. each line has a different direction. This line for example makes the robot move forward:

Move forward=new Line(side, 0);

Rotational movement is defined by the RotateTo object. In the seqond square the robot rotates after each line to face forward before continuing.
In the third square Lines and rotations are combined to make to robot rotate while driving.

Moves are executed by a pilot. The pilot is instructed to execute a move with the addAction() method.

Before the pilot can execute a move it must be informed about the geometry of the robot. This is done via a ModelBuilder object. The program tells the model builder where the wheels are, how big they are and what gearing is used.

Additional info about the way the pilot works can be found in this Prezi.

Make a better robot

This robot gives a solid platform to build more complex robots. Add your sensors, implement your ideas, play with it and have fun.