M20 wooden mini yacht

When my son was 3 years old, I made a small bathtub boat with him, using scrap wood and a piece of dowel. It lasted much longer and got more of his attention than any dollar-store bath toy, and about six years later we decided to try building a larger boat for the pool and local ponds we fished.

Here’s the result of our experimentation: a simple and worthy pond sailer that’s rigged and scaled like a real yacht. You can build it in a weekend using readily available materials and tools.

Project Steps

Prepare the sailcloth.

It’s hard to find waterproof fabric that’s easy to cut and won’t fray. You can make your own by stretching ripstop nylon loosely over a frame or 2 hangers, and spraying it lightly (in a well-ventilated area) with polyurethane.

First spray up and down, and then back and forth, until the fabric is well coated but not saturated.

Let dry overnight.

Mark and cut the parts.

Download the project plan and print it at full size. Following the plan, measure and mark the mast, jib boom, and mainsail boom lengths on the ¼” dowel. Trace the hull from the printed pattern onto the top and 2 ends of the cedar block; cut templates or use carbon paper. Draw the keel and masthead crane patterns on the brass strips, and draw the bowser (rigging clip) pattern 8 times on the thin plastic.

Cut and drill all the parts. Any fine-tooth saw will cut the dowel, or you can roll it under an X-Acto blade and snap the score. Heavy-duty shears or a hacksaw will cut the brass; be sure to file away the sharp edges afterward. You can saw or file down the hull’s shape, then use a hobby knife or thin chisel to excavate the slot for the keel. Drill all holes, plus pilot holes for the screw eyes (in the hull, just poke pilot holes in by hand with a thumbtack).

Finally, file, sand, and smooth all parts. The more time you spend here, the better — especially if you plan to use a clear finish over the wood.

Mount the keel.

On the underside of the hull, mask both sides of the keel’s slot with tape. Wearing gloves, and in a well ventilated location, mix and spread some 5-minute epoxy into the slot using a scrap stick or wooden match.

Slide the keel into position and hold it there while the epoxy cures. You can square it up using a business card on each side.

Use a gloved finger to smooth the epoxy along the joint line, and fill any voids with more epoxy.

Finish the wood.

Finish the hull uniformly, or for a big-boat look, paint the outside of the hull and stain the deck.

Sand the hull with 100-grit paper over a sanding block, and again with 150-grit. Apply a first coat of paint or varnish, and re-sand with 180-grit before each subsequent coat.

For a stained deck, first paint the hull upside down, then re-sand the top perimeter to remove any overspray. Rub stain into the deck and edge, let dry, and coat with varnish or polyurethane.

For the mast and boom pieces, bevel the cut edges for a more finished look, then sand with fine grit to remove any fuzz. Stain if desired, and cover with at least 2 coats of varnish or polyurethane sealer, sanding lightly between coats.

Assemble the mast and booms.

Cut a slot in the top of the mast and glue in the masthead crane. Once that’s secure, follow the plan to install all screw eyes: 4 to the mast, 1 on the fore end of each boom, 1 more on the mainsail boom (for the boom vang), and 4 to the deck. Screw these in until the shank of the screw is completely into the wood.

Insert the brass brad down through the hole in the jib boom and bend it into a clew hook.

Use needle nose pliers to open the mainsail boom eye, hook it onto the eye on the mast, and close it. This forms the gooseneck, the joint that lets the boom swing from side to side (far left in the photo). Press the mast down into the hole in the deck with the masthead crane centered afterward, and tap it gently down into its hole with a hammer.

Add the sails.

After the sail material is dry, trace and cut it to the plan patterns. Lay the boat on its side on a hard surface with the masts and booms in place and fit the sails to the areas for rigging. For the grommets, cut a small X at each sail corner, insert a grommet up through the hole, press the cloth down around it, and tap the grommet flat with the eyelet tool until it firmly grips the cloth.

NOTE: It’s a good idea to practice setting grommets first with a couple of sailcloth scraps and extra grommets. It’s time for rigging. Knot and cut a short length of dacron line, thread it through a bowser, and string the boom vang. For these and all other knots, add a tiny drop of cyanoacrylate glue immediately after tying; the line is slippery and won’t hold knots otherwise.

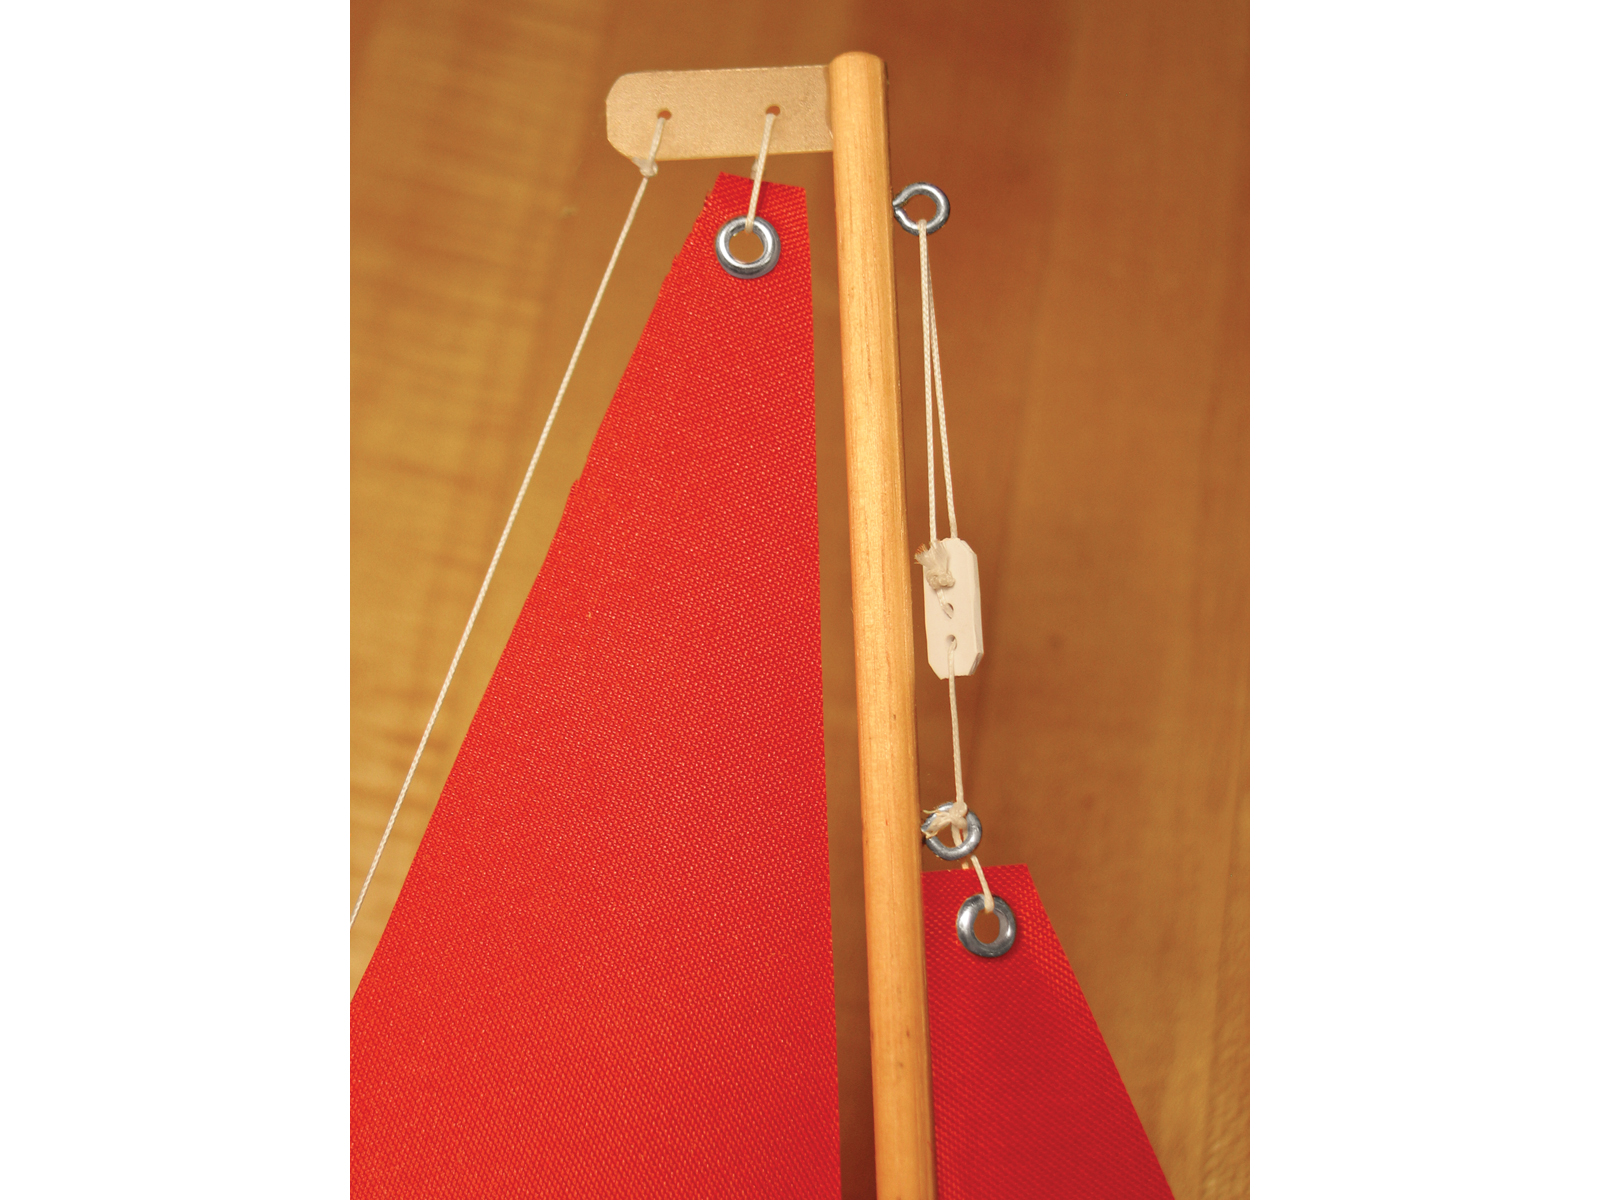
Use 5″ lengths of line to tie each sail grommet to its corresponding screw eyelet or drilled hole with a square knot. You’ll need about 10″ for the top of the jib sail, which threads through 2 eyelets before tying off to the uphaul bowser.

Referring to the plans, tie the 4 lower connections on the booms first, and then add the upper lines for tension, so there are no wrinkles in the sails along the booms. Thread a bowser onto the jib uphaul as indicated: for their final tensions, you’ll adjust the jib using the uphaul at the top, and the mainsail using the boom vang.

For the backstay, tie in a long length of line at the masthead crane and install a bowser, routing the line through the eyelet at the stern.

Tighten the backstay and the sails so that they’re fairly tight but the mast is not bowed forward or aft. Finally, add the 2 lines called sheets. For these, cut two 15″ lines. Tie each one through the hole in the aft end of a boom, thread it through the sheet eyelet on the deck just underneath, then through 2 holes in a bowser, through the other sheet’s eyelet, and finally through the last hole in the bowser, doubleknotting the line.

NOTE: It’s important to tie the bowsers exactly as shown on the plan to make them work. The sheets let you adjust the angle (trim) of the sails — slack for downwind sailing or tight for crosswind — letting you cross a pond or pool in any direction that isn’t too close to directly upwind.

Conclusion

This project first appeared in MAKE Volume 20, page 56.