Build the elemental slide guitar, from just a board, a wire, and a jar. Maybe you saw Jack White playing one in It Might Get Loud; now make your own for pennies.

About the Diddley Bow

After reading Alan Lomax’s excellent book The Land Where the Blues Began, I developed an interest in the diddley bow, a primitive one-string guitar rarely heard outside the rural South. Shane Speal, founder of the current cigar box guitar movement, suggested that I get the CD One String Blues, which featured nine cuts by diddley bow master Eddie “One String” Jones. The performances were stunning — raw, percussive, and deeply compelling.

After just one listen, I knew I needed to build and learn to play this instrument. On the first track of the CD, Jones described how he had built his diddley bow; a drawing of his instrument and two photos were included in the CD insert. With this information, I built my first traditional diddley bow.

In the South, the diddley bow is considered an informal practice instrument, built from found or recycled materials. Here’s how to build a stable, good-sounding instrument in about 10 minutes.

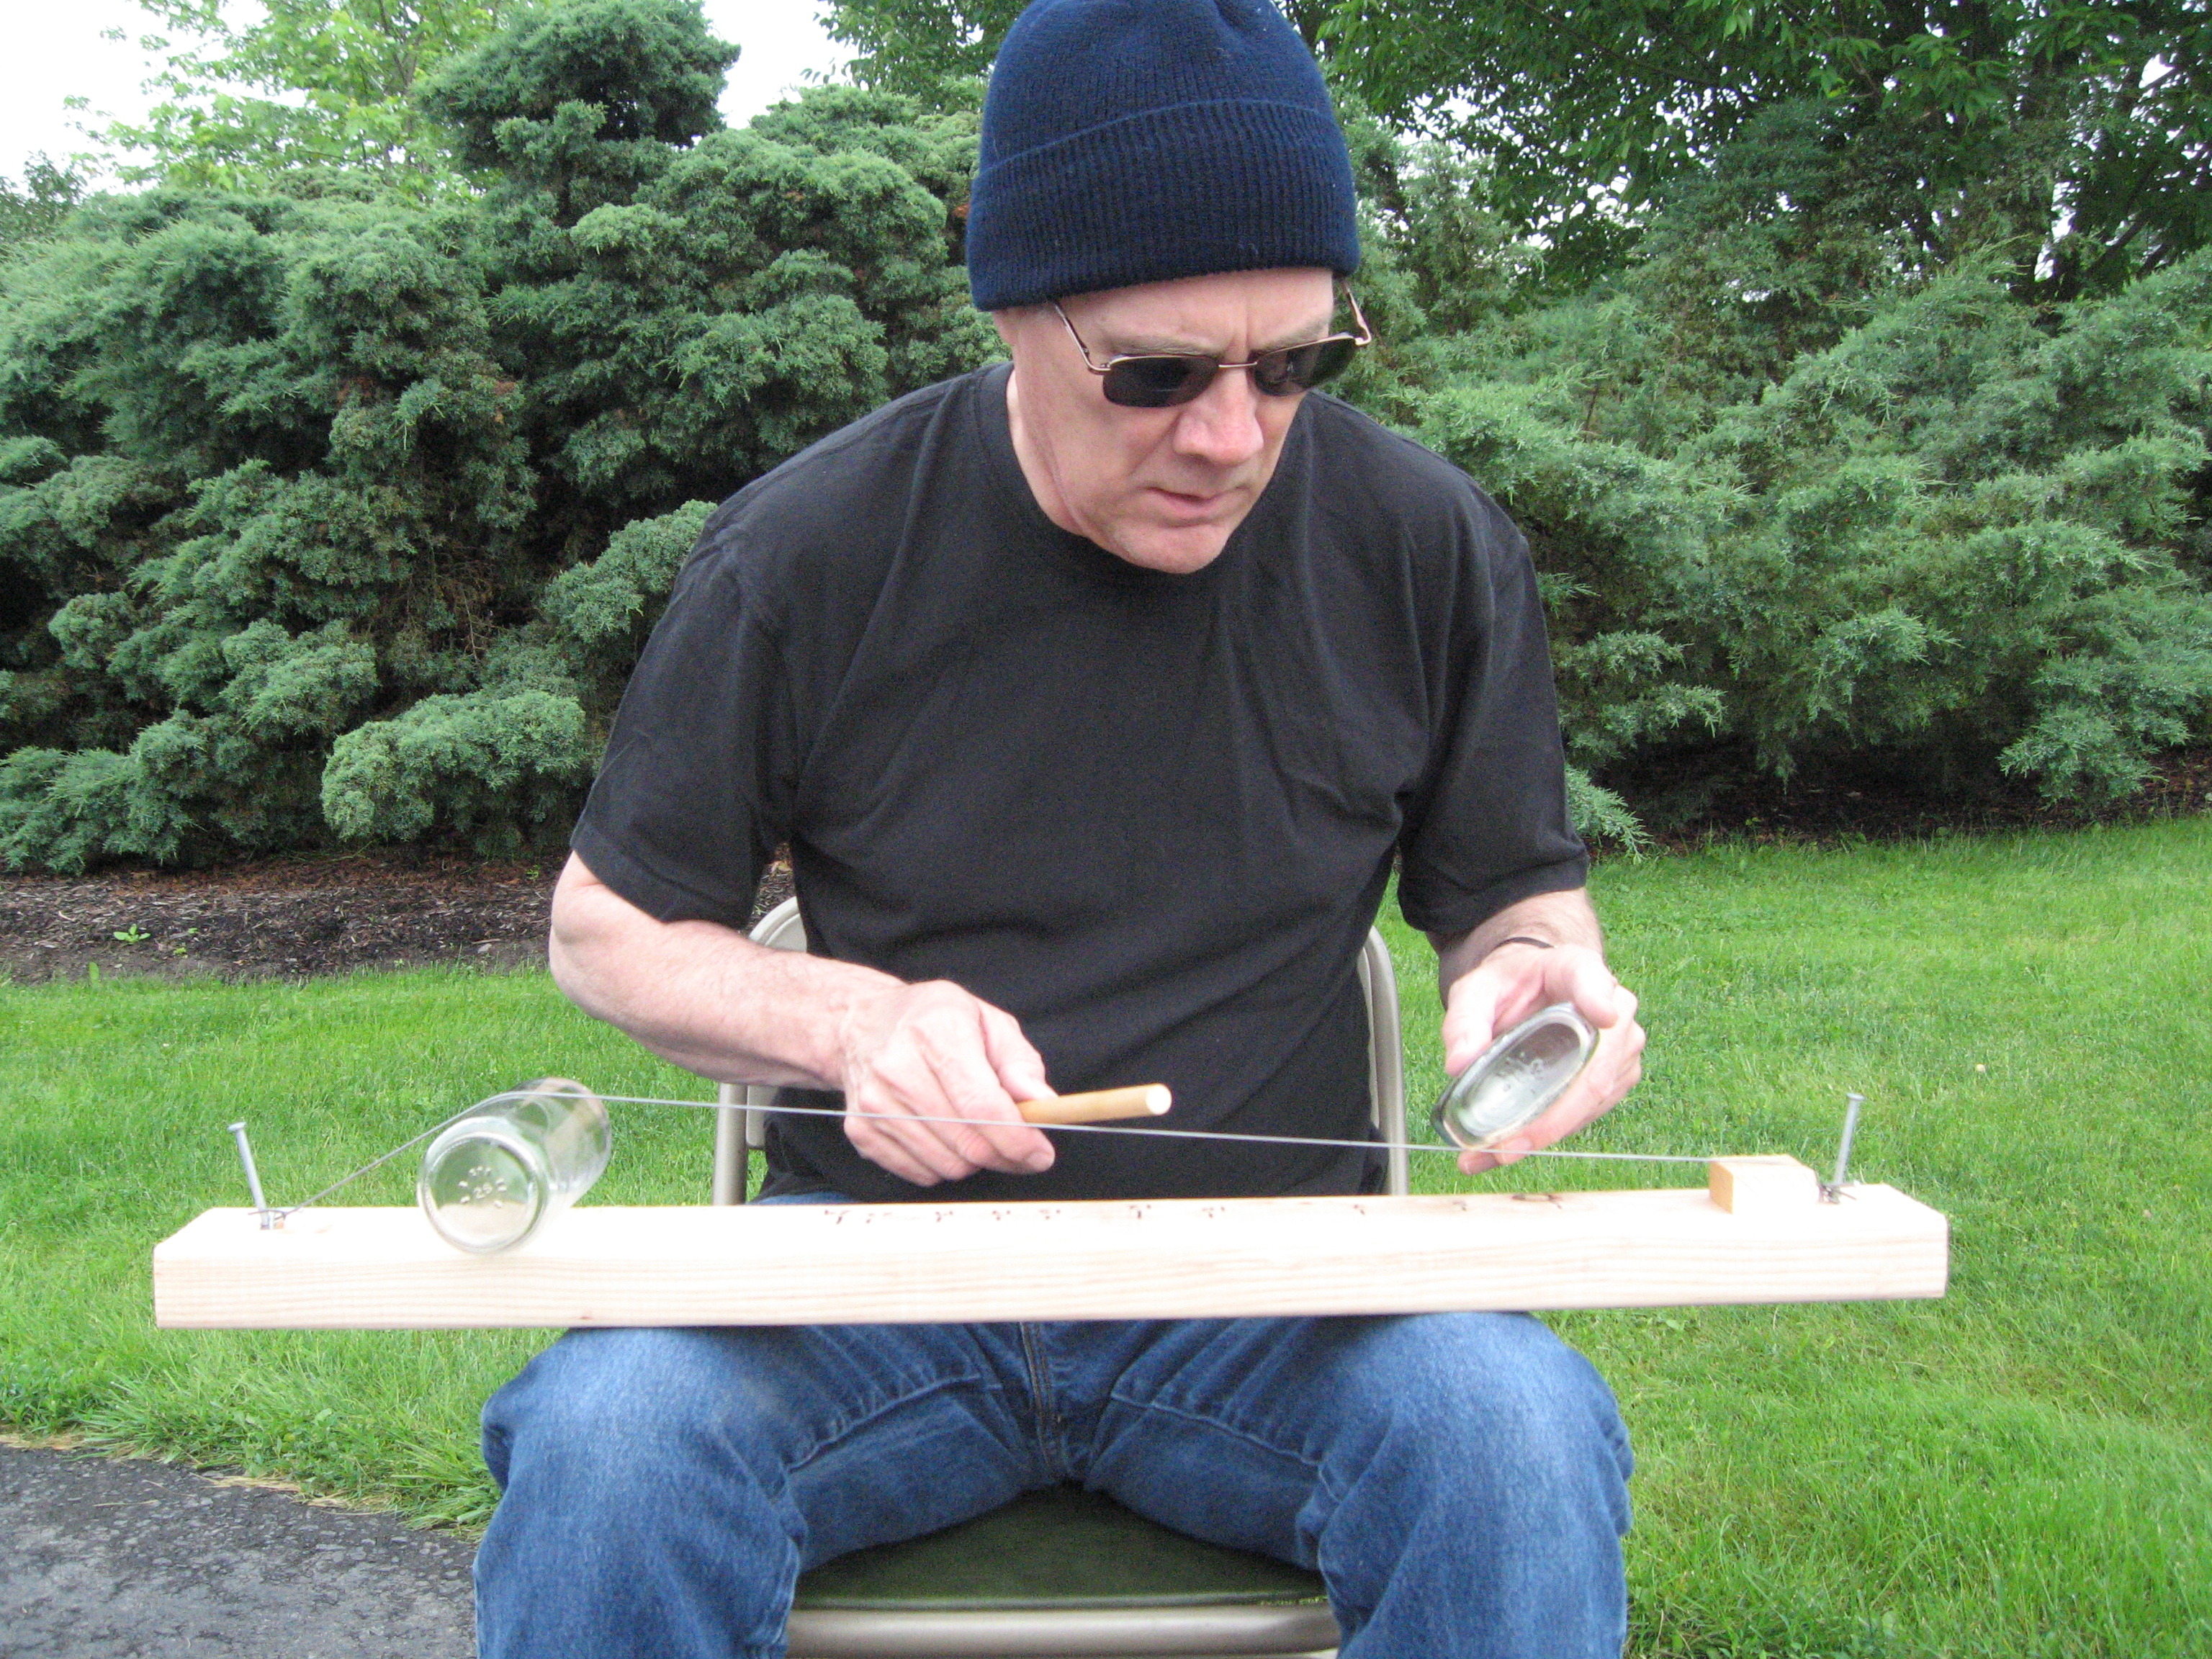
Traditionally, the string is struck in a rhythmic manner with a finger or a stick or some other implement, and the pitch of the string is altered by using a slide made of glass, metal, or some other hard substance. The diddley bow is slide guitar stripped down to its most elemental level.

WARNING: If you build a diddley bow, be aware that the wire is of unknown tensile strength and is being brought to unknown tension; in addition, the board and the glass jar bridge are both under compression. Use face and hand protection when tensioning up the diddley bow. Please use good sense when building, tuning, and playing these instruments.

Project Steps

Choose the right wire.

The main criterion for the wire is that it should not stretch much when put under tension.

The traditional diddley bow string is broom wire, the wire that holds the straws onto the handle of a discarded broom. The rust can be cleaned off the wire with Nevr-Dull polish.

Music wire from an old-fashioned hobby shop that sells model trains and planes (0.032″, 0.039″, 0.047″, 0.055″, or 0.056″) is a good substitute; I used it to make the diddley bow for this article. Hobby shops carry 36″ lengths good for about a 27″–30″ instrument; for longer diddley bows, you can order 72″ lengths from smallparts.com.

Guitar strings, which come in a variety of gauges, are a reasonable alternative, but are shorter than the music wire. Note that the larger diameters of wire are difficult to bend and cut (try heavier pliers or a Dremel), but sound better.

Galvanized fence wire from the hardware store is a poor substitute, as it stretches as you play, which causes the pitch to drop.

String the wire on the board.

Cut a piece of 2×4 or 2×6 lumber to about 3′ long (or about 4″ shorter than the length of your string wire, if you’re using music wire or guitar strings). Drive two 16-penny nails into the face of the board about 1″ in from each end, angling the nails upward toward the ends of the board.

Wrap one end of the wire around one of the nails for a couple of turns and then around itself. Wrap the other end of the wire around the other nail for a couple of turns, keeping it fairly tight, and then around itself, and cut off the excess on both ends. Keep the wire close to the board at both ends, and try to get it as tight as you can.

To keep the wire from slipping up on the 16-penny nail once the bridge goes underneath, drive a 6-penny finishing nail into the wood beside the 16 penny nail, and then hammer it down over the wire.

Install the bridge.

For the bridge, I have used small jars or bottles made of thick glass with cylindrical, not tapered sides, such as jelly jars, instant yeast jars, or hot sauce bottles. A large pipe coupling or an Altoids tin also work well.

Slip the jar under the wire at the center of the instrument, and slide it toward one of the nails, pushing it as far as it will go. When you’ve pushed it as close as you can to the nail, mark where the jar rests on the board.

Slip the jar away from the nail, past your mark, and then use a half-round wood rasp to rasp out a shallow groove across the board for the bottle to fit into.

Slip the jar back so it snaps into the groove.

Add the nut.

Once the jar is in place, the nut is installed. Slip a small scrap of wood (e.g., 1×2) under the string and push it as far as you can toward the other nail.

At this point, the wire should sound “bright” when struck with a stick. If it still gives a dull thump, the wire needs to be tighter. Use a tack hammer (or a regular hammer with a dowel) to whack the nut (not the jar!) toward the nail.

CAUTION: If you’re using a glass jar for a bridge, wrap the whole bridge end of the diddley bow in a towel when tensioning up the wire in case the jar shatters.

If the string is as tight as it will go with the current block of wood and still sounds dull, try a larger (taller) block of wood to increase string tension. If this doesn’t help, use a larger diameter jar, or restring, getting the wire a little tighter to start with.

Mark the position marks.

This diddley bow is played slide-style, resting across the knees. The pitch is changed by pressing a glass or metal slide against the string. When playing slide, I rely on visual cues (position marks) to get close to a pitch, and then on my ear to get it exactly. Position marks are similar to fret markers on a guitar. Not every fret has them — they’re there to help you know where you are along the string.

You could use an online fret calculator (see makezine.com/21/cbg), set for 24 frets, to mark the string at fret positions 3, 5, 7, 10, 12, 15, 17, 19, 22, and 24. But here’s the easy, traditional, low-tech method for laying out the position marks and double-checking them by ear.

Start by measuring the open string length, from the far edge of the wooden nut (the edge closest to the nail) to the top of the bridge.

From the far edge of the nut measure ¼, 1/3, ½, 5/8, 2/3, and ¾ of this length along the string, and mark the string at these points with permanent marker.

Now check your marks. Hit the string with a stick, and very lightly and briefly touch the string (damp it) with your fingertip at exactly the ½ mark while the string is vibrating. You should hear a chiming sound, which is a higher harmonic of the string. If you damp the string lightly a small distance away from this point, the chiming sound will not occur, and you will simply stop the vibration of the whole string.

If the harmonic is more pronounced when you damp the string at a slightly different location from your mark, this means the original mark is in the wrong location; change the mark so it’s at the point where the chiming sound is loudest when you touch the string. Mark the board directly below this point.

Once these steps work for the midpoint mark, proceed to the 1/3 and 2/3, and then to the ¼ and ¾ marks. Do the 5/8 mark last — the chime here will be difficult to hear, but if the rest of the points are marked properly, we can take this one as validated by the others. You should have 6 marks on the board. Going in order from the nut toward the bridge, number the marks 5, 7, 12, 17, 19, and 24.

Once the first 6 marks are established, proceed to mark the 3rd, 10th, 15th and 22nd positions. Measure the distance between the far side of the nut to position 5 (preferably in millimeters to make the math easier), multiply this distance by 0.63, and mark the calculated distance on the string from the lower numbered position (0, far end of the nut) to the higher numbered position (5), and finally on the board. This will be position 3.

Do the same between 7 and 12 (the distance between these two will be shorter), multiply by 0.63 to get position 10, mark it, and continue between 12 and 17 (shorter still) to get position 15, and between 19 and 24 to get position 22. There are no harmonic “chimes” at these positions.

Play your diddley bow.

The position marks form a pentatonic scale over 2 octaves, important for blues and rock. Remember that there are notes between the marks (a diatonic scale would be: open, 2, 4, 5, 7, 9, 11, 12, etc.).

Pick out a song you know well, and find the notes for it on the diddley bow. Work on finding one note at a time, then one phrase at a time, and finally put them together as a song. When working out a song, if the open string doesn’t work for you as a starting place, try starting on position 7. With practice, you’ll be able to play almost any kind of music on your diddley bow.

One of the secrets of rhythmic playing is using both hands to develop rhythmic drive, by using the left hand to stop the vibration of the string. The stick in the right hand beats out a rhythm as a timekeeper, while the left hand touches the string at different points in the rhythm to stop the notes from sounding, allowing a percussive “thump” to sound instead — this is a powerful technique.

These homemade instruments bring back the fun I had teaching myself to play guitar many years ago. I hope they give you the same pleasure!

[+] More on diddley bows, wire, and playing, plus concert video, a discography, and a bibliography, can be found on my website http://www.onestringwillie.com.

Conclusion

This project originally appeared in MAKE Volume 22.

Related Posts on Make: Online:

Make a 3-string slide guitar out of junk

http://blog.makezine.com/archive/2006/03...

Guitar slide from a glass bottle

http://blog.makezine.com/archive/2010/03...