When I was younger, I spent hours perusing Bill Beaty’s electrostatics web pages. At the time, I didn’t achieve any real successes trying to build his high-voltage contraptions, and so my interest waned.

Years later, I saw someone online use a soda can as a collector for their Van de Graaff generator, and all my childhood memories of futzing with styrofoam and foil came rushing back. I made my first sparks that afternoon, after a quick stop at our local surplus store.

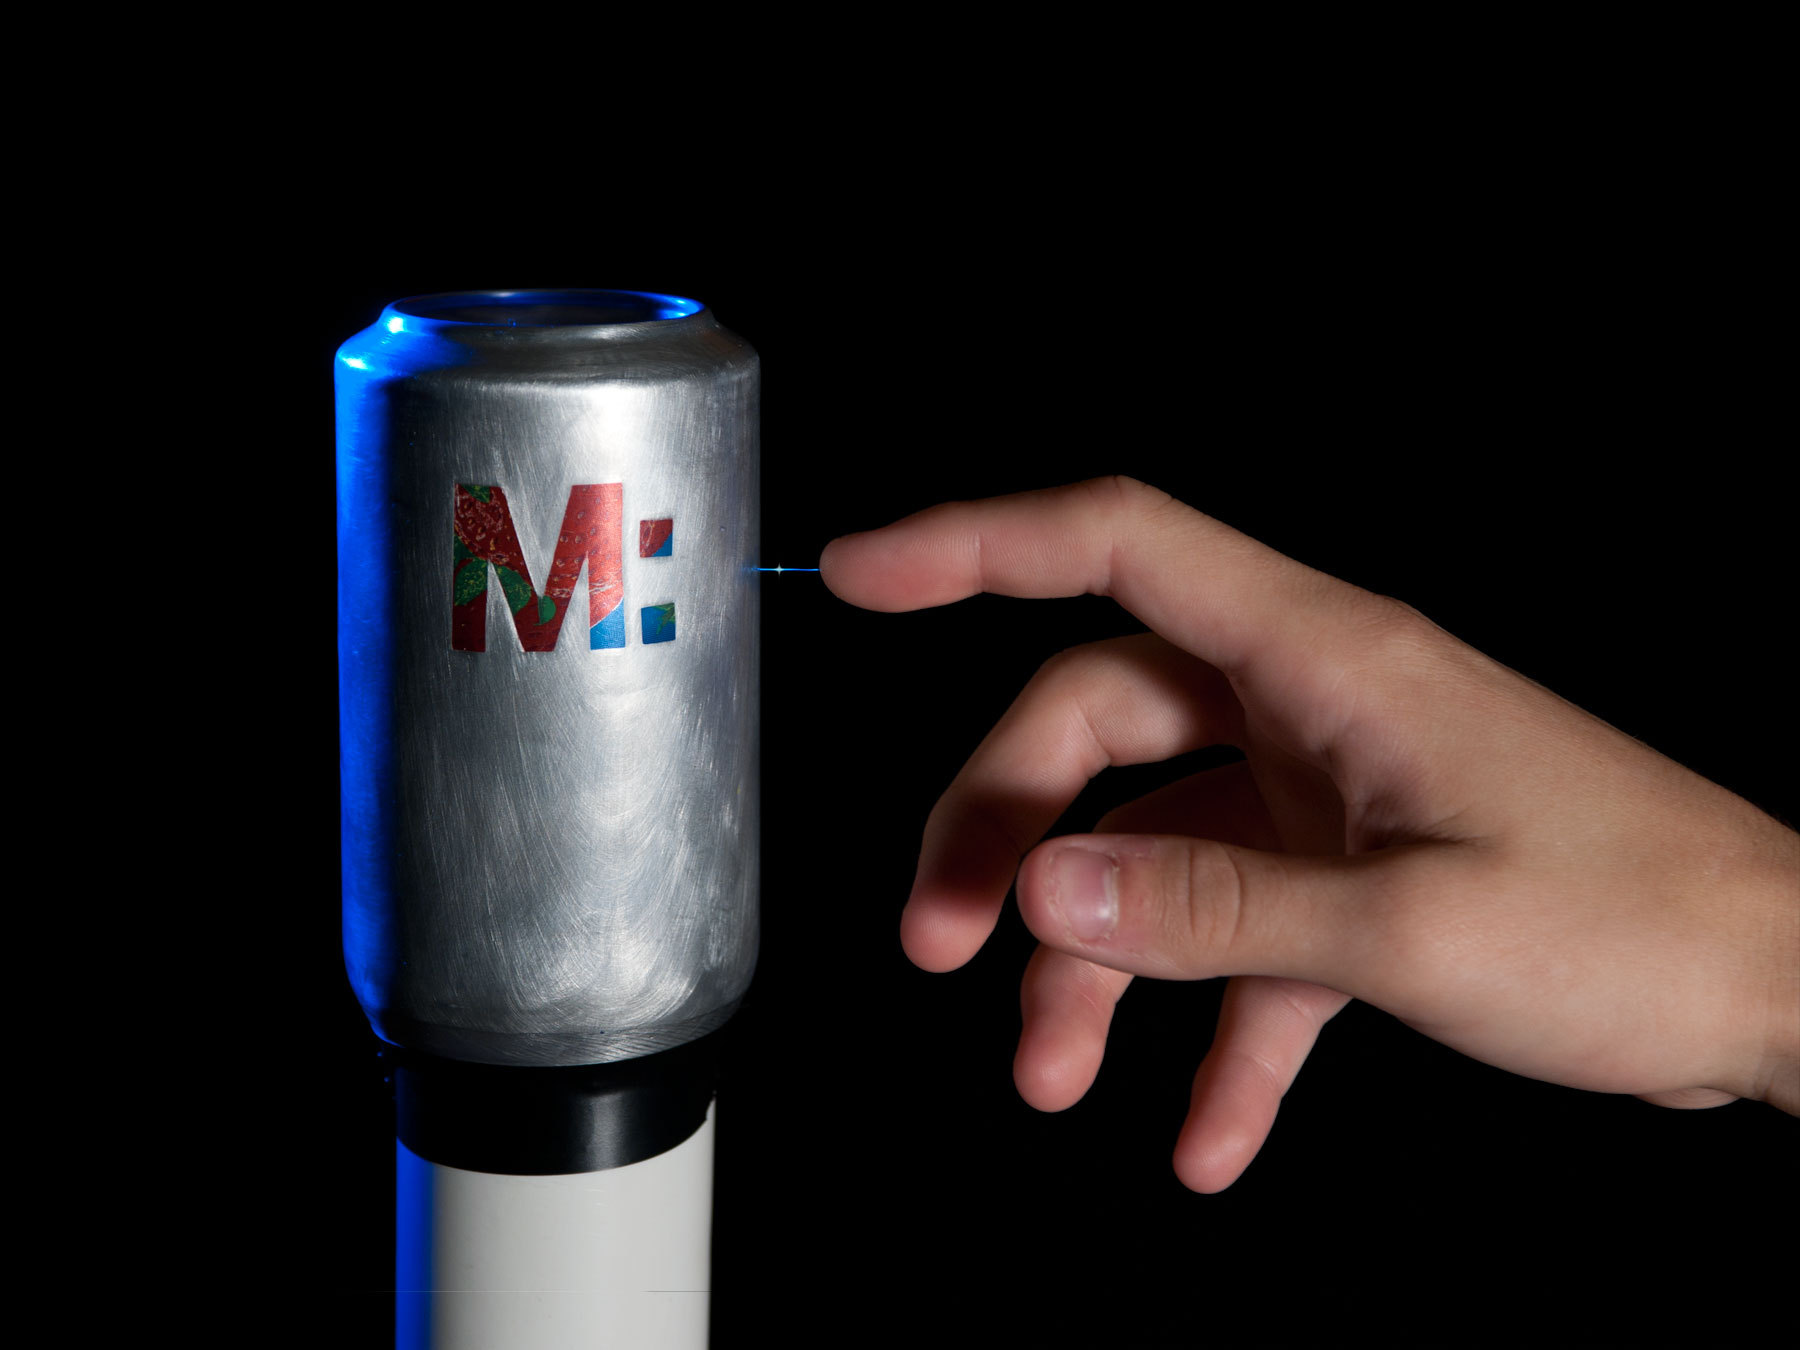
Here’s the simple design I came up with after consulting several tutorials. Using this device, I’ve generated thick, bright sparks 3″ long, and faint sparks 6″ long. Hold your finger close to it in a darkened room and you will see an eerie blue corona around your fingertip.

How It Works

There are 2 types of Van de Graaff generators. This one uses the triboelectric effect, in which certain materials become charged by contact with other materials — like when you rub a balloon with your hair.

During operation, a motor and roller at the bottom of the generator drive a rubber belt around a glass roller at the top, which creates a negative charge on the belt. A metal brush transfers this charge to a soda can, which is able to store a large amount of charge because it is both hollow and a conductor. The belt meanwhile becomes depleted of free electrons and needs to be replenished, and so a second brush at the bottom pulls in charge from whatever it’s connected to.

Project Steps

Build the base.

Stand the 3″×1½” PVC coupling on its wide end, and insert the 1½”×1¼” bushing. Cut a length of 1¼” PVC pipe about 2″ long and insert it into the bushing. Don’t jam the parts together. Press-fit them just enough that they’re joined, but loose enough to disassemble.

Connect the tee to the 2″ length of pipe

Prepare the motor.

Wrap the motor in electrical tape so that it fits snugly inside the 1″ side outlet of the tee.

To create the bottom roller, first wrap the motor shaft in tape until it reaches about ½” in diameter. Then split a length of electrical tape in half, lengthwise, and wrap the split tape around the middle of the roller. This “crowned pulley” shape will help the rubber belt stay centered on the roller (see MAKE Volume 22, “Puzzle of the Crowned Pulleys”).

Make the collector.

After enjoying a 12oz aluminum can of your favorite beverage, rinse and dry the can. Remove the top with a can opener. Be careful of the sharp edge inside.

Prepare the top roller.

To take the ends off a glass fuse, use a candle and 2 pliers. Grip one end of the fuse with one pair of pliers, holding its other end over the flame. Use the second pair of pliers to remove the hot end cap, being careful not to touch the hot glass or solder. Repeat for the other end of the fuse.

Remove any wire inside the fuse with the pliers. If there’s soot on the glass tube, clean it with rubbing alcohol and a cotton swab. From now on, try to keep the fuse dry and free of oils from your hand.

Make the top assembly.

The top assembly consists of a short length of PVC pipe underneath the can; inside the pipe is the glass top roller, mounted on a wooden dowel. The top brush enters through a hole across from the dowel, and its other end is connected to the can.

Cut a 5″ length of PVC pipe, and push it into the 1¼” coupling. About ½” away from the coupling, drill a hole through the center of the pipe and through the other side. The holes need to be fairly level. With a hand drill, this may take more than one try. This pair of holes is for the dowel and the top roller.

Drill a third hole for the top brush. This hole needs to be large enough for the stranded wire, and located halfway between the 2 dowel holes, the same distance from the coupling.

Cut the dowel to 1¾” long. Put the dowel through the first hole, the glass tube, the rubber band, and the second hole. Use a little hot glue to secure the dowel to the PVC so it doesn’t slip out.

Prepare the body tube.

The body tube is a single length of pipe that the rubber band runs through, between the top and bottom rollers.

To determine the right length for this tube, put the motor in the tee, loop the end of the rubber band over it, and hold the top assembly up. The belt needs to have a little tension, but too much tension just wastes power. Measure the distance between the top coupling and the top of the tee, and add 2″ so the pipe is long enough to actually fit into the couplings. Cut the pipe to this length. You may need to shorten it later to adjust belt tension.

Add the brushes.

The brushes are made of stranded wire and are located next to each roller. The top brush connects to the collector. You hold the bottom brush while operating the machine.

You’ve already drilled one brush hole at the top. Drill a similar hole, on the opposite side, in the tee, large enough to fit the stranded wire.

Cut a 12″ length of stranded wire. Strip 1″ of insulation off one end and ¼” of insulation off the other end. Insert the end with ¼” stripped through the hole in the tee until it’s about ½” from the bottom roller’s surface. Tape the wire down on the outside of the pipe with electrical tape.

Cut an 8″ length of stranded wire and strip 1½” of insulation off one end and ½” off the other. Insert the end with ½” stripped into the remaining hole in the top assembly so that the uninsulated wire is about ¼” from the rubber band, then tape the insulated section against the outside of the pipe to secure it.

Untwist the stranded wire inside the tube and spread it out a little, being careful to keep it close to the rubber band but not touching. Bend the other end of the wire over the top of the assembly and secure it with electrical tape.

Assemble and adjust.

Insert the motor into the tee. Drop the rubber belt from the top assembly through the body.

Insert the body tube into the top assembly. Use your finger to pull the rubber band down and loop it around the bottom roller. Carefully insert the body tube into the top of the tee, so that the brushes are on opposite sides.

Make sure the top and bottom rollers are aligned with each other. Hold the assembly up, look through the body, and check to see that the top and bottom brushes are close to the belt but not touching it. Also make sure the belt isn’t twisted, or so loose that it hits itself.

Connect the motor.

Put the batteries in the battery pack, and snap the 9V connector onto the battery pack. Press each wire against one of the motor terminals. The motor should spin.

The brushes should point at the moving belt on the side where it exits (not enters) the rollers. If this is backward, swap the motor power wires. Unplug the battery pack, and solder the 9V connector’s leads to the motor terminals. You can now use the battery snaps to connect and disconnect the motor.

Place the soda can on top so that the bare wire presses against it. Attach the battery pack. A charge should build up on the can!

Conclusion

Operation and Experiments

To increase the stored charge, hold the bottom brush. You’ll get the biggest sparks by holding the back of your hand flat alongside the can, and if you point a finger near it in the dark, you may see the air glow blue.

Tape threads or tissue paper strips to the can; they should spread out and repel each other. Tape a bent paper clip or wire to the can, and instead of building up a charge, the end of the wire will create a small wind of ions. Blow bubbles or drop confetti near your generator and watch what happens.

Troubleshooting and Adjustments

Humid environments inhibit the triboelectric effect. Test-rub a balloon or a fleece blanket on your head; if it doesn’t generate static, it’s too humid. You may be able to get your Van de Graaff generator to work after blowing hot air through it with a hair dryer.

If it still isn’t working, remove the can and go back over Step 9 (assembly), checking the brushes and belt. Also try cleaning the rollers or replacing the rubber band. All working surfaces must be clean, dry, and free of oil.

Once the generator works well, cover the rim of the can with electrical tape and attach it to the coupling. Covering the can-opener marks increases the maximum charge.

Eventually, the Van de Graaff generator will attract dust, reducing its effectiveness. Wipe the dust off with a dry cloth to return the generator to peak ability.

This project first appeared in MAKE Volume 28, page 124.