Eric Cheng is an award-winning underwater photographer, aerial imager, and publisher. He is the publisher of Wetpixel.com. He is an accomplished underwater photographer and writes about aerial imaging at http://skypixel.org.His underwater images have won contests such as the prestigious Nature's Best Magazine photo competition, which has placed some of his work in the Smithsonian's Natural History Museum. Eric's photography has been seen in over a hundred magazines and books worldwide.
The first aerial photograph was taken in 1858 by French photographer Gaspard-Félix Tournachon (from a hot air balloon), and since then, aerial perspectives in imaging have remained elusive to those without astronomical budgets. Historically, photographers have used just about everything to get cameras up in the air including balloons, birds, kites, rockets, airplanes, and helicopters.
In the last few years, unmanned aircraft systems (UAS), or “drones,” as they are referred to by popular press, have improved so much in performance and reliability that they have started to creep into the mainstream as the best way for (most) people to capture aerial images and video. These 5 tips will help you to get the best aerial videos you can.
Aerial video footage of surfers at Steamer Lane, Santa Cruz, Calif., July 2013, taken by the author.
Project Steps
1. CHOOSE THE RIGHT UAS.
The vast majority of people getting into aerial videography choose a quadcopter as their first UAS. Quadcopters are 4-propeller multirotor aircraft that use electronic flight controllers, sensors (including accelerometers, gyros, magnetometers, and barometers), and GPS to automatically stabilize flight and in some instances, allow autonomous “mission” flying via waypoint programming. They’re simpler to operate than tricopters, and more affordable than hexacopters.
The most popular quadcopter for aerial filming is the $679 DJI Phantom because it’s ready-to-fly (RTF) out of the box and was designed to hold a GoPro camera. (The new Phantom 2 Vision has a built-in camera instead, plus an FPV system — see tip 4 below.) The Phantom is the perfect platform, even for beginning hobbyists, because it’s easily hackable — there is a vibrant third-party accessories market, mostly consisting of enterprising individuals selling mods online.
The author’s quad of choice, the DJI Phantom, equipped with GoPro Hero3 camera and RotorPixel gimbal.
Multirotors from 3D Robotics are also a great choice. They offer kits (such as the 3DR Quad Kit, Maker Shed item #MK3DR01, makershed.com) and RTF models (including a new Phantom competitor called the Iris), all running their open-source, open-hardware flight platform for the ultimate in hackability.
Adventurous makers will likely want to build their own multirotor aircraft, which have the advantages of being (potentially) more budget friendly (build “The HandyCopter UAV” on page 44) and allowing you to tailor components to your needs. A DIY quadcopter or hexacopter consists of an airframe, flight controller, electronic speed controller (ESC), motors, propellers, batteries, radio, and receiver. Entire kits are available for less than $200.
2. CHOOSE THE RIGHT CAMERA.
Although large cameras can easily be put into the air if you configure and make your own multirotor aircraft, my favorite cameras for aerial videography are GoPro Hero3 cameras, which provide the best image quality for their size and weight. The GoPro Hero3 Black Edition weighs only 73 grams and can record video at 2.7K (2,704×1,524 pixels) at 45Mbps. And it’s got built-in Wi-Fi for downloading your footage.
GoPros are also pretty much the standard in aerial videography, which means maximum compatibility with OEM and third-party accessories for aerial imaging, such as vibration isolators and gimbals (covered in the next tip).
Finally, GoPros are easily protected while in the air by using their standard underwater housing or third-party lens protectors.
3. STABILIZE YOUR CAMERA.
The smoothness of aerial video is directly correlated to its perceived quality. But multirotor motion isn’t smooth. As a multirotor flies around, the flight controller automatically stabilizes the aircraft by sending power to its multiple motors. During flight maneuvers or in gusts of wind, a multirotor might pivot violently in multiple axes, and while this keeps the quadcopter itself stabilized in space, it wreaks havoc on footage recorded in mounted cameras. In the past, hobby aircraft used servomotors to correct for this sort of movement, but servos are slow and sloppy, unable to correct quickly enough.
Gimbals and aircraft motion. These days, stabilized aerial video is made possible by the incorporation of gimbals that use brushless motors. A gimbal is simply a support that allows the rotation of an object around an axis, and brushless motors are the same motors that revolutionized R/C model aircraft due to their great power-to-weight ratio (rewound for higher torque in gimbal use).
A typical camera gimbal allows rotation around two axes: roll and pitch. A sensor on the camera mount tells the gimbal controller, “I want to be level,” and the gimbal controller sends the appropriate signals to the brushless motors that control pitch and roll. In practice, brushless gimbals yield footage from quadcopters that looks like it was taken using a flying Steadicam (see ech.cc/aerialvid for some of my footage). Gimbals for GoPro cameras are available for as little as $150, and can simply be bolted to the bottom of any aerial platform.
The copter is crooked but the camera’s level, controlled by a brushless gimbal.RotorPixel gimbals are matched to the DJI Phantom and also pre-tuned to match the GoPro Hero3 camera.
Prop vibration and “jello.” The second image-quality problem that needs to be solved is the removal of “rolling shutter” artifacts. CMOS image sensors, which are used in most digital cameras, scan the image in rows from top to bottom as they read data for each frame. If a camera is moved around during shutter sweeps, it results in horizontal spatial artifacts, more commonly known as “jello.”
Jello is caused in UAS footage by high-frequency vibrations introduced by rotating motors and propellers. The best way to remove it is by balancing propellers, which can come from the factory with one side heavier than the other. Balancing is facilitated by inexpensive prop balancers, and is achieved by applying clear tape to the lighter side and/or sanding the heavier side. (Sand the flat sides, not the leading or trailing edges —YouTube has great tutorial videos.)
Balanced props, combined with the vibration isolators that are commonly used to mount gimbals, should yield beautiful, jello-free, stabilized video.
Inexpensive prop balancers help you reduce propeller vibration.Author’s gimbal mount, showing the blue rubber vibration isolator.
4. ASSEMBLE AN FPV SYSTEM.
It’s very difficult to get good video footage if you can’t see what you’re recording. In the UAS world, this is called flying FPV, which stands for first-person view. An analog video transmitter is used on the UAS to broadcast real-time video from the camera. The pilot uses a receiver and either a monitor or LCD glasses to see what the UAS is seeing. Experienced pilots can fly 100% using FPV without needing a line-of-sight view of the aircraft.
An entry-level FPV system can be purchased for around $250. You can read my full deconstruction of the Ready Made RC 5.8GHz starter kit at ech.cc/quadfpv — it taps into the GoPro to use it as the FPV camera as well. (For more FPV tips, see page 48.)
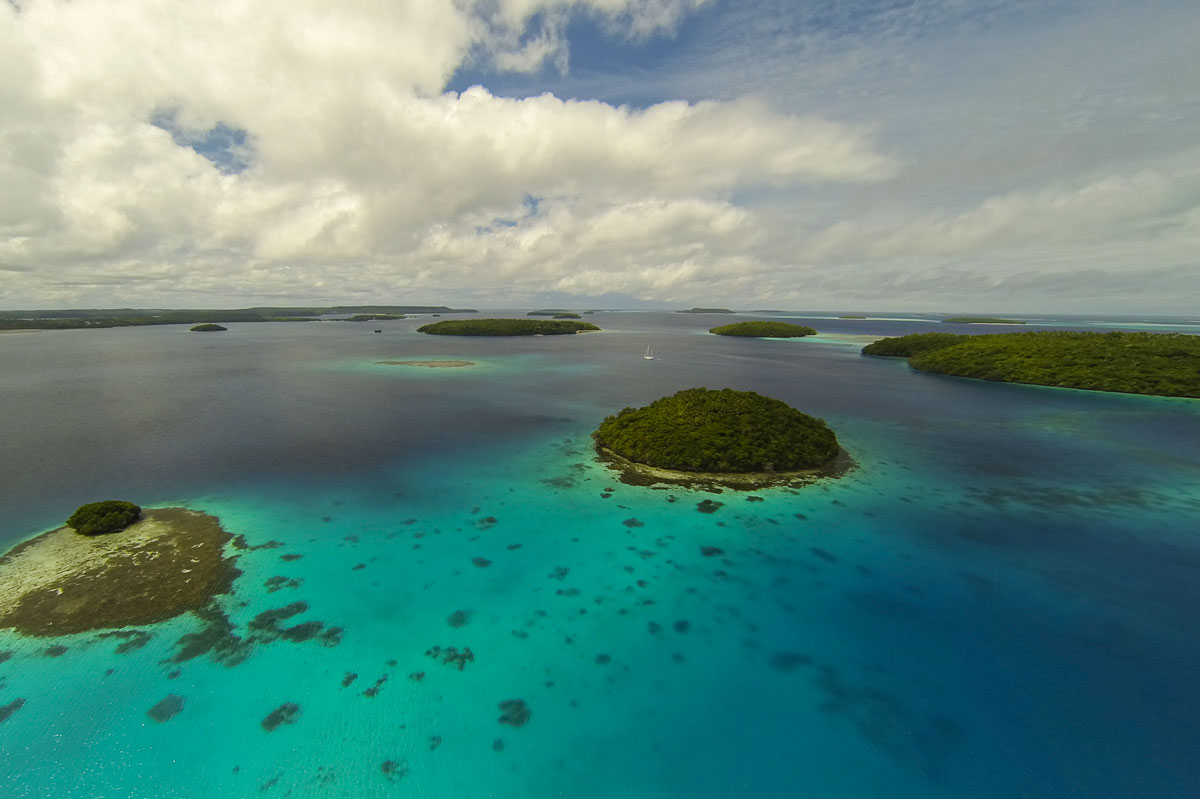
The author pilots his video Phantom over the waters of Tonga via an FPR (first-person view) system from Ready Made RC.
5. THERE’S NO REPLACEMENT FOR PRACTICE.
The most important thing you can do to improve your aerial video footage is to become a skilled pilot. There is no substitute for stick time, and spending all your time at a workbench instead of flying your UAS in an open field will never yield great footage.
I also recommend practicing flying using inexpensive toys. The Syma X1 and Blade Nano QX or mQX are all great toy quadcopters that cost between $36 and $90. They fly using the same controls, and do not offer the luxury of GPS location hold. If you can master a small quadcopter, the skills you learn will translate directly to larger aircraft.
More stick time = better video: fly as much as you can.TIP: Practice your skills with toys like the Blade Nano QX and the Syma X1.
Eric Cheng is an award-winning underwater photographer, aerial imager, and publisher. He is the publisher of Wetpixel.com. He is an accomplished underwater photographer and writes about aerial imaging at http://skypixel.org.His underwater images have won contests such as the prestigious Nature's Best Magazine photo competition, which has placed some of his work in the Smithsonian's Natural History Museum. Eric's photography has been seen in over a hundred magazines and books worldwide.