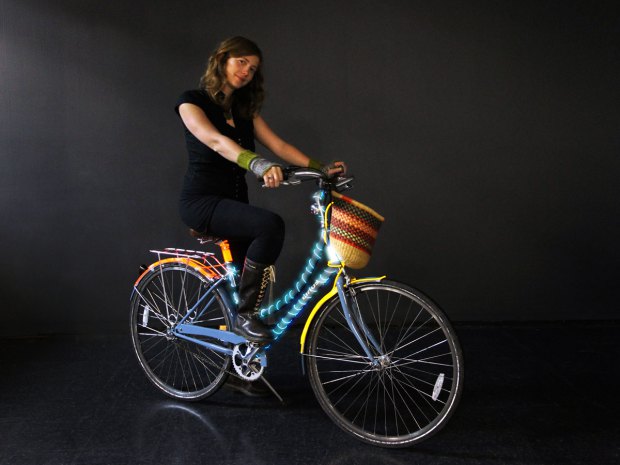
Glow_BIke_2_jbr

This project first appeared in MAKE Volume 38, on pages 68-71.

Bike lights and reflective tape are the common go-to’s for night riding, but why not go further and make your bicycle frame glow? About three years ago, Vancouver Hack Space member Luke Closs decided to put electroluminescent wire (EL wire) on his bike, mostly because he thought it would look cool — but also for the added benefit of bicycle visibility.

After making a few prototype kits, Luke decided he wanted to see hundreds of Glow Bikes in the city. I put together an EL wire kit and discovered it was a great introduction to soldering. So as Luke assembled kits, I took photos and compiled an instruction manual. These prepared materials helped us simplify “build nights” and get large groups of people to mod their bicycles together. At the end of this project, we sold over 100 bike kits!

Back then, soldering your own inverter to the EL was the only way to make it glow. Now there are lots of plug-and-play options, like the EL Wire Starter Pack we’ll use here. (There are even fancy splitters so you can have 4 wires powered from the same driver!) Even though it takes a bit of time and effort to solder your own EL, it’s a valuable skill — once I understood how to solder EL to a driver, I also knew how to fix it. It’s always good to “open up the box.”

With the Starter Pack kit, you can wrap your bike in glowing EL wire in minutes — but what if you want the glow to cross over to your handlebars, front fork, a bike trailer, or any other part of the bike that flexes? EL wire doesn’t like to flex, so we’ll show you how to splice EL wire to ordinary wire, to make clean bends in your design. Want an even brighter show? We’ll show you how to add a more powerful driver that also has the ability to respond to sound.

I encourage you to make your own Glow Bike and tell your friends as well. It’s rewarding and it’s sure to turn a lot of heads.

What Is EL Wire?

Electroluminescent wire consists of a copper wire coated in phosphor (a luminescent substance similar to what’s in glow-in-the-dark toys), which glows when an alternating current is applied across it by outer wrap wires (aka “angel-hair” wires).

01_EL_Illustration_jbr

Tips on Batteries and Drivers

This project uses readymade driver kits, but when you tackle bigger projects you’ll want to use more powerful EL wire drivers. You have several battery options depending on your skill level and requirements. EL wire drivers will accept 9V–12V, but your EL will be much brighter with a full 12V.

  • Alkaline batteries provide 1.5V, so 8 of them yield 12V. Ikea’s AA batteries are very cheap and super fresh, so they last a long time!
  • Rechargeable NiMH batteries provide 1.2V or 1.3V, so they’ll work but they won’t be as bright, or you’ll need 10 of the 1.2V type.
  • Rechargeable alkaline batteries (such as Pure Energy brand) give 1.5V, are lighter than NiMH, and have no heavy metals.
  • Lead-acid 12V batteries are heavy, but have a huge capacity and are very rechargeable.
  • LiPo R/C helicopter batteries are very light, but expensive. Get a 14.4V LiPo pack and use a voltage regulator to knock it down to 12V.

Project Steps

Design your Glow Bike.

Decide where you’d like to put the glowing EL wire on your bike frame, forks, handlebars, etc. Figure out the design you’re going for and make it happen! You can always redo it (unless you glued it on). This kit gives you 25′ of EL wire to work with. Some tips:

Clean straight lines and smooth curves look great!

Put the EL wire on the top/bottom (or front/rear) of your tubes rather than on the sides. That way, it’ll be visible from both sides, making your bike brighter!

Don’t put EL wire in places where it will flex when riding or storing your bike. This can break it. Instead, use ordinary wire in places where you need flex — for example, to cross from the frame to the front fork — and connect it to your EL wire as described in Steps 2 and 3.

Decide where you’ll mount the battery pack. Depending on your design, you might find it easier to use a 1-to-4 splitter right by the battery pack, then run 4 lengths of EL wire in different directions.

Prepare your EL wire for splicing (optional).

If your design crosses over any part of the bike that flexes, you’ll want to splice the EL wire to ordinary wire to bridge these places. Here’s how.

Disconnect the EL wire from the driver/battery pack, and cut it to length. Using wire strippers or a knife, strip the vinyl sheath off the last 2cm or so of the EL wire (about a thumb’s width). Don’t cut through the core wire at this step. (If you do, no worries, you can always try again!)

Slip a length of 3mm heat-shrink tubing over the EL wire. This step is easy to forget and very important! (You’ll see later.)

Wrap the top of your EL wire with copper foil tape.

Separate the outer, “angel-hair” wires from the core wire and wrap them backward onto the copper foil. Be careful, they’re fragile! (Again, if you accidentally cut them, you can start all over.)

Solder the angel-hair wires to the copper foil. If you have a third hand, this will make the process much easier. Or, ask a friend to lend a hand!

Repeat this step to prepare the other cut end of the EL wire.

Solder EL wire to ordinary wire (optional).

Cut 2 leads of stranded insulated wire long enough to bridge the flexible joint of the bike that you’re trying to cross. You’ll have to attach one between the copper foil contacts, and the other between the core wires. Measure your leads and cut them to fit so that you don’t have an awkward bind.

Slip a length of 1mm heat-shrink tubing over the shorter of the 2 leads (the one you’ll attach to the core wire).

Pre-tin the core wire by first heating it with the tip of the soldering iron, then touching solder to the wire (not to the iron) so that it melts and covers the wire. Then solder the shorter wire lead to the core wire.

TIP: What Is Pre-tinning? Pre-tinning means coating a wire or other metal object with solder by heating it first, then melting the solder over the top. Pre-tinning wires before actually fusing them together makes for a stronger joint.

Slide the heat-shrink over top of the joint, then apply heat to shrink it in place, protecting the connection. You can use your soldering iron or a heat gun.

Solder the longer wire lead to the copper foil, thereby connecting it to the angel-hairs.

Repeat this step on the other cut end of the EL wire to complete the connection.

Power up and test it.

To test your work, attach the EL wire to the driver and switch it on. The EL wire should glow!

Once you know your soldering worked out, disconnect the driver again. Apply Shoe Goo to all connections for extra hold, and then slide the bigger heat-shrink tube down over the connections, and apply heat to shrink it in place.

Add quick-connectors or splitters (optional).

If you want your EL wire connections to be detachable, say for connecting and disconnecting a Glow Bike Trailer, you can follow these same steps to solder the EL wire to 2-pin male and female connectors. First, snap the connectors together so you can keep track of the wire connections. Then splice them to the EL wire the same way you spliced the ordinary wire.

To use the Adafruit 1-to-4 splitter, follow these same instructions to solder 4 male connectors to your 4 segments of EL wire.

Attach your EL wire to your bike.

Route your EL wires according to your design, and use clear hockey tape (from Canadian Tire, say) or zap straps (aka zip ties) to secure the EL wire to the bike. If you prefer, you can glue it on with Shoe Goo, but it will be harder to change or remove.

Look cool and tell your friends!

Click the EL wire’s male connector (or the splitter’s male connector if you’re using a splitter) into the driver’s female connector, and switch on the glow.

The EL Wire Starter Kit driver has 3 modes: continuous glow, flash (about every 1 sec.), and strobe (about every 1/4 sec.). Time for a night ride!

Going Further

Flash to the beat. If you want to drive more EL wire on a single bike, or even better, if you’d like to make your bike flash to the sound of music, you can substitute the Sound Activated Driver (Long-Length version). It will drive 20’–50′ of EL wire from a 9V battery or, optionally, an 8xAA battery cage, and it’s got 2 modes — continuous glow, or sound reactive — with a slider to adjust the sound sensitivity. Bring a boombox and watch your bike flash to the beat!

Multiple colors. Now that you know how to splice EL wire, you can buy additional colors and splice them together, or patch 4 different colors into the splitter, to create new multicolored designs.