YouTube player

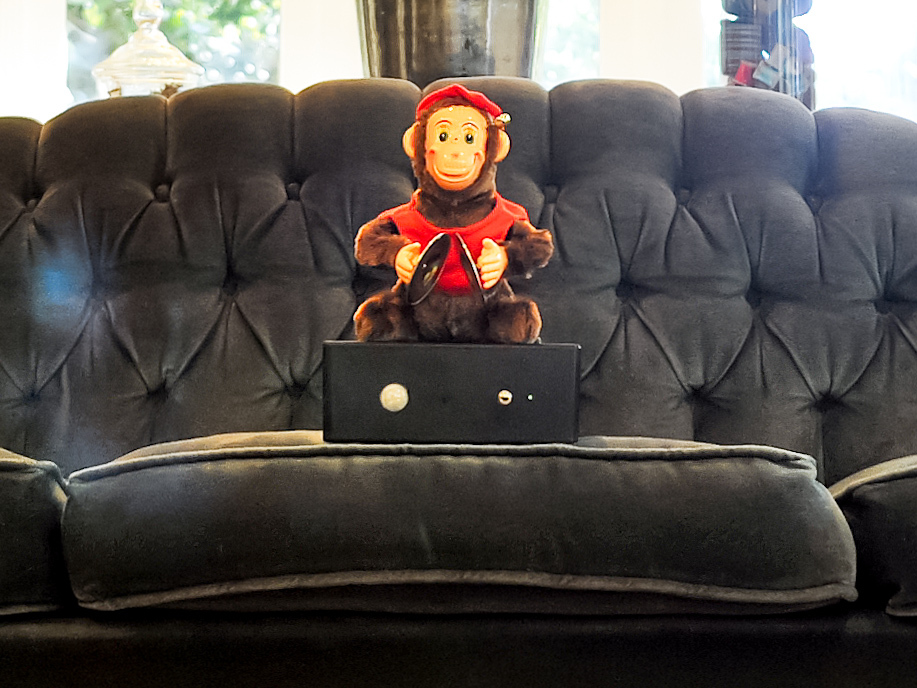
My cats like to jump on furniture and shed their fur, which ends up on my clothes. To stop them, I’m using a Monkey Couch Guardian. I made it from one of those old-fashioned cymbal-banging toy monkeys, modified with an inexpensive Arduino microcontroller and a proximity sensor. Now when a cat jumps on a table, couch, or bed, the Monkey Couch Guardian makes lots of noise, encouraging the cat to seek a quieter resting place.

I’ll show you how to make a simple PIR (passive infrared) sensor circuit to attach to a battery-powered, cymbal-banging monkey. You can use anything you like for an enclosure for the circuit. (I think a cigar box does nicely.)

Project Steps

Program the Arduino.

The first thing you’ll want to do is download the code for the Monkey Couch Guardian from makezine.com/go/monkeycode.

Open the code in the Arduino IDE software (free from arduino.cc) and upload it to the Arduino, using a standard USB cable.

Unplug the USB cable from the Arduino before proceeding.

Hack the monkey.

To tap into your monkey’s power supply, just connect 2 wires across the battery terminals in the monkey (I used yellow wire). I soldered the wires into the little metal contacts that press against the batteries. You could also tape them, but there’s not a lot of room, and soldering will make the connections stronger. The polarity doesn’t matter.

I also removed and discarded a small metal strip that was attached to the switch, because it isn’t needed. Your monkey may vary.

Test the connections by touching the other ends of the wires together. The monkey should start banging his cymbals and screeching when the wires touch.

Build the circuit (overview).

Here’s a schematic diagram that gives you an overview of the circuit, along with a layout diagram that shows how it’s breadboarded. I made both diagrams in Fritzing; the schematic is redrawn here for clarity.

The diagrams show a motor and a 3V battery supply. Both of these are inside the monkey.

The relay on the breadboard replaces the switch on the monkey. I took apart the switch on the monkey in order to connect wires to it.

You can power the Arduino with USB power, with an AC adapter, or with battery power. I recommend battery power, as it makes the system portable. Here’s a good tutorial that will show you how to make a 9-volt battery supply. You can easily add an SPST toggle switch to one of the wires of the DC plug, which will make it easy to power the system on and off.

Mount the relay.

This is the SPDT 5V DC relay. It has 5 pins on it. You’ll only be using 4 of them, which I’ve marked A-D.

Insert the relay into a solderless breadboard, straddling the center trench. On the breadboard I’m using here, pin A goes into hole e22, pin B to e21, pin C to f21, and pin D to e17. Your breadboard might be set up differently.

Wire the PIR sensor and Arduino.

The PIR sensor has 3 pins that fit a standard 3-wire servo extension cable. (Some vendors sell the sensor with a cable included.) You can also use plain hookup wire soldered to a 3-pin female header with standard 0.1″ breadboard pin spacing.

Connect the red wire to the 5V power header on the Arduino, and connect the black wire to Ground in the same block of power pins. Connect the signal wire (in my case, yellow) to pin 12.

Add a jumper wire (I used orange) to Arduino pin 13 and another wire (I used red, and I know I ideally should have used black) to the Ground pin next to it.

Connect the Arduino to the relay.

Connect the Ground jumper wire (red here) to hole d21 on the breadboard (relay pin B).

Connect pin 13’s jumper wire (orange) to hole d22 (relay pin A).

Connect the monkey to the relay.

Attach one of the yellow wires to breadboard hole j21 (relay pin C), and the other to d17 (relay pin D). It doesn’t matter which goes to which.

Add LED power indicator (optional).

Solder a 220Ω resistor to the anode (positive) terminal of the LED. The anode is the longer of the 2 wires emanating from the LED.

Solder a 6″ length of red hookup wire to the resistor, and a 6″ length of black wire to the LED’s cathode.

Insert the red wire into the 3V header on the Arduino, and the black wire to Gnd on the Arduino.

Test your monkey.

Apply power to the Arduino, and test the circuit.

If the PIR sensor detects motion, the Arduino will trigger the relay and the monkey will activate for 5 seconds, then go quiet for at least 15 seconds before re-arming.

Make the enclosure.

I used a cigar box for my first enclosure. You can use the RadioShack enclosure specified in the Parts list, or use any enclosure you like that will hold the breadboard and Arduino.

Mount the PIR sensor on the front of the enclosure. For extra credit, mount a toggle switch to power on the circuit and an LED to indicate that the power is on (see Steps 3 and 9).

TIP: A 3/16″ hole makes a tight fit for a standard 5mm LED.

Secure the Arduino, breadboard, and battery on the floor of the enclosure so that the wiring won’t come undone when the monkey jiggles the box. The breadboard has adhesive backing; you can use adhesive tape or hot glue for the other bits.

Secure the monkey.

Attach the monkey on top of the enclosure. You can use zip ties, sticky velcro tape, or whatever works for your enclosure.

Here we drilled 4 holes in the lid and zip-tied the monkey’s legs in place.

Guard that couch!

When the Monkey Couch Guardian is switched on, any motion within about 20 feet will trigger the PIR sensor. The monkey will start shrieking and clanging his cymbals, scaring away any unwanted furry intruders.

Aim your monkey’s PIR sensor strategically so that it detects motion only in the forbidden areas. Experiment with masking the sensor with tape, or partially blocking it with objects. Then you can leave it on, and walk past it without the monkey harassing you!