YouTube player

Protect your treasure from prying eyes without remembering a combination or carrying a key; your face is the key to unlock this box!  This project will show you how to use a Raspberry Pi and Pi camera to build a box that unlocks itself using face recognition.

The software for this project is based on algorithms provided by the OpenCV computer vision library. The Raspberry Pi is a perfect platform for this project because it has the power to run OpenCV, while being small enough to fit almost anywhere.

This is an intermediate-level difficulty project which requires compiling and installing software on the Raspberry Pi. If you have experience making things and are not afraid of a command line, you should be all set to build this project by following the steps below. You can also check out the write up of this project on the Adafruit learning system for a little more detail if you get stuck.

This project was one of the many excellent entries in our recent Raspberry Pi project contest

What will the next generation of Make: look like? We’re inviting you to shape the future by investing in Make:. By becoming an investor, you help decide what’s next. The future of Make: is in your hands. Learn More.

Project Steps

Prepare Box

Drill a 7/16″ hole in the top of the box for the Pi camera.

Drill large enough holes in the back of the box for the push button and power cables.

Build Latch

Mount a dowel in the front of the box that will be caught by the latch when the servo turns.

Build a small frame to support the Pi and latch servo. The servo can be clamped to the frame using a scrap of wood and machine screws.

Build a latch from two lengths of wood glued at a right angle and screwed to the servo horn.

Finish Box

Test fit where the frame with the Pi and latch can best fit in the top of the box. Make sure the latch servo can swing down and catch the dowel inside the front of the box.

Mount dowels running across the top of the box to support the frame.

Fix imperfections in the box with wood filler, sand, and finish with wood stain & polyurethane as desired.

Connect Electronics

Connect the servo’s signal line to GPIO 18 on the Raspberry Pi. Servo power and ground should be connected to the battery holder power and ground.

Connect one lead of the push button to Pi GPIO 25, and through the 10 kilo-ohm resistor to the Pi 3.3 volt power. Connect the other lead of the button to Pi ground.

Connect both the battery ground and Pi ground together.

Mount the Pi camera through the hole in the top of the box and attach the cable to the Pi.

Compile OpenCV

This step will install the latest version of OpenCV on the Raspberry Pi. Unfortunately OpenCV needs to be compiled from source because the binary versions available are too old to contain the face recognition algorithms used by this project. Compiling OpenCV on the Pi will take about 5 hours of mostly unattended time.

Power the Pi and connect to it through a terminal session.

Execute the following commands to install OpenCV dependencies:

sudo apt-get update && sudo apt-get install build-essential cmake pkg-config python-dev libgtk2.0-dev libgtk2.0 zlib1g-dev libpng-dev libjpeg-dev libtiff-dev libjasper-dev libavcodec-dev swig

Execute the following commands to download and unpack the source code for a recent OpenCV version:

wget http://downloads.sourceforge.net/project/opencvlibrary/opencv-unix/2.4.7/opencv-2.4.7.tar.gz && tar zxvf opencv-2.4.7.tar.gz

Execute the following commands to prepare the OpenCV source code for compilation:

cd opencv-2.4.7 && cmake -DCMAKE_BUILD_TYPE=RELEASE -DCMAKE_INSTALL_PREFIX=/usr/local -DBUILD_PERF_TESTS=OFF -DBUILD_opencv_gpu=OFF -DBUILD_opencv_ocl=OFF

Execute this command to start compiling OpenCV (note that compilation will take around 5 hours):

make

Once OpenCV has finished compiling, execute this command to install it on the Pi:

sudo make install

Finally install some Python dependencies by executing these commands:

sudo apt-get install python-pip && sudo pip install picamera && sudo pip install rpio

Train Face Recognition

In this step you’ll train the face recognition algorithms with pictures of the face that’s allowed to open the box.

Download the software for this project from the following github repository (click the download zip link on the right): https://github.com/tdicola/pi-facerec-box

Unzip the archive and copy the contents to a directory on the Pi.

In a terminal session on the Pi navigate to the directory with the software and execute the following command to start the training script:

sudo python capture-positives.py

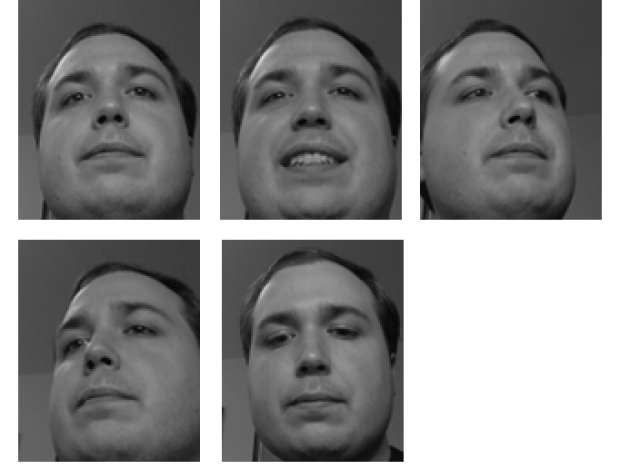
Once the training script is running you can press the button on the box to take a picture with the Pi camera. The script will attempt to detect a single face in the captured image and store it as a positive training image in the ./training/positive subdirectory.

Every time an image is captured it is written to the file capture.pgm. You can view this in a graphics editor to see what the Pi camera is picking up and help ensure your face is being detected.

Use the button to capture around 5 or more images of your face as positive training data. Try to get pictures from different angles, with different lighting, etc. You can see the images I captured as positive training data above.

If you’re curious you can also look at the ./training/negative directory to see training data from an AT&T face recognition database that will be used as examples of people who are not allowed to open the box.

Finally, once you’ve captured positive training images of your face. Run the following command to process the positive and negative training images and train the face recognition algorithm (note that this training will take around 10 minutes to run):

python train.py

Configure Servo

In this step you’ll determine the servo pulse width values for the unlocked and locked latch positions.

With power applied to both the Raspberry Pi and latch servo, connect to the Pi in a terminal session. Make sure the box is propped open so you can watch the servo move without it getting stuck.

Execute the following command to start an interactive Python session as root (necessary to access the GPIO pins and move the servo):

sudo python

At the Python >>> prompt, enter this command to load the RPIO servo library:

from RPIO import PWM

Next enter this command to create a servo object:

servo = PWM.Servo()

Finally, execute this command to move the latch servo to its center position:

servo.set_servo(18, 1500)

The 1500 parameter to the set_servo function is the servo pulse width in microseconds and can range from 1000 to 2000 at each servo extreme.

Try executing the set_servo function with different pulse width values until you find the values which are appropriate to move the latch into the open and closed positions as shown in the pictures.

Don’t forget you can remove the servo horn and reattach it to better orient the latch on the servo.

Once you’ve determined the pulse width values for the unlocked and locked positions, open config.py in the project root with a text editor and change the following values:

Set LOCK_SERVO_UNLOCKED equal to the pulse width value for the unlocked latch position. On my hardware I found a value of 2000 was appropriate.

Set LOCK_SERVO_LOCKED to the pulse width value for the locked latch position. I found a value of 1100 worked for my hardware.

Run Box Software

When the face recognition training and servo calibration are complete, you’re ready to run the box software!

With power applied to the Raspberry Pi and servo, connect to the Pi in a terminal session and navigate to the project root.

Run the following command to start the box software (be careful, the servo will immediately move the latch into the locked position):

sudo python box.py

After the software loads the training data (this might take a few minutes), point the camera towards your face and press the button to have it try to recognize your face.

If the box recognizes your face it will move the servo to the unlocked position. If your face is not recognized there will be some information written to the terminal about how close the face was to the training data.

For a face to be recognized it needs to match the positive training data with a confidence of 2000 or less. If your face is matching the positive training data, but the confidence is a little too high you can adjust the confidence threshold in config.py (under the POSITIVE_THRESHOLD setting). If you still can’t get a good recognition, try adding more positive training images and running the training again. The face recognition algorithm used in this project is sensitive to the lighting of the face so try to keep the lighting the same as was in the training (or add more training images under different lighting conditions).

Once the box is unlocked, press the button again to lock the box. No face recognition is necessary to lock the box.

If you get stuck and the box won’t recognize a face to unlock itself, follow the steps in the servo configuration step to manually move the servo to the unlocked position with the set_servo command.