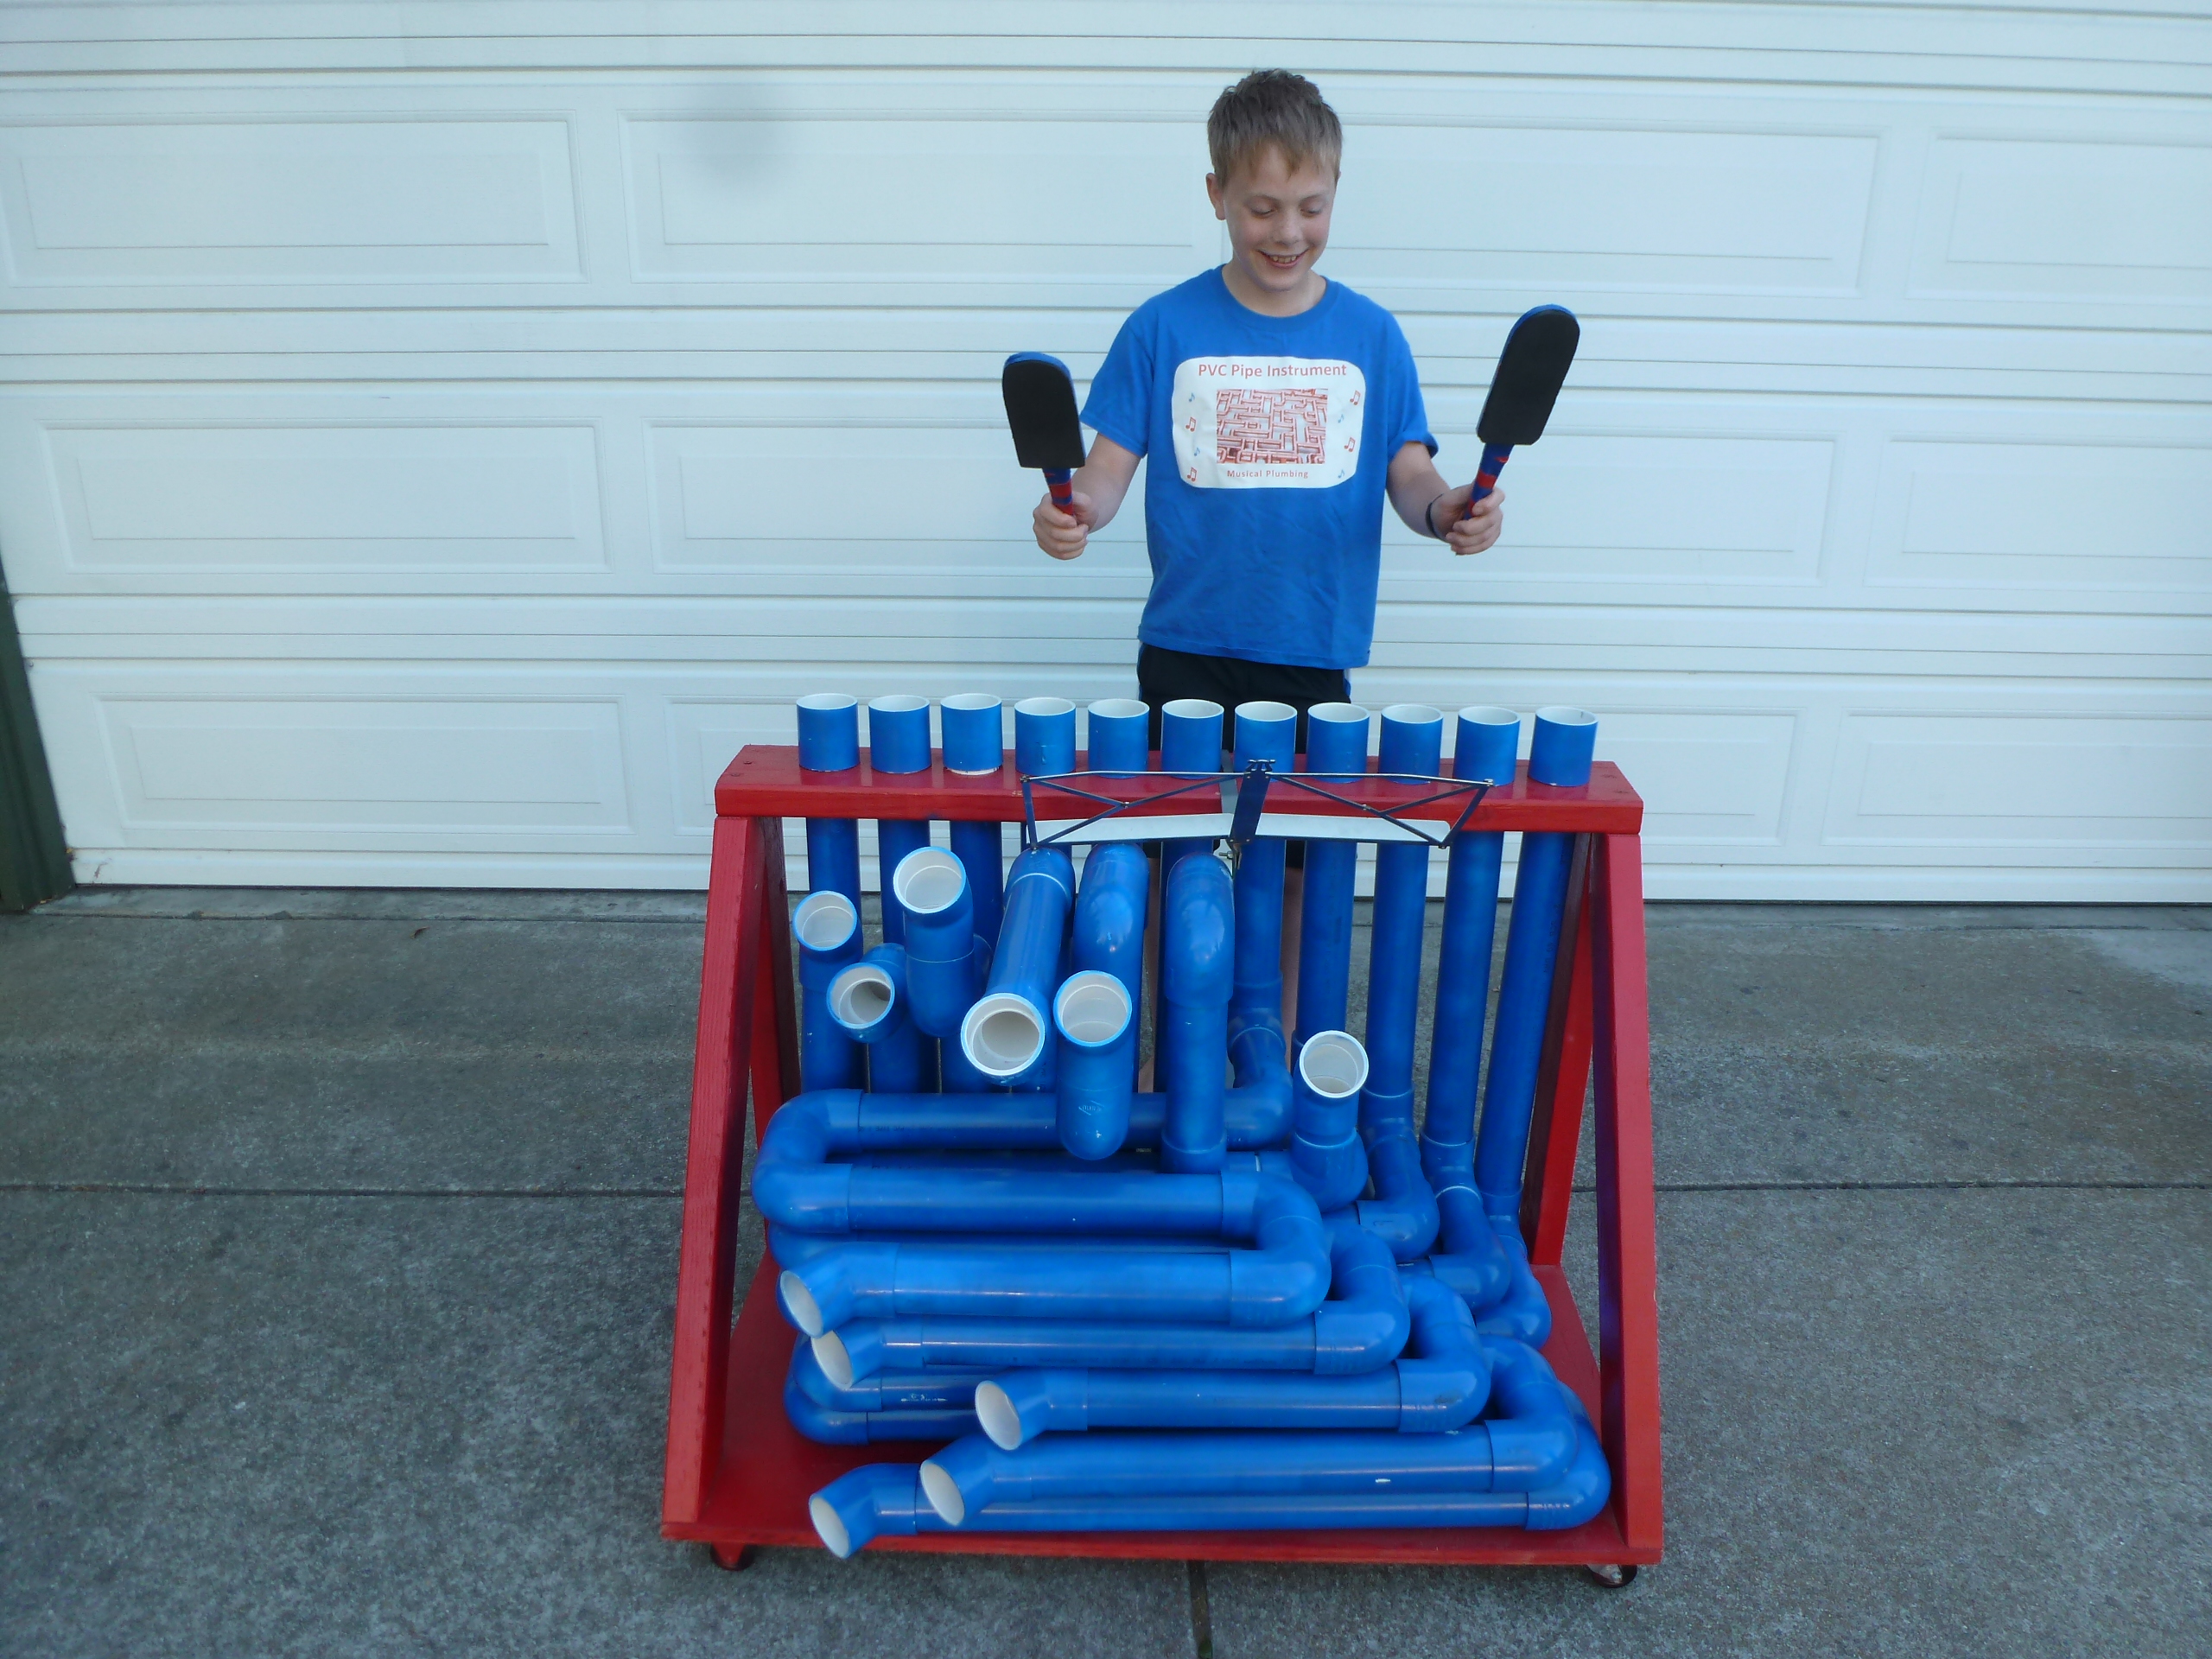
P1070706

I have always loved beating on things. So when I saw Blue Man Group beating on large pipes of different lengths to make music in one of their performances, I thought that was really cool. But it wasn’t until I saw a regular kid a little older than me performing on YouTube with his own instrument that I was inspired to take on this challenge myself.

I enjoy listening to music, and I enjoy playing music even more. Although I have access to a piano and other traditional instruments, I have always been partial to things that I build myself. The basic principle of making music with pipes is to beat on one end to create a pressure wave. The length of the pipe determines the length of the wave, and different wave lengths make different notes. I already knew that much, but in order to make an instrument that could play real music, I was going to have to get a bit more scientific about it. I had a lot of questions to get answered.

YouTube player

How can I get a pipe to make a specific note? How many notes do I need to play different songs? Which notes should I make? Can notes be too high or too low to sound good on pipes? How big a project am I really up to taking on?

I knew that if I created a note to match every key on a piano, I would probably fill a room with pipes, and that would be way too big a project and also prohibitively expensive. But I have never needed all of those keys to play anything. For Mary Had A Little Lamb, I only need three notes, or pipes. For Jingle Bells, I need 5. I eventually decided that I would need at least one octave, plus a few extra notes to play a reasonable variety of songs.

A great thing about this project is that everyone can make different decisions and come up with a personalized instrument to suit their needs. I’ll describe what I did so you can follow along or make changes as you wish.

The first thing to figure out is how long each pipe needs to be. I chose to make 11 notes, from G2 to C4 (using piano note designations). Here is an excerpt from a handy table I found on the internet to help with the pipe lengths. You may find charts with slightly different numbers, but these will be a good starting point.

Note that the diameter of the pipe doesn’t change the note, just the tone. I used 2-inch PVC, which produces a good sound and is a good size for hitting with paddles. You can also use ABS pipe and get the same results.

At first, I assumed that if I made a pipe exactly the length of the desired note’s wavelength, I would get that note exactly. This is not true. The real world doesn’t seem to work that nicely. So even with a straight pipe, adjustments need to be made. Of course, with an instrument such as we are making, the pipes aren’t straight. So I did some experiments to figure out how much length an “elbow” adds to the effective wavelength through trial and error. I compared a straight pipe that I “tuned” to a specific note, and then tried to match that note with two sections of pipe connected in the middle by an elbow. I found that each elbow added about 2-1/4″ inches to the wavelength.

Armed with the results of my research and planning, I was ready to design and build the instrument. Feel free to use this background to develop a plan for your own instrument, then proceed to the design and build steps below.

What will the next generation of Make: look like? We’re inviting you to shape the future by investing in Make:. By becoming an investor, you help decide what’s next. The future of Make: is in your hands. Learn More.

Project Steps

Design it

With the information in the table above about how long each pipe should be, I started drawing pipe routing on a piece of graph paper for all of the notes. This can get confusing as you start to draw multiple pipes on top of one another, but it might help to use different colors for each pipe.

The sketch (image 2) is my drawing, looking straight at the front of the instrument. You can see the tops of the pipes with the notes and lengths indicated, and the pipes extending downwards. The arrows indicate how many times the pipe goes in each direction, as indicated. Two right angle elbows create a U-turn to switch directions.

Also shown (image 3) is a model that I created to help visualize the routing of the first pipe.

The end result of planning all of the pipes resulted in the parts list above. Don’t bother buying PVC glue. I used glue on one pipe and it deadened the sound, so I stopped.

After I figured out the pipes, I created a wooden frame to support the pipes and to make it easy to move around. I used mostly recycled wood from previous projects, starting with plywood for the base, a vertical 2×4 on each side, and two diagonal 2×4 braces. For the board across the top, I purchased a 2×6 so that it would be wide enough to cut holes for the pipes, and still be strong enough to support the pipes and withstand a vigorous beating.

With an 11-note instrument, and pipes spaced pretty close together (3-1/4” center to center), the minimum width of the whole instrument will need to be about 40″. I wanted it to be able to go through doorways pretty easily, so the depth is 24″. Adding casters to the bottom will allow you to roll it around.

Build the frame

Start by building the frame so that when you get to building the pipes, they can be cut to fit the space and they will be supported.

Position the vertical (24”) 2×4s at the back corners of the plywood and connect with two screws each from the bottom of the plywood. Now position the top board (2×6) across the top of the vertical 2×4s, aligning the back edge. Attach with 2 screws on each side. Note that the front edge will overhang a little to accommodate support from the angled boards.

To fit the angled 2×4s, hold the 32” boards alongside the frame at the desired angle and mark with a pencil at the top of the plywood and along the front edge of the vertical 2×4 and the bottom of the top board. Cutting along the pencil marks will result in a single angled cut at the bottom and a 90 degree point at the top end. See diagram (image 2) above.

Attach the angled boards with 2 screws through the bottom of the plywood and a single screw through the top board for each angled board.

To make the holes for the pipes in the top board, you will need a large hole drill. There are different types of fixed and adjustable hole drills. Your holes need to be just big enough for the pipes to slide through. I made mine 2-13/32” diameter, which made the pipes pretty tight, and challenging to reinsert later, after painting. On the other hand, the pipes were held in place pretty well. If you want a looser fit, you can make your holes 2-7/16” diameter.

Double check the diameter against the actual pipes that you have for final sizing. Position the centers of the holes in a line across the middle of the top board, and spaced 3-1/4” apart. By drilling the holes after assembly, you won’t need to worry about drilling into your workbench or creating a special mount to hold it.

Now you can flip the frame over and attach the casters. I used two fixed wheels, pointed in the long direction of the plywood, and two swivel wheels. But if I did it again, I would use four locking swivel wheels to make it easier to move. Be sure to lock the wheels before playing, especially if you are on a hard surface.

Cut and fit the pipes

Now you are ready to start building the pipes! Each note will start with a coupling above the top board, and a pipe, pressed into the coupling and extending downward through each hole.

PVC connections are plenty tight when they are twisted together and seated all the way into the couplings and elbows, so they do not need to be glued. Avoiding the glue makes the job simpler, a lot less messy, and for some reason, sounds better than when the pipes are glued.

Start with the lowest note at the right side of the instrument (viewed from the front or audience side). This will be the longest note and will lie mostly flat on the plywood. The next note will lie on top of that one, and so on. The first note is the low G, and the table says that it should be about 138 inches. Since you have already planned for that length on your graph paper, you don’t need to worry about the actual length until you get to the final section.

Start by placing a 90° elbow on the plywood, directly under the left hole with one side pointing up. You can measure from the inside of the elbow where the pipe end will sit, up through the hole to the top side of the top board. Now add to that the distance that the pipe will extend into the coupling. This is the length of the first section of pipe. I used a miter saw for cutting the pipes because it was quick and easy to position and cut (see image 2). But there are also PVC cutters available. Use whatever tool you are most comfortable with, and observe all safety precautions.

After each cut, be sure to clean out any plastic chips from the pipe and remove the plastic “fuzz” that can remain at the edge of the cut.

Once the pipe is cut to length, twist the coupling on to one end, drop it though the hole and twist it into the elbow. Be sure that the coupling sits flat on the top board. If not, shorten the pipe just enough so that it does. This is important because you want the top board to take all of the force from playing, and not the pipes below.

Now you are ready for the next section of pipe. Keep measuring and cutting according to your plan, which may be different from mine. Just remember to add about 3” to the length of each section to accommodate the 1-1/2” that sits in each elbow. When you get to the last section, I recommend leaving it a few inches too long for tuning. I’ll cover tuning in the next step.

If you are following my plan, the next section of pipe should be 6” long and pointing toward the front of the instrument out of the elbow. Now put an elbow on the end of the second section, pointing to the left. If you set another elbow all the way to the left side of the instrument, leaving space inside of the 2×4s, you will be able to determine how long the next section should be. Mine is about 30”.

Next is a U-turn, which you make by cutting a 3” pipe and pushing two elbows all the way together over it. Keep the U-turn flat on the plywood, then add another 30” pipe back to the right, and then another U-turn.

Tune it

Always cut the last section too long by a few inches and place the fitting on the end as if you were finished. Hit the top of the coupling at the top of the instrument to see what note you have created.

You don’t have paddles yet, so use anything that is handy, like a flip-flop. Be sure to let the flip-flop bounce off of the coupling when creating the note, instead of letting it stay down, as this will affect the note some. [Sidebar: Leaving the paddle down when hitting creates a closed pipe, which plays a note one octave lower because the pressure wave has to travel the length of the pipe twice to get back out.] Now you can compare your note to a standard.

I happen to have an electronic tuner that my sister used for her violin, making it very easy to tell if the note is high or low, and by how far. I highly recommend using an electronic tuner because it removes the guesswork and anyone can get good results. If you don’t have an electronic tuner, you can also use a piano or any other instrument that is tuned to a reliable standard.

But there is some skill required to determine how well the pitches match just using your ear, which few people have.

With the pipe too long, your initial note will be too low, or flat. Now remove the fitting on the end and the last length of pipe from the U-turn and cut some length off. Reassemble the pipe and 45° fitting to test again. This will be very tedious the first couple of times. But don’t worry; you will get better at guessing how much to cut the more you do it. If you find that your note is now too high, or sharp, you have cut off too much. Just set the last section of pipe aside for later use, and start again.

Once your first pipe is tuned to match G2, you are done with that pipe and can move on to the next one.

The next four pipes are almost identical to the first, except the first pipe section going down will be a little shorter so that the back and forth pipes will lie on top of the previous pipe. Also the long pipes going from left to right will be 3-1/4” shorter than the previous set because they start farther over. The tuning process is the same.

When I got to the sixth note, the E, I changed tactics to fill in the space behind the pipes from the first five. Start the rest of the notes the same as the first G by going all the way down to the plywood. Then use a U-turn to go forward and back up before coming straight forward. Use the pictures for reference.

Note that when you are tuning the higher notes, you can add less extra length before tuning, but small length adjustments will make a bigger difference in the pitch of the note.

Once you are happy with all of your notes, you have a fully functional instrument and can start playing right away, assuming you weren’t already playing stuff on the pipes you had all along like I did.

Paint it

I like to make my stuff attractive, which means painting the whole thing. If you want to paint the pipes and the frame different colors, you will have to do some disassembly first. The easiest way to do this is to remove the first vertical pipe for each note from its 90° elbow at the bottom. This will allow you to remove the coupling and down tube straight up through the hole together, and lift the remaining sections out of the instrument as a single piece. Start with the high notes.

You may reassemble them outside the frame for painting, or leave them separate.

In a very large area, like a garage or driveway, lay out a lot of newspaper and distribute the pipe sections carefully so that they maintain their shape. Spray paint everything. Use two coats to be sure to cover the writing on your pipes.

Once dry, flip all of the pipes over to paint the other side. The frame may also be spray painted, or you can use a brush. In either case, be sure to tape over the wheels or remove them during painting. Also, if you want to leave the inside of the pipes unpainted, you can insert a short piece of pipe in both ends of each pipe, then remove them after the paint is dry.

Once the paint is completely dry, you may carefully reassemble the pipes, again starting from the low notes. Be careful not to scrape paint off of the down tubes when reinserting them through the holes.

Now the main part of your instrument is done. You can continue to use whatever you used while tuning to play your instrument and you may be perfectly happy with this. However, for best results, you will want to create some custom paddles. The instrument will sound better, and you can look cool while playing too.

Make paddles

Paddles can be a very individual thing, and I encourage you to try different materials, styles and weights to suit your own needs. The evolution of my paddles progressed from packing foam wrapped in duct tape, to flip-flops, to flip-flops covered in socks, to foam rubber on sticks. My current design is a foam rubber pad with a polycarbonate backing, glued to wooden stick handles and wrapped and decorated with multi-colored duct tape.

I will describe how to create my current generation of paddles for those of you who want to skip the first few steps of trial-and-error.

But realize that my design, and yours, may continue to evolve after this article is written.

I found that using a softer, porous material to hit the pipes creates a clearer and purer tone. Softer materials help to make full contact across the top of the coupling, creating a better pressure wave. And a porous surface, like a sock or foam rubber, seems to soften the beginning of the note, and avoids creating a “slappy” sound.

My local hardware store sells sheets of foam rubber in various thicknesses, so I bought the thickest they had, which is half an inch thick. They also sell 1/8” sheets of Plexiglas or Lexan for backing material. This will provide support for the foam rubber, while still being strong and flexible. Next, you need handles. So get four feet of half-inch wooden dowels.

If you are already a maker, you should have plenty of glue and duct tape lying around. But get those if you don’t. I found Gorilla Glue to work very well for this project.

The pads of the paddles should be about three inches wide to completely cover the pipe couplings, without overhanging onto the next note over.

The length is less important, but a longer pad will be more forgiving when you are playing quickly and not aiming perfectly. Mine are 7” long and 3” wide. The end is a full round shape (pictured), and the back corners are rounded just a little. Cut two pieces of foam rubber and two pieces of plastic this shape.

Now use a thin, but complete, application of glue to attach plastic to one side of each rubber shape. If using Gorilla glue, remember to wet the surface a little first and press them together while drying. If the edges don’t line up perfectly after gluing, just run a belt sander around the edge to clean it up.

Now for the handles. I found it to be most comfortable to use two dowels next to each other, and slightly twisted (opposite for each hand). Flatten and taper the last three inches or so of each dowel so that there is a good surface to glue to the plastic. Position the flattened ends on the plastic and a bit apart so that the other ends can come together, one on top of the other.

Glue the dowels in place, and repeat for the second paddle, with the twist in the opposite direction. Once the glue is completely dry, wrap the handles and cover the back and sides of the paddles with duct tape. Be sure to NOT put any tape on the surface of the foam rubber, or you will get that slappy sound again. Be creative, and use different colors to suit your personality.

Just Beat It

It seems like there should really be no explanation needed to play such a simple instrument. Basically, you just hit the tops of the pipes with paddles and notes come out the other end. You don’t even have to re-tune it like most instruments, ever.

But I learned that there is some technique to getting the best sound, and I even figured out how to convert some of my favorite songs to play on the pipes.

The first tip is to use good paddles, which we already covered. The next tip is to position your arms at your sides, with your elbows bent at about 90 degrees.

Use your forearms and wrists to bounce the paddles off of the top of the pipes, making sure to hold the paddles at just the right height and angle so that they are as flat as possible when they make contact. Full, flat contact is important to create a good strong pressure wave. And quickly removing the paddle from the pipe by bouncing allows both ends of the pipe to be fully open, creating the proper resonance.

To see what can happen when the pipe is not fully open on both ends, try this. Have a friend hold their hand firmly over the end of one of your pipes, sealing it off completely. Now hit the pipe with the paddle, using your best technique, of course. Notice that the resulting note is exactly one octave lower than usual. So a partially covered pipe from a non-bouncy paddle will create a muddled note with mixed frequencies.

Now, what do you want to play? If you have some beginner piano music, you may be able to play directly off of the sheet music, assuming there are no sharps or flats. Once you get good at the simple stuff, you may want to try something more interesting, like songs you hear on the radio.

Trial and error, where you keep trying different notes until a song sounds right, might work sometimes, but can be frustrating, especially when you realize that the note you need is between two consecutive notes on your instrument — those silly black keys again.

Your instrument, if you made it like mine, is in the key of C, just like a piano. This means that playing a scale (sequence of 8 notes) starting at C will sound right. But starting on any other note will sound wrong unless you adjust by using sharps and flats. If you have music for a song you want to play, and it has no sharps or flats in the key signature at the beginning, then your instrument should work, as long as you have notes that go high enough and low enough.

If there are sharps or flats in the key signature, you will need to transpose the notes first. My dad helped me with this, so I won’t try to explain how to do that here. But it can be done.

I have just started planning for a larger version of the instrument that will have a full three octaves and all of the black notes so that I can play anything I want. Obviously it will be a lot wider. Plus, the sheer number of pipes and the second row will make supporting and routing the pipes far more complicated than I can draw clearly on graph paper. But, I’ve started learning to do 3D modeling on the computer. Wish me luck.