


First the Physical
Last month we announced the release of PSoC 4 BLE by Cypress. It’s similar to the PSoC 4 that came before it, but as the acronym might imply, this latest board integrates Bluetooth Low Energy (which I’ll detail further down).
 At a size not much larger than an Arduino Uno (only mentioned for size-comparison, not feature list), it’s pretty intriguing to have Bluetooth ready to go as soon as you power up the board, without needing any additional shields or modules — not even $7 ones.

There’s also the presence of a capacitive sensing, or CapSense, slider. Whether you knew it or not, you’ve likely — I’d bet definitely — already interacted with CapSense, be it on your smartphone, using a stylus, or even integrated with your vehicle or refrigerator.
And it doesn’t stop there, not by a mile. Here’s a glimpse of the full feature list and pinout description for the baseboard:

Without a doubt, that’s a lot to digest. But you’re probably starting to suspect this thing can do a lot more than your standard microcontroller.

Glancing at the feature list, you might notice the low-dropout regulator (#16) that operates from 1.9V-5V. I’ll always read included documentation, but during my unboxing I typically skip past any paperwork and go straight to handling any board or kit I’ve just acquired. And this was one of the immediately intriguing features, flipping over the board to realize you can power it from a CR2032 coin cell battery.
(I’ll come back to this feature later when I demo the readymade CapSense slider project that comes preloaded on the kit.)
You’ll also notice the numerous Arduino-compatible headers. Sure enough, shields designed for Arduino fit snugly on the PSoC 4 Pioneer Kit. For instance here’s a MakerShield connected to the baseboard:

You’ll lose access to some of the baseboard’s headers — namely the block located at J8 (#10) — so you’ll have to take this into account with any designs, but for the most part there’s a lot of compatibility with existing shield options.
My only physical quibble is the USB connector on the board receives Mini-B (not Micro-B) plugs (which for whatever reason I have fewer and fewer of laying around). Of course a Standard-A to Mini-B cable is included with the kit so no worries there. (I just need to be sure to not lose that cable.)
The kit also comes with a PRoC BLE Module and a CySmart USB Dongle; I’ll visually show the dongle further down, but for the most part I glance over these devices in this post. Just know that they are there — and they are useful!
That’s a quick visual summary of the board, but you’re probably asking yourself, “What is PSoC?” Indeed. The video below, by Cypress, is pretty much to the point, and will start to pique your interest about the capabilities and functions of this board as we proceed:
If the video embed doesn’t load you can watch it here. You can watch more videos on PSoC at the Cypress Developer Community Video Library.
Now the Software
 Please note: The software needed to interact with the PSoC 4 BLE Pioneer Kit is a Windows-only IDE. In our testing (I use Windows, but my colleagues use OS X) the software ran fine in VMware on OS X.
The kit allows you to run a default program without needing to load any software or drivers (more on that, next), but to squeeze the full potential out of — or even just to tinker with — your PSoC 4 BLE Pioneer Kit, you’ll want to download and install PSoC Creator. It’s with this software that a world of opportunity will become available.
Before proceeding, I should say to anyone who already has PSoC Creator 3.0 installed, you should update to 3.1! It has a lot more features and is required for the Bluetooth project detailed below.
If you’re accustomed to working with an IDE like Eclipse or Emacs or NetBeans, PSoC Creator might throw you for a curve. For starters, at over 600MB it’s a beast to download. That’s because the software contains multiple templates, numerous datasheets, and more than 120 components with configurable attributes. In addition, the GUI-based environment allows you to drag-and-drop your PSoC design right inside the IDE.

If you’re scratching your head on that, don’t worry, there’s a whole slew of videos at the Cypress Developer Community Video Library aimed specifically at PSoC Creator.
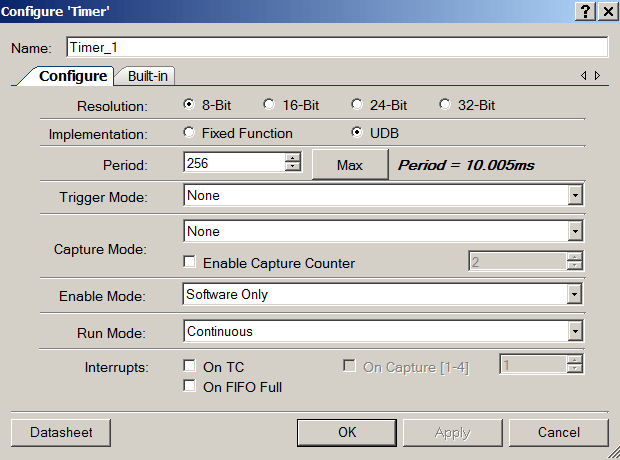
Components include everything from registers, op-amps, and comparators to PWM, DMA, and a range of logic gates (AND, NOR, XOR, etc.). Of course, there are your analog and digital ports and pins. And everything is configurable, and the software pumps updates routinely that include new components and attributes. You can even create your own components! Simply hover over any component in your design to see its parameters, and double-click it to change the configuration:

After messing around with the software for a while, I’m sure you’ll want to start building!
Testing The Kit
Preloaded on the PSoC 4 BLE Pioneer Kit is a basic Bluetooth (I say basic, but it’s really more than that) program. As noted above, you don’t need to load any software or drivers to get this program running or to see the potential embedded in this kit. Simply plug in the USB dongle to your computer (or any USB power supply, if you want to avoid an operating system altogether) and snap in the included CR2032 battery in the baseboard. Follow the instructions included in the Quick Start Guide, and within a few minutes (at most) you’ll be using the CapSense slider to adjust the status of an LED on the USB dongle:
No software required!
Now, given your understanding of the software (or desire to learn), and having seen what is possible with the baseboard hardware, let’s go one step further.
The latest version of the PSoC Creator software includes a “Find Me” example Bluetooth project. It’s located under File -> Example Project, but you could also build the project from scratch following the instructions in the guide Getting Started with PSoC 4 BLE (page 25, My First PSoC 4 BLE Design). I highly recommend you do this, instead of simply opening an example project, as it will really help you understand the software/hardware integration and steps required to build and program the PSoC 4 BLE kit. You’ll “get it” much sooner than opening an existing project and trying to understand how it works. For me, the whole process took less than an hour (and I was taking photos and notes along the way for this blog post). In the end, you’ll communicate with the Pioneer Kit using the CySmart mobile app available for Android and iOS. The result will have you speculating your next – or first – IoT project!
When you’re done with this project, the design in PSoC Creator will look something like this:

While the real-world interaction will look like this:
Lastly, an Opportunity
If you don’t have a kit but you’ve read this far, hopefully I’ve excited you enough to want one. Well today could be your lucky day!
We have 50 PSoC 4 BLE Pioneer Kits to give away … for free!
Update: the give away is now over; we’re going through submissions now, and will respond to all applicants soon. Thank you for your interest and your patience. [Ed.]
Now before you jump up and shout “First!” pause for a moment and take a breath. This isn’t a first-come first-serve scenario, and you might want to review the software before submitting your final request for a free kit. This will help you wrap your head around the capabilities of the kit (and software), and also to ponder what you might do with it. Additionally I recommend you read through the Further Exploration links below; the 100 Projects link contains some great – and simple – ideas to inspire you. (For instance the link contains pre-compiled code for an SD Card Shield; now, how would you utilize the IoT to take advantage of this capability? How would you integrate GPS, XBee, or a ping sensor? Do you want to connect your thermostat to the IoT, or perhaps have an idea for an interactive game?)
You’ll have to answer the question: Given what you’ve seen above, and given the capabilities of the software, what pioneering Internet of Things project would you build?
Of course you’ll want to imagine a world of seemingly impossible awesomeness, but also be realistic. Dive into the components catalog and conceptually design a novel IoT project to pitch. We’ll be following up with accepted applicants in the weeks and months ahead to encourage your project along, and offer other opportunities for your PSoC 4 BLE Pioneer Kit.
I recommend reading and viewing the links in Further Exploration below, but when you’re ready to proceed, go here to tell us why you should be chosen to receive a free PSoC 4 BLE Pioneer Kit.
This opportunity is open to U.S. and international applicants. We’ll give a few days for applications to start coming in before reviewing submissions. When all 50 available Pioneer Kits are confirmed to be sent out, this post will be updated with any additional information.
Further Exploration
Early last year Bil Herd from Hackaday posted a video on the PSoC Pioneer (sans-BLE) that is another good introduction to the kit and its capabilities. Going back to 2013, Cypress worked with element14 to publish 100 Projects in 100 Days, also using the non-BLE Pioneer Kit. Project no. 2, the CapSense Slider Example, is featured in Bil Herd’s video, and these projects in particular should get you thinking about your IoT project and the possibilities that are already available for you to build upon.
And when in doubt, build a Nerf Gun turret!
ADVERTISEMENT
Join Make: Community Today


