


 Years ago, we published the following piece here on Make:, a modified version of a section of my book at the time, the Absolute Beginner’s Guide to Building Robots. I’ve noticed this Make: piece continue to get traffic over the years. And when someone commented on another site that they found my solder dance “strangely useful,” I thought it might be time to resurface this piece.
Many people are way too intimidated by the idea of learning how to soldering. It can be frustrating, but only if you don’t have a few necessary tools and you don’t follow a few basic techniques. And it takes a little practice, though not very much. It’s basically about just getting in there and doing it. When I was learning, it was the rhythm of how you placed what where and when–a little sequence of well-timed movements–that made me think of those 1-2-3 dance step illustrations from the 1950s, hence the solder dance.
First, let’s look at the little tabletop lambada we’re going to do and then at some of the basic tools we’ll need to make our dance happen.
Note: The illustrations for this piece were done by none other than Mark Frauenfelder, founding editor-in-chief of Make: and co-founder of Boing Boing. When not running sidestream media empires, he’s also a talented artist and illustrator.
Let’s Do the Solder Dance!
Like many good things in life, good soldering is all about timing, rhythm. It’s a sort of dance where you have to get the sequence and the timing just right. And, like dancing, as you learn, you will go from feeling like a fumbling klutz to joyfully finding your groove. And then, the real fun and self-expression can start. There’s nothing like having a lot of components to solder on a PCB, getting on a roll, and seeing these near-perfect little solder beads being laid down in quick succession, like you’re some kind of precision solderbot. You’ll know you’ve finally become good at soldering when you look at that empty PCB and a big pile o’ parts and feel excited to get crankin’, rather than feeling a sense of dread, like you’re about to tackle your tax returns.
To emphasize the sequence and timing aspects of soldering, we’ve illustrated it as a little dance. Following along with us, won’t you? 1-2-3, 1-2-3…

 Step 1: The first step in our fire stick and molten alloy rumba involves touching the hot, clean iron (use the moist cleaning sponge on your stand) to both the component lead that you’ve poked up through the PCB and the copper solder pad. You want to heat both of these elements, as they need to both accept the solder.
 The Side Step: A little side-step trick, after heating the pad/component lead, is to touch the tip of the solder wire to the tip of the iron to sort of get it in the mood for melting. Just a quick touch to the iron is all you need.
 Step 2: Now touch the pre-heated tip of the solder to the OTHER side of the component lead (away from the iron). So, you have the solder, then the component lead in the middle, and then the iron on the other side. It should only take a few seconds for the solder to flow. It’s very important that the iron is clean and hot and that you’re heating both the pad and the lead at the same time.
 Step 3: As soon as the solder flows and you have a nice plump little mound of solder, pull away the solder wire first and then the iron. If you pull the iron away first, the solder will instantly cool and stick the solder wire to your solder point. Not good. Doing this 1-2 step without getting it backwards is main part of learning the dance. If you do solder the wire to the lead, no biggie, just heat it again, remove the wire, and start over.
And that’s basically it! Let’s also look at a few other important aspects of prepping and finishing your weld.

To prep your component for soldering, you need to feed it through the appropriate holes on your circuit board so that the component leads protrude from the solder pad side of the PCB (the component itself being on the printed side of the board). One way of getting the component to stay in place for soldering is to bend the leads as shown in A above. This will also bring the leads down closer to the pad so that you can make good iron contact with both the lead and the pad. If the leads are too long (so that they’re in your way), you can clip them down before soldering, as seen in B above. You don’t have to do this unless it makes access to the solder point easier. For a neat and tidy finished board, make sure your components are tight-down and flush with the PCB on the component side before soldering. Once you have a healthy solder join, you can go ahead and clip the excess component leads so that they are flush with the solder bead you just deposited.

Image A above shows a good angle for iron-to-pad/lead contact and where the solder makes contact with your solder point. Image B shows what you should end up with: plump, shiny mounds of solder that fully surround the component and make complete contact with the PCB pad. Solder welds that are dull-looking, have dark spots in them (impurities), pits, depressions, or do not make complete contact with the PCB surface and the component lead are called cold solder joints. You need to desolder (using the special tool described below) and resolder these as they can cause component failure.
The Right Tools for the Job
A lot of builders try to get away with what they have and don’t take the time to assemble the few essential tools needed to be successful in soldering. Don’t. The basics tools are all relatively cheap and you don’t need that many. Here is a list of critical tools and supplies:
 Soldering Iron You don’t need one of those expensive professional soldering workstations you see advertised in electronics parts catalogs, but you should have a decent iron, ideally with a variable temperature feature. I used the Xtronic 16-30 Watt iron for years and was more than happy with it (before investing in a more feature-rich workstation). I paid under US$30 for it. A hot iron is a happy iron. You want to get in and out of there (to the solder/component/soldering pad) as quickly as possible to weld the component to the pad without baking the component’s little brains out. Discrete components are designed to take the heat, but you don’t want to push your luck (and a scorched PCB is *so* not pretty looking). So you want an iron that can be as hot as it needs to be to melt the solder, but not hotter. You’ll probably also want some tips of different sizes, especially really small tips if you’re going to be doing a lot of work on tightly populated circuit boards.
 Soldering Stand Don’t rely on that little stamped metal shard that usually ships with a cheap iron. It’s not sturdy, safe, or reliable enough to use for serious soldering work. You want a nice, solid holster-type stand that will keep your soldering iron handy (and away from your precious flesh) until you need it.
Cleaning Sponge A clean iron is a dutiful iron. Most solder stands come with a sponge and sponge reservoir (see above image). Even better, there’s also a cleaning device called a Solder Genie, which is an ash-tray-like container of brass shavings. This gizmo is superior to the sponge (won’t cool down the tip), but it’s OK to start out with the sponge, as it’s most common and useful comes with an inexpensive solder stand. You can even buy brass scrubbies at the dollar store and make your own brass-based tip cleaner.
 Desoldering Pump/Solder Sucker This device is a spring-action piston pump that, when triggered, sucks molten solder into its barrel. Such a device is essential for removing solder and soldered-on components. For the beginner, who’ll likely be doing a lot of resoldering of parts, having and knowing how to use such a device is important. There’s also a product called Desolder Braid (or Solder Wick). It’s a copper-braided material that’s used to “wick up” molten solder. I prefer the sucker, but it’s good to have some braid on hand for situations where the pump is difficult to use. Try out both technologies and go with the one with which you’re most comfortable.
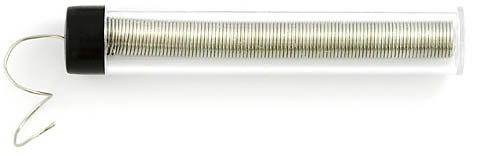 Solder Of course, you can’t do a lot of soldering without solder. Solder is a metal alloy that melts at a fairly low temperature (anywhere below 840 °F) and is used to bond metals together. In electronics soldering, a common composition is 60% tin and 40% lead, which has a nice low melting point of below 370 °F. Because lead-based solder is not so environmentally friendly and not so meatbot friendly (that means YOU), silver solder is also frequently used, which is silver and tin. Also, make sure to get rosin-core solder. This is a solder that has flux in the center, a chemical compound that helps clean impurities from the bond (especially oxidized metals). Impurities/oxidation is one of the enemies of a good, conductive solder bond. You need to keep everything clean (the tip of your iron, the solder pads, etc) and flux helps to do just that. I have several tubes of the 64-025 Lead-Free Silver Bearing Solder I got from RadioShack, which came in .032" diameter in a handy hard plastic tube. It sold for $3 for .25 ounces. Since I don’t do a ton of soldering these days, these should last me for a while.
Solder Paste Not really a necessity, but solder, or flux, paste is a good bit of kit to have. If you’re having trouble with getting a good solder bond, especially if working with recycled components or repairing old electronics where there might be a lot of dirt and oxidation, you can use flux paste to clean everything beforehand to achieve a good weld.
 Helping Hand You will quickly learn, in doing electronics, that you just don’t have enough appendages to hold an iron, the solder, your component(s), the PCB or whatever else you’re trying to join together. You have at least four things to hold and only two appendages available (assuming you’re not handy with your feet) and we don’t recommend using your mouth (although we can’t say we haven’t done so in the past). You can use other housemates or unusually docile pets, but after a while, they get grumpy and start making Union-like demands. The answer is a little widget called a Helping Hand, or sometimes, a Third Hand. It’s a jig that has (usually) two adjustable “arms” with alligator clips on the ends. These things are only a couple of bucks at electronics stores. I recommend having at least two. You can even make quick n’ dirty ones with a piece of thick, bendable wire nailed to a board with alligator clips attached to the ends, but again, since they’re so cheap, buying a couple is not going to break your bank.

Needlenose Pliers, Diagonal Cutters, Wire Stripper There are all sorts of cool tools you can collect for electronics work, from expensive German mini screw driver sets to digital multimeters and oscilloscopes, but three specialty tools you’ll definitely need are a pair of small needlenose pliers, small diagonal cutters (for flush-cutting component leads after soldering), and wire strippers, for cutting the insulating jacket from wires for soldering. You don’t need to get expensive ones. I use the ones that came with a computer repair toolset I bought two decades ago. I use it nearly every day and no tool has broken or failed. The entire kit (with a cheap soldering iron and most of the other tools listed here) only cost me $35.
Other Things That Are Nice to Have On Hand You don’t have to have these, but they’re nice to have around: Scrubby pads (for cleaning contacts, PCB pads, wire, etc. before soldering), heat-shrink tubing (for covering wire joins, motor connections, and other component wiring with insulating plastic jackets), electrical tape, poster putty (for temporarily holding things in place), and two-part epoxy and super glue (for bonding things that don’t take kindly to molten metal).
ADVERTISEMENT


