


Ready to enjoy physical computing and have fun making IoT devices? MicroBlocks is the answer!

MicroBlocks is a coding environment for microcontrollers that’s human friendly, but more than that, it’s education friendly. Founder John Maloney worked on Scratch for a decade; his sidekick Bernat Romagosa founded Snap4Arduino, and the third musketeer, Jens Mönig, heads Snap! development, so MicroBlocks and Snap! can communicate using standard web services.
I got involved with MicroBlocks when I was developing the WebThings Gateway by Mozilla and I championed the Mozilla Open Source Support grant, which funded a Web Thing library so that Internet of Things (IoT) developers could easily transport data between their devices and a local Raspberry Pi, other SBC, or PC, running the WebThings Gateway (see Make: Volume 72, “Your Own Private Smart Home”).
Improve Learning by Coding Things “Live”
What’s so cool about MicroBlocks? It’s similar to Scratch and Snap!, where command blocks (rectangular) can be executed, and reporter blocks (rounded) can be evaluated, simply by clicking on them. MicroBlocks works the same way, except your commands control a microcontroller that can interact with the physical world. You can click a block to turn on LEDs, drive servos and motors, and play music. You can sense inputs from buttons, temperature sensors, accelerometers, and so much more. MicroBlocks scripting offers students what they expect — coding interaction with the physical world that’s live.
Other blocks-based physical computing environments, such as Snap4Arduino and the Scratch micro:bit extension, support live programming by running your code on a PC and sending commands to a microcontroller. But the microcontroller does nothing when detached.
With MicroBlocks, your code runs directly on the microcontroller. As you work, your code is incrementally compiled, downloaded, and stored in persistent Flash memory so it still works even when the microcontroller is untethered and powered by a battery pack. This portability and autonomy allows MicroBlocks projects to be worn, carried in a pocket, or deployed to collect data outdoors.


When MicroBlocks detects which board is connected to your PC, it will automatically pull in libraries to support the features of that board. For the BBC micro:bit, two libraries are automatically added to the blocks palette: Basic Sensors (reporter blocks) and LED Display (command blocks). When you attach external components (e.g., NeoPixels, or a distance sensor) you can manually add libraries to support those components. The images above show two core categories (Input and Pins), and two from added libraries (Basic Sensors and LED Display).
These libraries make physical computing so much easier. Trying them out is just a few clicks away:

For sensors and actuators external to the board, simply enter the pin number associated with the attached component. For example, attach buzzer to pin (14) sets up your board to play musical tones or even songs, on a piezo speaker attached to pin 14. A favorite built-in example among students is the theme song for Harry Potter:

Different categories of blocks are color coded, making it easier to figure out what the blocks do. Core categories also include:
- Control: “when” hat blocks, conditionals and loops, time delays, broadcasts, comments
- Operators: math, expressions, logic
- Variables: to create local or global variables and set or change them
- Data: list and string functions
- My Blocks: to create your own command or reporting functions.

Outside these core functions, the rest of the blocks and libraries typically relate to physical computing. Actuators are controlled as Outputs. Sensors are monitored as Inputs. Communication can be done over both wired and wireless channels including I2C, SPI, peer-to-peer radio, HTTP, Wi-Fi, and infrared remote control. Above shows a snippet from a fun built-in example called RadioTexting.

One of the coolest aspects of MicroBlocks is the ability to plot data in real time! It lets you understand the output of a sensor so you can create algorithms. This image shows a plot of motion sensed from a micro:bit accelerometer while a person was walking. This live plotting made it possible to create a Step Counting library.
Turning Microcontrollers into IoT Devices
How do we teach the next generation to create smart, truly connected devices? IoT vendors like to tout “end-to-end” security, but that means data from your device go directly to the cloud, which disables interoperability between devices on your local network. And what if internet access is down? Or the cloud provider goes out of business? Who else can access your data?
Fortunately, MicroBlocks offers simple HTTP libraries and a Web Thing library that’s compatible with Snap! and the Mozilla WebThings Gateway. Students can easily create their own IoT devices, using HTTP as a ubiquitous interoperability, control, and monitoring layer. These free, open source tools provide complete privacy and standard web security, with no dependency on big tech titans and no need to ask permission for cloud subscriptions, input a credit card, or give up privacy by sharing data.
To see some easy web devices made with the BBC micro:bit, the Citilab ED1, and WebThings Gateway, see “Build Some Web Things with MicroBlocks” below.
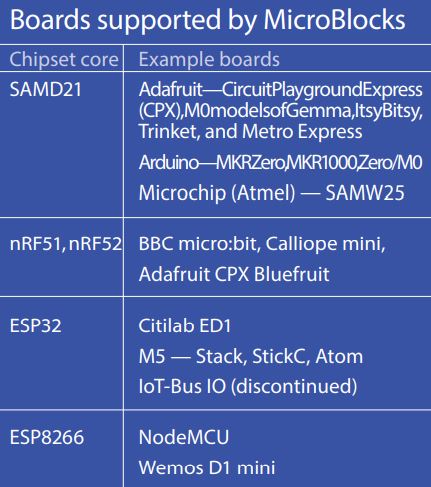
Low-Cost Boards, High Educational Value

What hardware can you program? Anything that can run the MicroBlocks virtual machine (VM). Several pre-compiled VMs come built into MicroBlocks, and can be installed on your microcontroller board via a menu command. For less common boards, you can build and install the VM using PlatformIO. Many boards from the following processor families are supported:
• Microchip (Atmel) SAMD21 (Arm Cortex M0)
• Nordic nRF51, nRF52 (Arm Cortex M0, M4)
• Espressif ESP8266 and ESP32 (Tensilica Xtensa)
Other boards in these families are often easy to add. For example, dozens of ESP8266 boards can run the pre-compiled NodeMCU VM, although some use different pins for the user LED.
Boards Supported by MicroBlocks
Get Started with MicroBlocks
1. Download MicroBlocks for Windows, Mac, Linux, or Chromebook and follow the setup instructions there.
2. You can also run MicroBlocks in a Chromium-based browser such as Chrome or Edge. To connect to your board via the WebSerial API, visit chrome://flags and enable the Experimental Web Platform Features flag. (Assuming WebSerial becomes a standard feature of Chrome, that step will no longer be necessary.) Then just browse to microblocks.fun/run/microblocks.html.
3. Once you’ve got MicroBlocks, see microblocks.fun/learn for next steps. For educators and makers alike, the site offers excellent Activity Cards and Guided Activities to get you started.
Build Some Web Things with MicroBlocks
Networked Clock — Here’s a simple example of a connected device. It shows how to turn a small Wi-Fi enabled microcontroller (such as any ESP32 or ESP8266 device), into a “networked” clock.


The next two examples take advantage of programming microcontroller boards as “web things” that can be managed through a WebThings Gateway running on a Raspberry Pi (or by Snap! running on your PC). Wi-Fi boards communicate with the gateway wirelessly. Non-Wi-Fi boards such as the micro:bit can communicate over a USB-serial cable using the MicroBlocks Add-on.
The gateway provides a sophisticated web interface that allows student data to stay in the classroom — no Internet connection required. If the gateway is connected to the Internet, remote access monitoring and control is available by tunneling into it over HTTPS. This “data center in the classroom” approach enables students and teachers to access the Raspberry Pi from home or anywhere else, using only a web browser. Want to detect that the classroom door was opened or that motion was detected? Or count the rotations of the hamster wheel or make sure the fish tank temperature is in the right range? No problem!
The Rules Engine of the gateway enables interoperability at the web layer. Individual devices don’t have to know about each other, they simply publish their own properties, actions, and events. You can mix and match devices you make with those you buy in the store.
Web Button — The next project shows how to turn a BBC micro:bit into a “web button.” The MicroBlocks script produces events, communicated in a JSON string that’s received by the WebThings Gateway. This way, two micro:bit boards can communicate using the Radio protocol, so that one of them is portable. Users can create a simple rule using the gateway, such that a “press” event triggers turning on the 8 LEDs of the RPi-HAT. A “double-press” event can be tied to a rule that turns them back off. When using two micro:bit boards communicating over the Radio protocol, one of them can be portable and powered by a battery. As a result, pushing button A or B on either micro:bit will result in a “press” or “double-press” event that will turn the other RGB LEDs on or off.


Smart Lights — This last example also takes advantage of the Radio library to turn two BBC micro:bit boards into web controllable “smart lights.” One is connected over USB to the Raspberry Pi gateway, and the other communicates with it wirelessly (using the Radio library). You can turn the light on or off using the micro:bit button, or toggle the “web light” icon on the web user interface.


In general, the web user interface of the WebThings Gateway (running on a Raspberry Pi) shows how easy it is to control a micro:bit LED display, acting as a web-thing-enabled “smart light.” Button A on the micro:bit can also toggle the light on/off.
The beauty of a standardized “Web of Things” approach to IoT was described in detail in Make: Volume 72, “Your Own Private Smart Home”. It puts IoT in the hands of the user. No commercial data centers, clouds, subscriptions, accounts, or other third-party services are required. All data storage, processing, analytics, and logging is run on the Raspberry Pi gateway and therefore can be completely owned and controlled by a classroom of students (or an individual Maker). The combination of MicroBlocks Web Thing libraries and the WebThings Gateway enables complete privacy and security, plus interoperability via the web!
ADVERTISEMENT


