

By Steph Cortés
If you were a giant nerd like I was in grade school, you took great pleasure in discovering new things to spell out on your calculator. In the time before text messages and iPhones, you were considered the coolest kid in class if you knew all the right “equations” to get the calculator screen to reveal a special salutation. Here’s a quick and easy felt project that marries all the nostalgic awesomeness of school-time shenanigans and the modern technological need to keep your electronic gadget’s screen scratch-free.
Materials
1 sheet of Eco-Felt in the following colors: gray, orange, cobalt blue, sky blue, and black
Ruler
Scissors
White embroidery thread
Large embroidery needle
Fabric marker with disappearing ink (a felt tip pen can be substituted in a pinch)
High-temp hot glue gun
2 sticks of hot glue
Directions
Step 1: Using your ruler to measure, cut out 2 pieces of felt measuring 4″x6″ in both orange and grey. Cut out one small rectangle measuring 1″x3″ in black.
Step 2: Bringing your felt next to your ruler, mark out 7 small 1/2″x1/2″ squares of cobalt blue felt to use for buttons. Use the same dimensions to mark out 12 small squares in sky blue felt and 1 small orange square.
Step 3: Cut out all the small squares of felt. Don’t worry if your fabric marker has left some ink on the felt. It will take up to a couple of hours to disappear completely.
Step 4: Take your small squares of felt and place them (unmarked side up) on the 4″x6″ gray sheet of felt so that you can get a sense of what your calculator will look like. Feel free to mix up your buttons for an even more unique look.
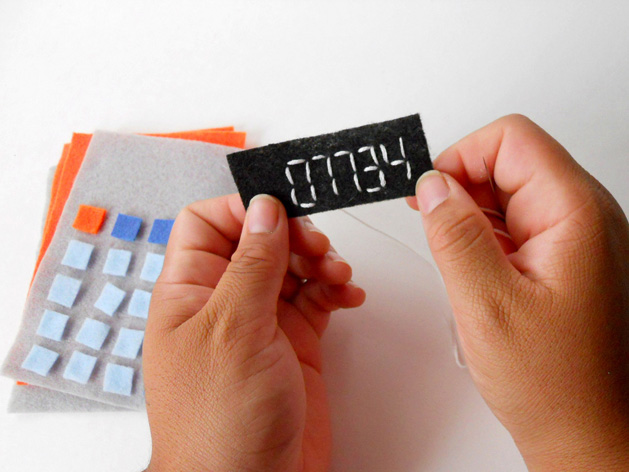
Step 5: Using about 18″ to 24″ of white embroidery floss, thread your large embroidery needle, making sure to tie a knot at the end. Leaving about 1/4″ margin, start embroidering the black screen with your message.
Working the embroidery from the right end of your screen to the left, use small 1/4″ straight stitches to embellish your black felt, forming old-school analog-looking numbers “07734” as your “HELLO” message. Don’t worry if the numbers/stitches look uneven or imperfect. That’s the glorious part of handmade items: every item is unique!
Step 6: Now that you’ve finished embroidering your message on your calculator, pull lightly at the edges of the felt to ensure that the stitches haven’t made the fabric bunch up. Flip your screen over & tie off a knot on your embroidery. Cut off the thread on the top of the knot.
Step 7: Carefully squeeze a line of hot glue around the edges of the back of your black screen. Make sure to leave a little bit of room to allow your fingers to handle the screen. Gently press the screen onto the top of the grey felt. Take care to use the tips of your fingers to pat the screen down into the felt so as not to press hard enough to let the glue sink through to the other side of the screen.
Step 8: Add a dab of hot glue to the back of each one of your small felt buttons. Lightly press them onto the grey felt in the order that you had them laid out. Allow the calculator a couple of minutes to cool off when you’ve finished attaching all of the buttons.
Step 9: Take a sheet of the orange felt and squeeze a line of hot glue down the edge of the sheet. Line up and carefully press the grey felt onto the orange felt to attach. Continue to attach felt until the orange lining & the grey exterior are fully fused. Repeat for the other two pieces.
Step 10: Just as in Step 9, take the back of the calculator (orange side facing up) and squeeze a line of hot glue down the edge from the upper left corner of the sheet. Line up the front of the calculator (screen at the top) and carefully press the pieces together. Once the left side is secure, squeeze a bit of glue in the lower left corner. Continue to squeeze out another line of hot glue along the edge of the bottom of the calculator & attach the felt. Repeat for the right side of the calculator.
Step 11: Press all sides of the calculator to make sure they’re securely attached. Allow a few minutes to pass to let hot glue cool. Use scissors to trim edges of the calculator if any hot glue might have creeped out.
How to care for and use your new Convo Calculator:
Since this project is made out of felt, it’s very flexible and versatile. They make awesome sleeves for iPods, iPhones, digital cameras, and various smart phones. Since they make great gifts for geeks of all ages, I’ve seen my friend use them to comfortably stow sunglasses. Since felt does tend to pill with a lot of use, I would recommend spot cleaning with a little soap and warm water, then laying flat to air dry.
Hot glue is a great tool for attaching felt in a time-saving manner. Feel free to check out a fully hand-embroidered version of my “HELLO” Convo Calculator in my Etsy shop.
About the Author:
When Steph Cortés isn’t crocheting video game inspired amigurumi while watching Netflix, she can be found drawing comics & rocking her micro-business, nerd JERK. More often than not, she’s updating her Facebook with rad links to geektastic trivia & new items. Check out her blog for sneak peeks at what’s going on behind the scenes & general awesomeness.
ADVERTISEMENT


