Super Fly Feather Earrings: Adorn yourself with one of nature’s finest adornments.
By Sara K. Woll
Photography by Portia Sanborn

I invite you to play with feathers. Hollow and air-filled, they want to take flight, and bring their own levity and movement, which I refer to as wonk, to each project. Accept the wonk and your process will be much more pleasant. The technique described here to create feather earrings can be adapted to adorn anything: hats, barrettes, skates, even the ends of your arrows. The best tip I’ll share with you is this: collect your feathers at fly shops. Fly fishermen and women create their own lure to attract specific fish using lots of natural materials including feathers and fur. My dad’s feathers were aflutter when he learned that he could shop for gifts for his vegetarian daughter at his favorite fly shop, and my workspace would remind him of his father’s, downy drift of feathery fluff coating pliers and wire. Who knows what you may attract when your ears dangle your very own super fly feather earrings!
Materials
2 pairs of pliers, one with small nose
Crimping tools
Cutters
Headpins
26 or 24 gauge wire
Crimp beads with large inner diameter
Porcupine quill beads (or other beads with large inner diameter)
Feathers
Lever-back earring wires
Directions:
Step 1: Prepare the feathers.
Making a matching set of earrings presents a unique challenge to artists working with natural material. No 2 feathers are exactly alike. However a little foresight can ensure your earrings will be very similar. Choose 3 to 6 feathers for each earring, clip off excess fluffy top.
Strip away the fluffy bit (afterfeather) at the top of each by pulling the fibers upward, or opposite the direction they are growing, and away from the central spine (rachis). Try not to strip away too much of the barb, or sharper colored feather fibers, as the rachis gets weaker and thinner as it extends away from its thicker base.
Step 2: Stack the feathers and headpin.
Create a neat stack of feathers to look the way you envision your earring. Arrange them on the tip of your pointer finger so the spot where the bare rachis ends lines up on each feather. Place your headpin on top of that stack so the flat head marks that transition, with the straight pin part away from the feather barbs, in alignment with the bare rachis.
Step 3: Make the headpins.
Headpins are available in different lengths, gauges, and metals. They look like straight pins, but aren’t sharp. I would recommend a 26 or 24 gauge headpin for this project. They can also be quite easily made. One method I’ve used successfully is to create a swirl at the end of a 1½" piece of wire, using tiny pliers to grasp the end and then swirling the wire around the pliers 2½ turns or so. That swirl can then be smashed with a hammer for texture if you like.
You can also use a culinary torch to melt the end of a piece of wire into a little ball that would serve as the head. You’ll need to use copper or sterling, and indulge in good ventilation if you experiment with the torching technique. Clean the wire with 1200-grit sandpaper and wipe with a soft cloth to remove oils from the skin and tarnish that could cause the end to melt strangely. Cool each headpin quickly in a water bath. (This torch method comes courtesy of Dev Khan, wire wrapstress extraordinaire: devkhan.com).
Step 4: Slide a holding bead and crimp bead over the stack.
Carefully holding your stack of feathers and headpin between 2 fingers, slide a “holding bead” over the headpin and all the bare spines of your feathers. This step allows you to adjust the wonk of the feathers, making sure they are facing in the desired direction and are hanging as you envisioned. I use porcupine quill beads because they are natural, sturdy, and have a huge inner diameter, so I can fit them over the whole stack easily. They are easy to find and remarkably inexpensive. Next slide the crimp bead over the whole stack just like the holding bead.
Step 5: Crimp.
The crimp tool has 2 jaws: one moon shaped and one egg shaped.
There are different sizes of crimp beads and crimp tools. Again I choose crimp beads with larger inner diameters, so I can fit more feathers inside. The medium-sized crimp tool works well with most crimp beads. First squeeze the crimp into a moon shape with the inner most jaw.
Then turn the tool 90° and use the egg-shaped jaw to squeeze that moon shape closed.
Using your clippers, snip off the extra bit of bare rachis right above the crimp.
This step is very satisfying because when it works well you will have successfully secured feathers with no tying or glue. However I caution you to try this step on some lesser feathers to practice, because when the crimp is smashed, its edges can get sharp and could sever the rachis of the feather and create a setback.
This is also a moment of accepting and delighting in the natural movement that the feathers themselves bring to the project. When we close the crimp, the feathers, in the process of getting squeezed inside, will almost certainly twist or flare in a unique way. This is one of the beauties of natural materials and offers the experience of flowing with the materials. Give each feather a tug to make sure they are all securely fastened and haven’t been cut by the crimp bead.
Step 6: Embellish.
Now you are holding a headpin that boasts a bouquet of feathers secured at its end. Your options at this point are limitless! You may choose to slide the beads of your choice onto this headpin as in traditional earring-making fashion. You may choose to make another headpin of feathers and use two on each earring, making a fuller feather look. You could even sew the feathers into your cap (and call it macaroni) or wire the headpin to a barrette for a headpiece.
Step 7: Create loop to attach headpin to earring wire.
The earring wire is the hardware or finding that goes through the ear. I recommend lever backs, the style that includes a little clasp behind the ear that keeps your earring in place. These earrings are feather-light and if not secured will be whisked away by your hair or the breeze and you won’t even feel it.
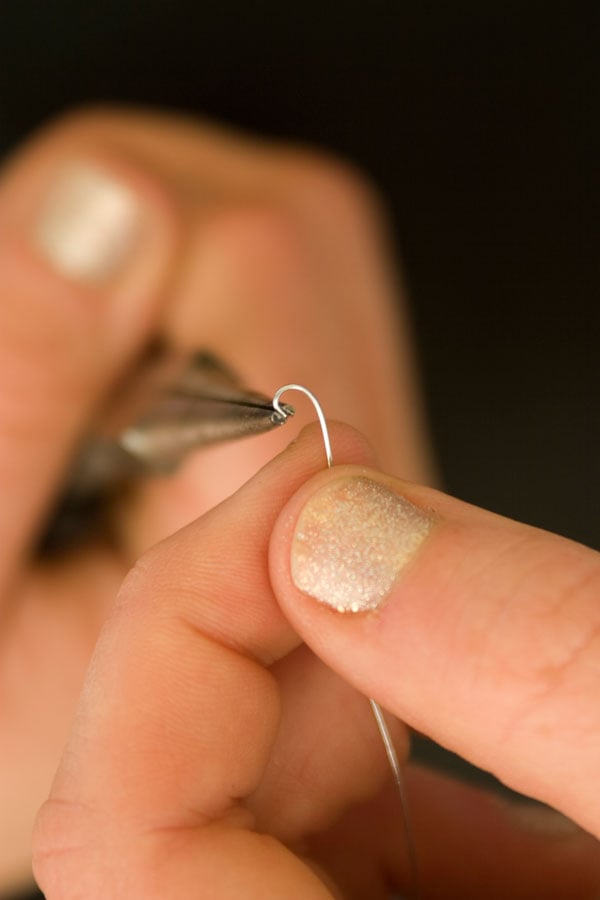
To make a sturdy loop in the top of your headpin, you’ll need 2 pairs of pliers: one pair with a tiny nose and the other acting as a second hand. With the tiny pliers, hold the headpin about a crimp bead’s length above the top of your crimp. With your fingers, bend the straight end of the headpin down, making it parallel to the feathers. This loop needs to be perpendicular to the loop on the bottom of the earring wire so that your earrings face forward.
Change the hold on your tiny pliers so that you are squeezing the top of the fold, where your loop will be, as shown below.
Hold the other end of the pin with the other pliers and wrap that end twice around the loop held by the tiny pliers.
Clip off the end. This step gets much easier with practice, so try it a few times first if it’s new for you.
Step 8: Join the earring to the earring wire.
The lever backs that I recommend are stamped out of a piece of metal and the loop at their bottom can be opened, but it’s not designed to be opened and closed many times. Any time you are opening a loop, it’s important that you not take it out of the round. So instead of opening it wider, you’ll open it to the side.
Open this loop gently to the side, slide on the loop at the top of your earring, and gently close that loop again with your tiny pliers. Admire your handiwork!
Innovative Variations
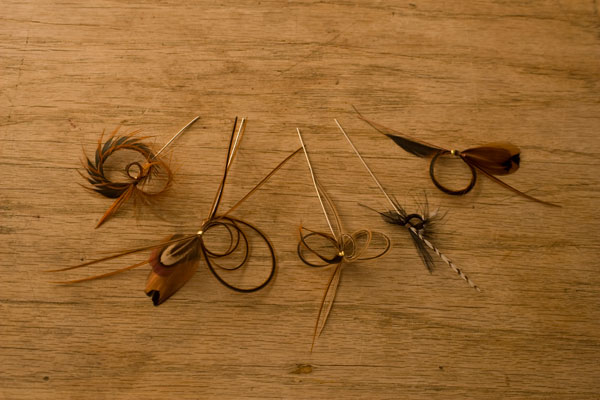
There are so many shapes and gestures that feathers can embody that they offer multitudinous variations on this simple theme. Once you can reliably secure them to a headpin, charge your designs with these ideas:
If one cluster of feathers is great, two can only be better. Try layering different feather bundles for different effects.
You could also affix bundles of feathers to either end of a V-shaped heap pin, allowing for feathers to not just hang down but laterally as well.
When feathers are bent or looped, their barb fibers splay into circles of divine geometry.
By pulling a long feather up through the crimp, looping it around, and inserting the rachis through the crimp again, you will create a spiky loop of goodness that is inspiring to add to any design.
Combine these variations, bring your own flavor, and enjoy your crafting.
About the Author:
Sara K. Woll enjoys watching her hands fly craftily and is always amazed at what they create. She loves to play with fibers, feathers, copper, gemstones, and pieces of costume jewelry from her Grandma Sue. Her wearable art is a tribute to nature, the most extraordinary artist of all, and can be found at optimist.etsy.com.
ADVERTISEMENT


