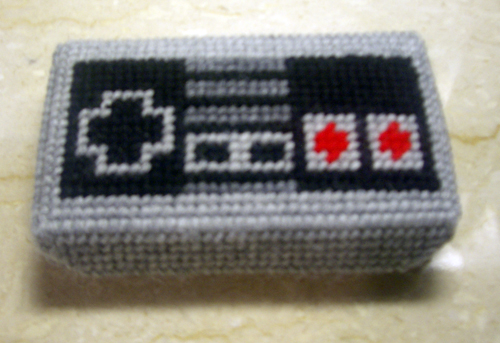
For a friend’s birthday, I decided to make the needlepoint Nintendo DS case created by Rosemary Travale (rosered) on Crafster (CRAFT post here). I loved the retro Nintendo game control look and it was a perfect gift to my video game loving friend. I wanted to make this fast, so I went with a larger plastic grid to speed things up! In doing so, I made some modifications along the way. Needlepoint is an easy craft to learn and do. This is the perfect first project to pick up and learn the basic needlepoint stitch. After you make this case, you’ll be able to needlepoint just about everything!
Here’s an modified tutorial along with a downloadable grid in PDF and Adobe Illustrator format (If you want to modify the file yourself to change things). Thank you Rosemary for the inspiration! You can easily make one of these in less than one week! Keep reading for the full tutorial and photos.
What you’ll need:
- 1 sheet of clear plastic canvas in #7 mesh (Mine was purchased at Joann’s – Darice 10 1/2″ X 13 1/2″)
- 1 ball light grey yarn (this is the most used color throughout)
- 1 ball dark grey yarn
- 1 ball black yarn
- 1 ball red yarn (you’ll use the least of this color so use some from your left over stash or split it with a friend)
- 1 piece of grey felt
- Scissors
- Tiny snap buttons
- Sewing thread
- Sewing needle
- Grey (or contrast color) embroidery thread
- Embroidery needle
Cut the plastic in pieces in the follow sizes, based on the number squares:
Tip: Double check measurements by using your Nintendo DS as a guide.
Top and Bottom ( 2 pieces): 21 X 37
Front and Back Sides (2 pieces): 6 X 37
Left and Right Sides (2 pieces): 6 X 21
Flap (1 piece): 5 X 37
(Optional: Cut the corners of the flap so there’s a rounded edge. The bottom row measures 31 squares.)
Here’s the needlepoint grid:
The basic stitch used is the Continental stitch seen here. It is very easy to follow (start with #1 and work your way through the numbers in the squares.) There are more directions here in A Guide to Needlepoint.

I started with all the non-pattern light grey pieces first to get my needlepoint stitching to perfection. After doing this for a while, you’ll be able to manage the flow of how you stitch without stressing over the grid of the pattern.
I also left a small tail on some of the edges of the side pieces so I could use them to stitch together the box. For the back piece measure where the power plug goes and cut out the small area. This allows you to keep your Nintendo nicely in the case while charging.
Tip: When starting or ending your needlepoint yarn, do NOT knot off your yarn!
To start yarn, hold smaller end of yarn in the back of the canvas with your left hand and proceed to “work over” the yarn as you start to stitch. You’ll see that the yarn gets attached together and is really sturdy. On the backside weave your yarn through worked area horizontally or vertically (depending on your direction.)

You may want to line your case to hide all the ends of your needlepoint. I used a light grey felt. I measured the area on the back of the front cover and on the inside of the case (you can measure this as you are stitching up your pieces so it’s easily laid flat over the felt). Just cut the pieces of felt and sew into the case with embroidery thread with a decorate stitch. Use a fun contrast color if you
want to as well.
You could go the glue gun route as recommended by Rosemary but I find that yarn and hot glue are not forgiving if you don’t place it in exactly the right area and need to move it. (Yes, that happened during this project but thankfully nothing was destroyed except the felt which was easy to recut.) You could also use fabric to line the case, but hem the edges before you sew it in the case.
I also used snap buttons to open and close the case because I was worried of the stress of wear and tear on the flap by ripping open velco in the long haul. In this case, if a snap comes off, I can easily sew it back on. It’s up to you.
So volia! Here’s a handy needlepoint Nintendo DS case with a retro Nintendo control that will make you the envy of your friends. If you have made this needlepoint case as well, leave a comment on any tips or tricks you have while making this.
Thank you Rosemary for the great tutorial to being with!
ADVERTISEMENT


