

By Brookelynn Morris
Gardening is a rewarding craft that bridges the gap between art and earth. Plants grow and thrive and all they need to do it is a bit of water, sun and love. They give us colors, textures, and flowers, all of which can be combined in endless ways. Provide them with a container and some lush soil, and they in turn will provide an enriched environment and years of beauty.
Materials:
Plants
Large clay pot
Potting soil
Perlite
Vermiculite
Spade
Vitamin B
Watering can
Clippers
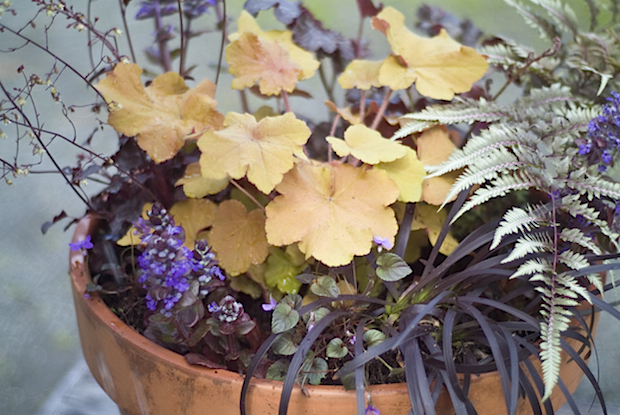
*I used the following shade loving plants for this garden: Huchera Caramel, Huchera Midnight Claret, Huchera Stormy Seas, Black Mondo Grass, Painted Fern, Blue Ajuga and Violets
Step 1: First choose a space for the container garden, then shop for plants that meet the needs of your location. Consider the amount of sun or shade available. Are you looking for plants that conserve water? Do you want annuals, or perennials? Work on a garden plan, and consult the web and gardening books for as much information you can find. The more you know before you purchase plants, the better.
When you arrive home from the nursery, set the plants into groups, and see what works. Arrange the plants, still in their containers, until you have a balanced design. As you build your design, be sure to consider how the plants will grow together. They look one way now, but try to imagine how they will look in a year or two or three.
Put taller plants in the back, and shorter ones in the front. Place low growing plants to the sides so that they will drape down the container. Play with dynamic colors, and odd textures. I am often surprised to learn which particular plants harmonize and which don’t. This is one of my favorite creative processes!
Step 2: Prepare your pot. Make sure that the container you choose has good drainage holes at the bottom. To prevent loosing soil out of the bottom when you water, flip a piece of broken pottery over the opening. Don’t block the opening all the way, just make a sort of shield.
Step 3: Blend a potting soil that meets the needs of your plants. My formula starts with a rich mix of dirt, then I add vermiculite and perlite. Vermiculite is a small grain of mineral that adds surface area, and perlite is a bigger grain of puffed minerals that create pockets of oxygen. Plants that love shade and moist soil like ferns only get a small amount of the add-ins, while the succulents and grasses that prefer well draining soil can have a soil mix of up to 50/50 dirt and add-ins.
Step 4: It’s likely that the plants you found will need some cleaning up. Remove any dead leaves, or dead flowers using sharp clippers.When a plant is too big for its container, it will become root bound and get stuck in its container. To remove a stubborn plant, cut away any roots that are peeking out, and then gently squeeze the sides of the container. Un-bind the roots by breaking them open and removing anything that looks less than healthy. Weeds will find anywhere they can to grow, and they might have hitched a ride home with you from the nursery. Remove anything that shouldn’t be there, and do your best to pull out as much of the weed’s root system as you can.
Step 5: Now it’s time to pot up! Fill your container up with dirt high enough so that when you add the plants their base will sit a bit lower than the lip of the pot.
I tend to start with the centerpiece, and then build around it. It’s also good to start with the back of the container and then work towards the front. In general, I add the larger plants first, then fill in with the smaller and more delicate types. Work carefully, being sure not to break any of the fragile branches, but if you do, don’t fret! Any branches lost will most likely grow right back! I find that my design tends to become more refined as I actually pot up, so don’t be afraid to switch your plants to find perfection.
Step 6: When all your plants are snugly placed in their container, water them in. Add a Vitamin B plant supplement to the water to help them avoid shock. I add 1 tablespoon of Vitamin B per each gallon of water, and then drench the plants with the mixture. This first watering should be heavier than normal, because letting lots of water flow through the soil will help it settle down. All that’s left to do is to love your new container garden! Give it lots of attention, water it whenever the soil dries out, and enjoy watching it grow and thrive.
ADVERTISEMENT


