Get a taste of traditional printmaking with the world’s first 3D-printed etching press! With the help of 3D printing, these unique art techniques are finally accessible to a lot more people, and in places where printmaking wasn’t possible before.

Printmaking has been around for 500 years, used for illustrating books, printing banknotes, and duplicating famous paintings. Today, printmaking is known for its distinct look and is used by artists around the world, but lots of people don’t have access to printmaking due to the high costs of a press. Etching presses for intaglio printing are especially hard to find due to the high amount of pressure that’s needed.

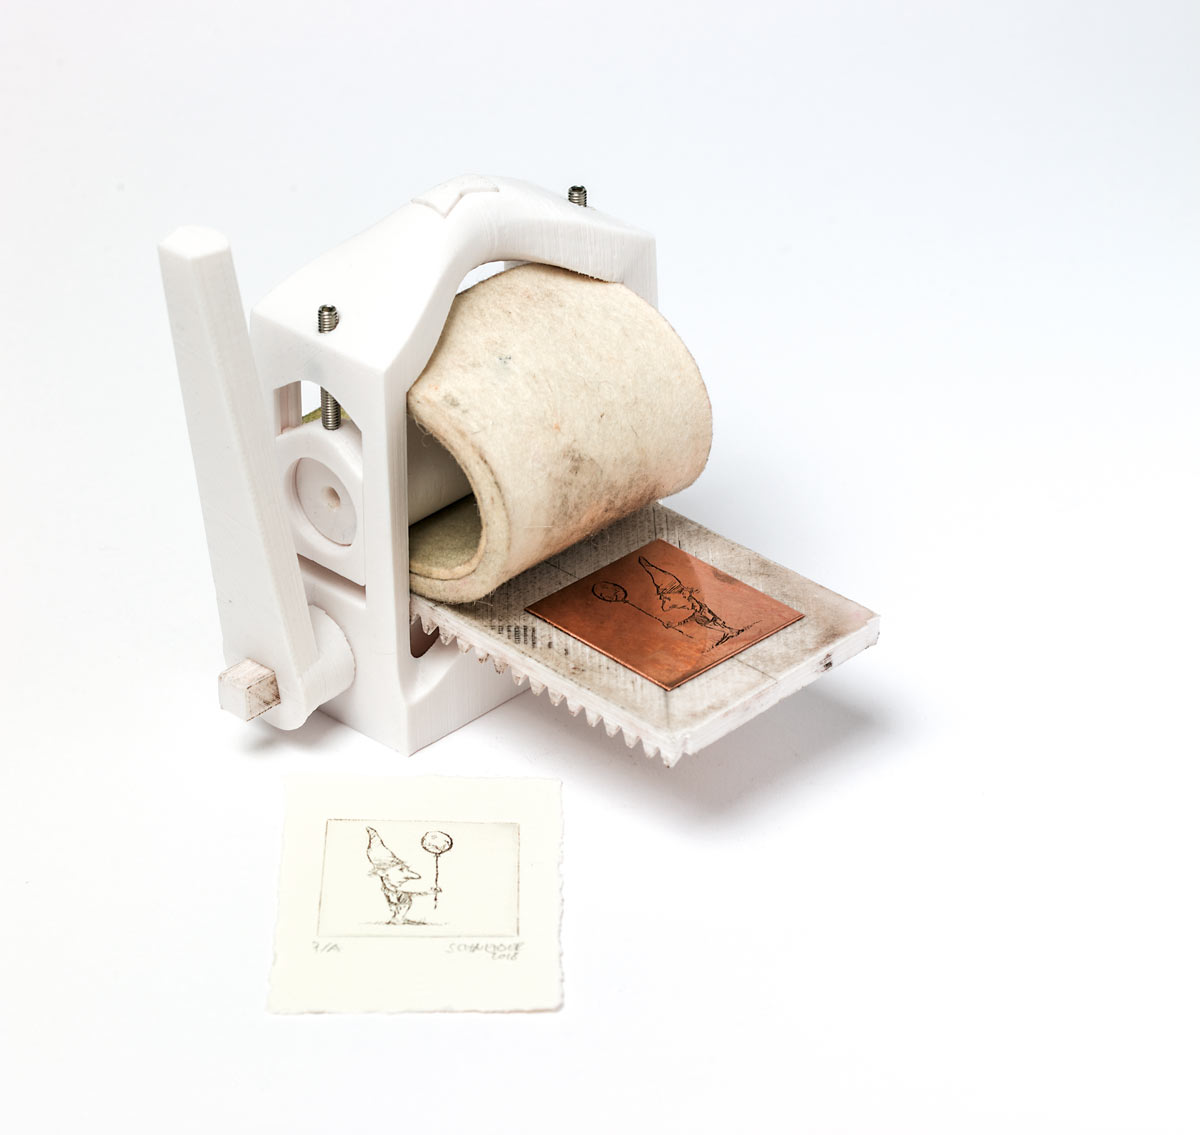
So I designed a working press that can be produced with a 3D printer: the Open Press Project . The 3D files are free to use, and the project has already grown into a small community of excited makers and printmakers all over the world!

Get In the Grooves

I like to explain intaglio printing technique in comparison to relief printing, because everybody knows how potato prints and rubber stamps work: In relief printing, the raised surfaces of the stamp or plate are covered with ink while the grooves remain un-inked. With intaglio printing it’s the exact opposite: We carve scratches and grooves into a plate and fill them with ink. Then we remove the ink from the surface, so that it remains only in the grooves. The paper is then compressed into the grooves to pick up the ink.

Comparison between relief printing (left) and intaglio printing (right): A) Roller, B) Paper, C) Ink, D) Plate with grooves and scratches, E) Felt.
A) 2x side parts, B) upper roller , C) lower roller, D) press table, E) roller wrench, F) lower roller pin, G) 2x M5 screws, H) 2x M5 nuts, I) top connector, J) 2x side connectors, K) printing cloth/felts

Keep It Rolling

Now that you’re a printmaker, there’s much more to explore. For your intaglio plates, you can use all kinds of materials including copper, zinc, aluminum, steel, plastics, CDs and linoleum, wood, and foam board. I’m using copper most of the time, though for beginners it’s less expensive to practice on juice boxes or CDs.

Your press can also be used for relief printing techniques like linocuts, woodcuts, and 3D-printed plates, and for mixed-media colligraphy, which can be printed intaglio or relief.

I would love to welcome more makers to our Open Press Project community on Instagram. Please share your presses and prints, it would make my day!

I would also love to see your redesigns, adjustments, and improvements to the press itself. After more than 300 years of non-existing innovation in the design of a printing press, it’s time to take it to the next level! All of the STL files are licensed under the Creative Commons Attribution-NonCommercial 4.0 International License, so you’re free to copy, share, and edit the press for non-commercial purposes.

Questions or feedback? Email me at martinschneiderart@gmail.com. I would love to hear from you!

Project Steps

Print the Parts

I’m using standard PLA for all my prints since it doesn’t warp as much as ABS during printing, which is very important for the rollers. However, people have successfully printed with different materials, so feel free to experiment! I use support structures for the lower roller only; the other parts should be printable without.

All in all it’s simple to print the 10 parts, you just need to keep an eye on the printing orientation! Since the strength of 3D-printed parts depends on how the printing layers are arranged, it’s important that the turquoise and orange parts are printed lying down. The side pieces (turquoise) are special, because they have an interlocking part in the middle, “printed in place,” which needs to be able to slide up and down later. You might need to break these free after printing, since they might be fused together lightly.

Print the two rollers standing up. That way the surface has a better finish, which is important for the quality of the intaglio prints later. The bed is printed with the gear facing upward. The side pieces and two of the little connector pieces are the exact same model, you just need to print two of each.

I suggest you use a lot of infill for the parts, since they need to withstand a lot of pressure while doing printmaking. I’m using 25% for the side pieces and the printing bed, 50% for the rollers and the roller pin, and 15% for the handle and the little connectors. I suggest a 0.2mm layer height for the side pieces and a maximum of 0.3mm for the other parts.

True the Rollers and Bearings

You might need to use sandpaper to touch up the rollers, since some 3D printers are not super accurate when it comes to printing perfect circles. Measure the diameter after printing and make it as round as possible with the sandpaper. Same goes for the bearings in the side pieces! If these aren’t accurate, the rollers won’t run smoothly later.

Add Nuts and Screws

Remove any support structures if you used them, then put a screw through the top part of each side piece and through its hex nut. Make sure it hits the moving part in the middle and is not moving around too much. With these you will be able to change the pressure that is applied to the printing bed. More on that later!

Assemble the Press

First make sure the rollers turn without jamming when you stick them into the bearings of the side pieces. If they do, use some sandpaper again. You can also put some Vaseline between the pieces to make them run really smoothly.

Put the rollers in between the two side pieces and connect everything with the little bow tie-shaped connectors.

Then push the roller pin into the lower roller and add the handle. You’re almost ready for printmaking.

Mount Press to Board

I like to attach my press to the edge of a wooden board before using it. That makes printing easier, since you don’t need to hold the press down while turning the handle.

That’s it! Your press is ready for printing.

Prepare the Paper

Before you etch your plate, first prepare the paper that you’ll print on later. It’s important that you use paper that can soak up the ink from the scratches on the plate. Special handmade paper for this purpose can be found in art supply stores.

Use some tap water and a brush to wet the paper on both sides. Let it soak in a while before you use it for printing. If you’re planning to make multiple prints, you can stack the papers and wrap them in plastic to keep them wet.

Make your Plate

This might be the most difficult part of the whole process: You need to come up with a subject for your plate!

After you figure out your image, grab your beverage carton. It will print just like a copper plate, but it’s much more accessible and easy to use. The packaging I’ve used here is from orange juice, but you can use all sorts of tasty drinks as an excuse to make some art.

To etch your image, use the drypoint needle to make deep scratches into the inner layer of the carton — the plastic/aluminum layer. The paper backing underneath will later soak up ink and transfer it onto your print paper. The scratches are perfect if you can feel them when you move your finger over them.

The awesome thing about beverage carton is that, unlike copper, you can very easily cut away parts of the plate entirely, or use a scalpel or X-Acto to carefully remove parts of the first layer only. That’s great if you want to have large colored areas, since the ink will stay in these parts of the plate.

One more thing to keep in mind: The plate will be mirrored in your prints — everything you scratch into the plate will be flipped. That’s important if you want to print text, for example.

Ink the Plate

Now for the fun part: inking the plate. Since intaglio ink is oil-based you’ll have a hard time removing it from your fingers and clothes, so you might want to use gloves and an apron. Make sure the ink covers the whole plate and fills the scratches especially. There’s no such thing as too much ink, so be generous!

Wipe the Plate

Now use scraps of paper to push all the ink into the scratches and remove it from the surface of the plate at the same time. If you have an old telephone book laying around, this is a great way to get rid of it. There will always be some ink left on the surface on the plate, but try to wipe it as clean as possible while at the same time making sure that ink stays in the scratches.

Set up Your Press

Carefully place the inked plate on the printing bed face up. Then place the wet paper on the plate and put the felt blanket on top of that. Your sandwich is now ready to be printed!

I’m using some old wool felts in our workshop. Some of them have holes and can no longer be used with a big press, so I cut them into pieces.

Printing Time!

Carefully push the sandwich in between the rollers and wait for the lower roller to get ahold of the gear teeth. It might be a bit tricky; you might need to remove some pressure by loosening the screws to make more space for the bed. Also you might have noticed that the gear teeth of the printing bed are tilted, so there is only one orientation that’ll work.

Now turn the handle until the bed goes through to the other side. Make sure that the felt is moving (not stuck) and that the upper roller is turning, too. Now for the magic moment: Carefully lifting the felt and paper is my favorite part of the whole procedure!

Inspect and Adjust

Congratulations, you have successfully printed your first print on a 3D-printed printing press! Now’s the time when some problems might become visible. If the print is too light and doesn’t show clean edges, you might want to adjust the pressure of the press. Also it may be the fault of your plate: Make sure the scratches are deep enough.

Experiment with different amounts of pressure and the wetness of the paper to get your best prints. Below you can see the differences between two prints. While both are quite good, the lines of the left one are more blurry while they’re super sharp on the right one. For the left one, the surface of the plate had more ink left on it, that’s why there is more color in general. But this comes down to preference — you just have to figure out what you like.

Dry Your Prints

Oil-based ink usually needs a few days to dry, so be patient. Place each of your prints in between sheets of regular copy paper to make a stack, then place some heavy books on top. Let this sit for a few days, replacing the copy paper with some fresh paper after a day or so. After that, you’re ready to sign your prints!