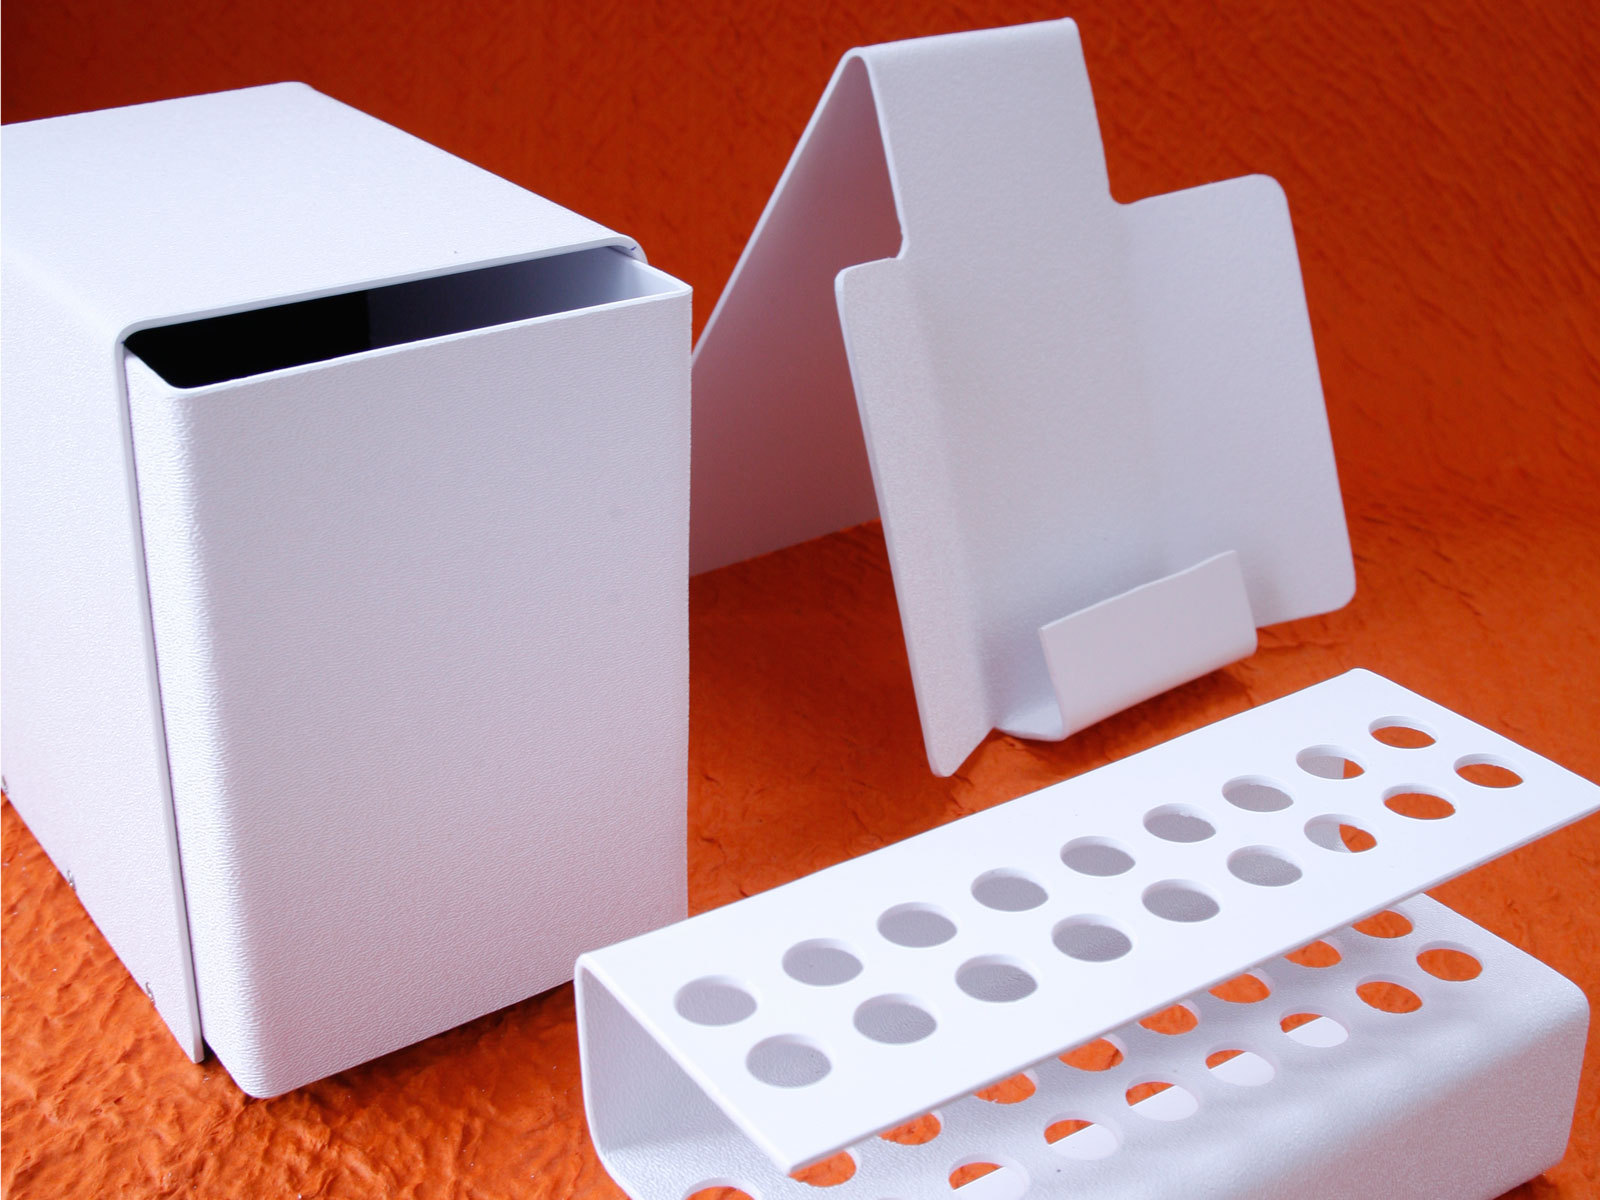
Last night I dreamed of a magical material that would be bendable like metal, as easy to shape as wood, and would never warp, split, or splinter. It would be washable, would never need painting, and would last almost forever.

This morning, when I sat down at my desk, the stuff from my dream was right in front of me. It fact, it had been there for several months, ever since I made a pen rack from ABS.

ABS is acrylonitrile butadiene styrene, a plastic that really does have dreamlike qualities. If you’ve ever picked up a Lego block, you’ve handled ABS. Car stereo installers and model railroad buffs sometimes use it, but craftspeople and hobbyists generally have been slow to adopt it. You can saw it, drill it, sand it, whittle it, and drive screws into it, and it never warps, splits, or splinters. Best of all, you can bend it quickly into complex shapes by using a simple gadget that costs around $200.

To acquaint you with its pleasures (and a few quirks), I’ll describe how to build a page stand — a simple work aid that facilitates copy-typing by holding pages upright beside your video monitor. After that I’ll describe a portable CD caddy and a pen rack, and will suggest more projects you can make.

What will the next generation of Make: look like? We’re inviting you to shape the future by investing in Make:. By becoming an investor, you help decide what’s next. The future of Make: is in your hands. Learn More.

Project Steps

Prepare your plastic.

Pieces of ABS a couple of feet square are available online, but you’ll save money if you truck on down to your nearest plastic supply house and buy it like plywood, in 4’×8′ sheets. To discover whether you actually have a nearby plastic supply house, search for “plastic supply” in your yellow pages or Google Local.

HobbyLinc has ABS sheet and a lot of extruded structural shapes for model making. eStreetPlastics has limited stock at good prices. Regal Piedmont Plastics has a huge inventory and many supply centers around the nation, but you’ll have to collect it yourself, and they may not be willing to cut 4’×8′ sheets into smaller pieces.

Stock colors include black, white, and “natural,” which is beige. Sheets usually are textured on one side, which is the side that should face outward, since it is more scratch-resistant than the smooth side. To build the page stand, you will need white ABS, 1/8″ thick.

Because the plastic surface you end up with is the surface you start with, you’ll have to be careful not to scuff or scratch it while working. Clean your bench thoroughly before you begin, taking special care to remove any metal particles, which will tend to become embedded in the plastic.

Use wooden shims in the jaws of your vise, and avoid resting the plastic accidentally on any sharp tools or screws. Working with ABS requires a clean environment and a very gentle touch.

Make preliminary cuts.

You’ll bend up on the blue dashed line, and down on the red dashed lines. To make rounded inner corners, drill ½” holes (blue circles) before cutting. There’s nothing else to it: no fasteners or additional sections. Very often an ABS object can be fabricated by making multiple bends in a single piece.

Begin by cutting a 7″×16″ rectangle out of a larger piece. Because ABS is not brittle, you cannot just drag a knife to score a groove and then snap it, as you can with acrylics. A saw is necessary.

The bad news is that if you use a table saw, the plastic will tend to melt and stick to the blade. This will lead quickly to kickback, in which the blade grabs your workpiece and hurls it at you powerfully enough to break bones. If you have extensive experience using a table saw, you are actually more vulnerable, because the reflexes and cautions you have developed while dealing with wood will not be adequate for working with soft plastic. Please take this warning seriously!

Avoid using a table saw to cut plastic. If you must use one, install a special plastic-cutting blade.

Fortunately there is a simple answer: buy a plastic-cutting blade, which has a larger number of thicker teeth to absorb the heat.

The blade I use is a Freud 80T, but there are others. If you use a blade that is not suitable, it will start to accumulate smears of plastic on its flat area. This is the final warning you will get. Clean that blade with a solvent such as acetone, and never use it for ABS again.

To make long, straight cuts you can also use a panel saw (big and expensive, but safe and accurate), or a handheld circular saw guided with a straightedge clamped to the sheet. This is the method I prefer. A battery-powered circular saw has enough power to do the job and it is less likely to melt the plastic.

For smaller cuts, a band saw is trouble-free. Since ABS is soft, you can also use hand tools with very little effort, especially a Japanese-style, pull-to-cut saw, which makes exceptionally clean cuts. When pulling it, be careful that it doesn’t jump out of the cut and across your hand.

Mark and shape the ABS.

Mark your cutouts. After you have your 7″×16″ rectangle, clean its edges with a deburring tool, then place it textured-side down and use a fine-point water-soluble pen to draw the shape that you’re going to take out of the piece.

Afterward, you can wipe the lines away with a damp cloth. Don’t use a permanent marker, as the solvents to clean it will dissolve the plastic.

Drill holes at the inside corners. ABS tends to open a fissure when you bend it at any inside corner where you don’t have a smooth radius. Therefore, you need to make ½” holes at these corners, as shown on the plan (shown in step 2).

I use a template (available from any stationery store) to mark the circles. If I don’t take this step, I tend to forget to drill the holes.

A regular ½” bit is too aggressive for drilling ABS; it will tend to jam itself into the plastic within one turn of the drill. Forstner bits work better.

Cut out the piece. After drilling the holes, cut around the edges of the shape using a band saw, hand saw, or jigsaw. The plan shows some of the outside corners rounded, in addition to the inside corners, but this is a matter of taste.

My favorite sawing tool is a DeWalt XRP jigsaw using Bosch blades, designed for hardwood or plastic. This will cut complex curves in ABS as easily as scissors cutting paper.

Saw slightly outside of each line, so that if the blade wanders you can use a coarse metal file to straighten the edge afterward.

My favorite sawing tool is a DeWalt XRP jigsaw using Bosch blades, designed for hardwood or plastic. This will cut complex curves in ABS as easily as scissors cutting paper.

Remove cut marks and add bend marks. Remove any lines that you no longer need because they will become harder to erase after you apply heat during the bending process.

Clean the plastic with a soft sponge and dishwashing liquid (never use solvents such as xylene or acetone), then make just a couple of dots to remind you where you will position each bend.

Bend the ABS.

This is the fun part. You need a plastic bender, which is an electric heating element mounted in a long, thin box that you place on your workbench.

The bender I use is made by FTM, a company that offers all kinds of neat gadgets for working with plastic. Their cheapest bender is just over $200 with a 2′ element. You can get a 4′ model for about $50 more. Be careful; the bender will inflict serious burns if you happen to rest your hand on it accidentally, and since it has no warning light, you can easily forget you have left it plugged in. Gloves are definitely advisable.

Simply lay the plastic over the hot element for a brief time (25–30 seconds for 1/8″ ABS, 40–45 seconds for 3/16″, and up to 1 minute for ¼”). If you overheat the plastic, you’ll smell it, and when you turn it over, it will look like brown melted cheese. Naturally you should learn to intervene before the plastic reaches that point.

ABS is ready to bend when it yields to gentle pressure. Take it off the bender and bend it away from the side that you heated. If you bend it toward the hot side, the softened plastic will bunch up inside the bend, which doesn’t look nice.

You can work with it for about half a minute, and when you have it the way you want it, spray water on it to make it set quickly. Alternatively, if you need more time, you can reheat it. Since the force necessary to bend the sheet increases in proportion with the length of the bend, a long bend can be difficult, so I usually apply a loose vise at intervals.

When making multiple bends in ABS, the sequence is important. If you don’t think ahead, you may find that a bend you just made creates a shape that won’t lie flat on the bender anymore, leaving you unable to continue. The page stand design is fairly simple, but you’ll be in trouble if you don’t check the plan and make the bend on the dashed blue line after all those on the dashed red lines.

When creating your own designs, it’s safest to model them in paper or cardboard first.

TIP FROM THE MAKE LAB: If the $200 pricetag for a professional bender is too steep for you, don’t worry, you can build one. Tap Plastics sells a bare 3′ heating element, and with a little plywood, tinfoil, and fiberglass tape (also from Tap) you can make your own bender for about $65.

Use two pieces of ¼” plywood, placed ¾” apart to make a raised channel on another piece of plywood. Then, cover the entire channel with several layers of thick tinfoil and a few layers fiberglass tape. Lay the heating element in the channel, plug it in, and start bending. For complete video instructions, check out http://tapplastics.com.

Bend a CD caddy.

One type of object that’s difficult to make with ABS is a box. If you cut a cross shape (like the Red Cross logo) and then bend the 4 arms of the cross upward to make 4 sides of a box, their edges will not align accurately, and you will have no easy way to join them together — unless you try plastic welding. Some people claim they can make good plastic welds using appropriate equipment, but I’ve never seen a really neat weld made by hand.

Rather than try to force ABS to form conventional box shapes, it’s easier to make unconventional box shapes that are appropriate for ABS. The diagram shows a plan for a very durable 2-piece traveling CD caddy. Many soft binders are sold for CDs, but I like to keep CDs in their jewel cases, and I wanted an indestructible hard-shell caddy that would let me do this.

My box-making strategy was to bend 1/8″ ABS to form a 3-sided shell around thicker end pieces of 7/32″ or ¼” ABS. I attached the shell by driving small screws through it, into the edges of the end pieces. Since ABS has no grain, it tolerates this easily, so long as you drill adequate guide holes first.

Start by bending the shell to fit the end pieces. Don’t be surprised if you have to deviate slightly from the lines in the plan. Mostly the plastic stretches around the outside of each bend, but a little shrinkage occurs on the inside too. You lose perhaps 1/32″ on the inside of a bend in 1/8″ plastic, although this may vary depending on how hot the plastic is when you bend it. Some trial and error is inevitable. If the fit is too tight or too loose, you can reheat the bend and lean on it to push it in the direction you want.

You’ll need #4 stainless steel sheet metal screws, flat-headed, 5/8″ long, for the next step. Assuming you have drilled holes in the shell as the plan suggests, countersink them very gently to avoid eating too deeply into the plastic, then hold each end piece in place and mark its edge by poking a pen through the holes in the shell.

Remove the shell and drill guide holes in each end piece, centered within the thickness of the plastic. Because ABS does not compress like wood, the holes must be larger than you might expect; otherwise, the plastic will swell around the screw. A 3/32″ bit is just right for a #4 screw.

After assembling the box, the last step is to make a lid. Because I dislike hinges and catches, I chose to fabricate a sleeve that fits snugly around the box to protect its contents. The slick surface of the plastic allows the sleeve to slide on and off with a smooth, gliding action, even though it fits tightly.

Cut and bend a rectangle to form 3 sides of the sleeve, and use another thicker piece of ABS as the fourth side. Make 2 bends so that the rectangle fits around your box, then attach the fourth side of the sleeve with #4 screws using the same technique as before, and the job is done.

Bend a pen and pencil rack.

ABS makes it trivially easy to create desktop accessories. With 4 bends in a single rectangle, and some ½” holes, I created a nifty little rack so I can see immediately if anyone runs off with one of my pens!

Conclusion

Other projects

Many items in the kitchen or bathroom are ideal for ABS, such as a toothbrush stand, a spice rack, or a holder for soap and shampoo to hang on the side of your bathtub. Of course you could buy these items, but by making your own you end up with something that is exactly right for your particular needs.

ABS is very flexible, but a couple of longitudinal bends will make it extremely rigid (comparable to aluminum after it has been formed into a channel or a tube). You can even make bookshelves out of ABS if you add a bend along each of the 2 long edges of a strip. Similarly, you could make a stand for your video monitor, or even a chair, if you’re feeling ambitious. At my workplace, I found that after bending ABS into a channel shape, it was strong enough to support a pair of 20-lb. compressed gas cylinders.

This project first appeared in MAKE Volume 10, page 100.