Reade Richard is a maker/educational content developer for Steamlabs with a passion for micro:bit and laser-cut activities. In his spare time, he enjoys bringing artifacts from his favorite films, books, and games to life using woodworking, laser cutting, and other fabrication tools at his disposal.
Andy is an innovator and a thought leader in education and connected learning. His passion and purpose are to empower kids and adults to invent the future!
This article appeared in Make: magazine Vol 84. Subscribe for this and more projects and articles
How much more creative could your projects become if you added artificial intelligence? In this article, we’ll show you how you can use your webcam and free web-based software to add powerful vision recognition AI to a simple micro:bit project. You will train an AI model to recognize different classes of objects that will be used to make predictions based on what can be seen through your webcam.
Your First AI Project
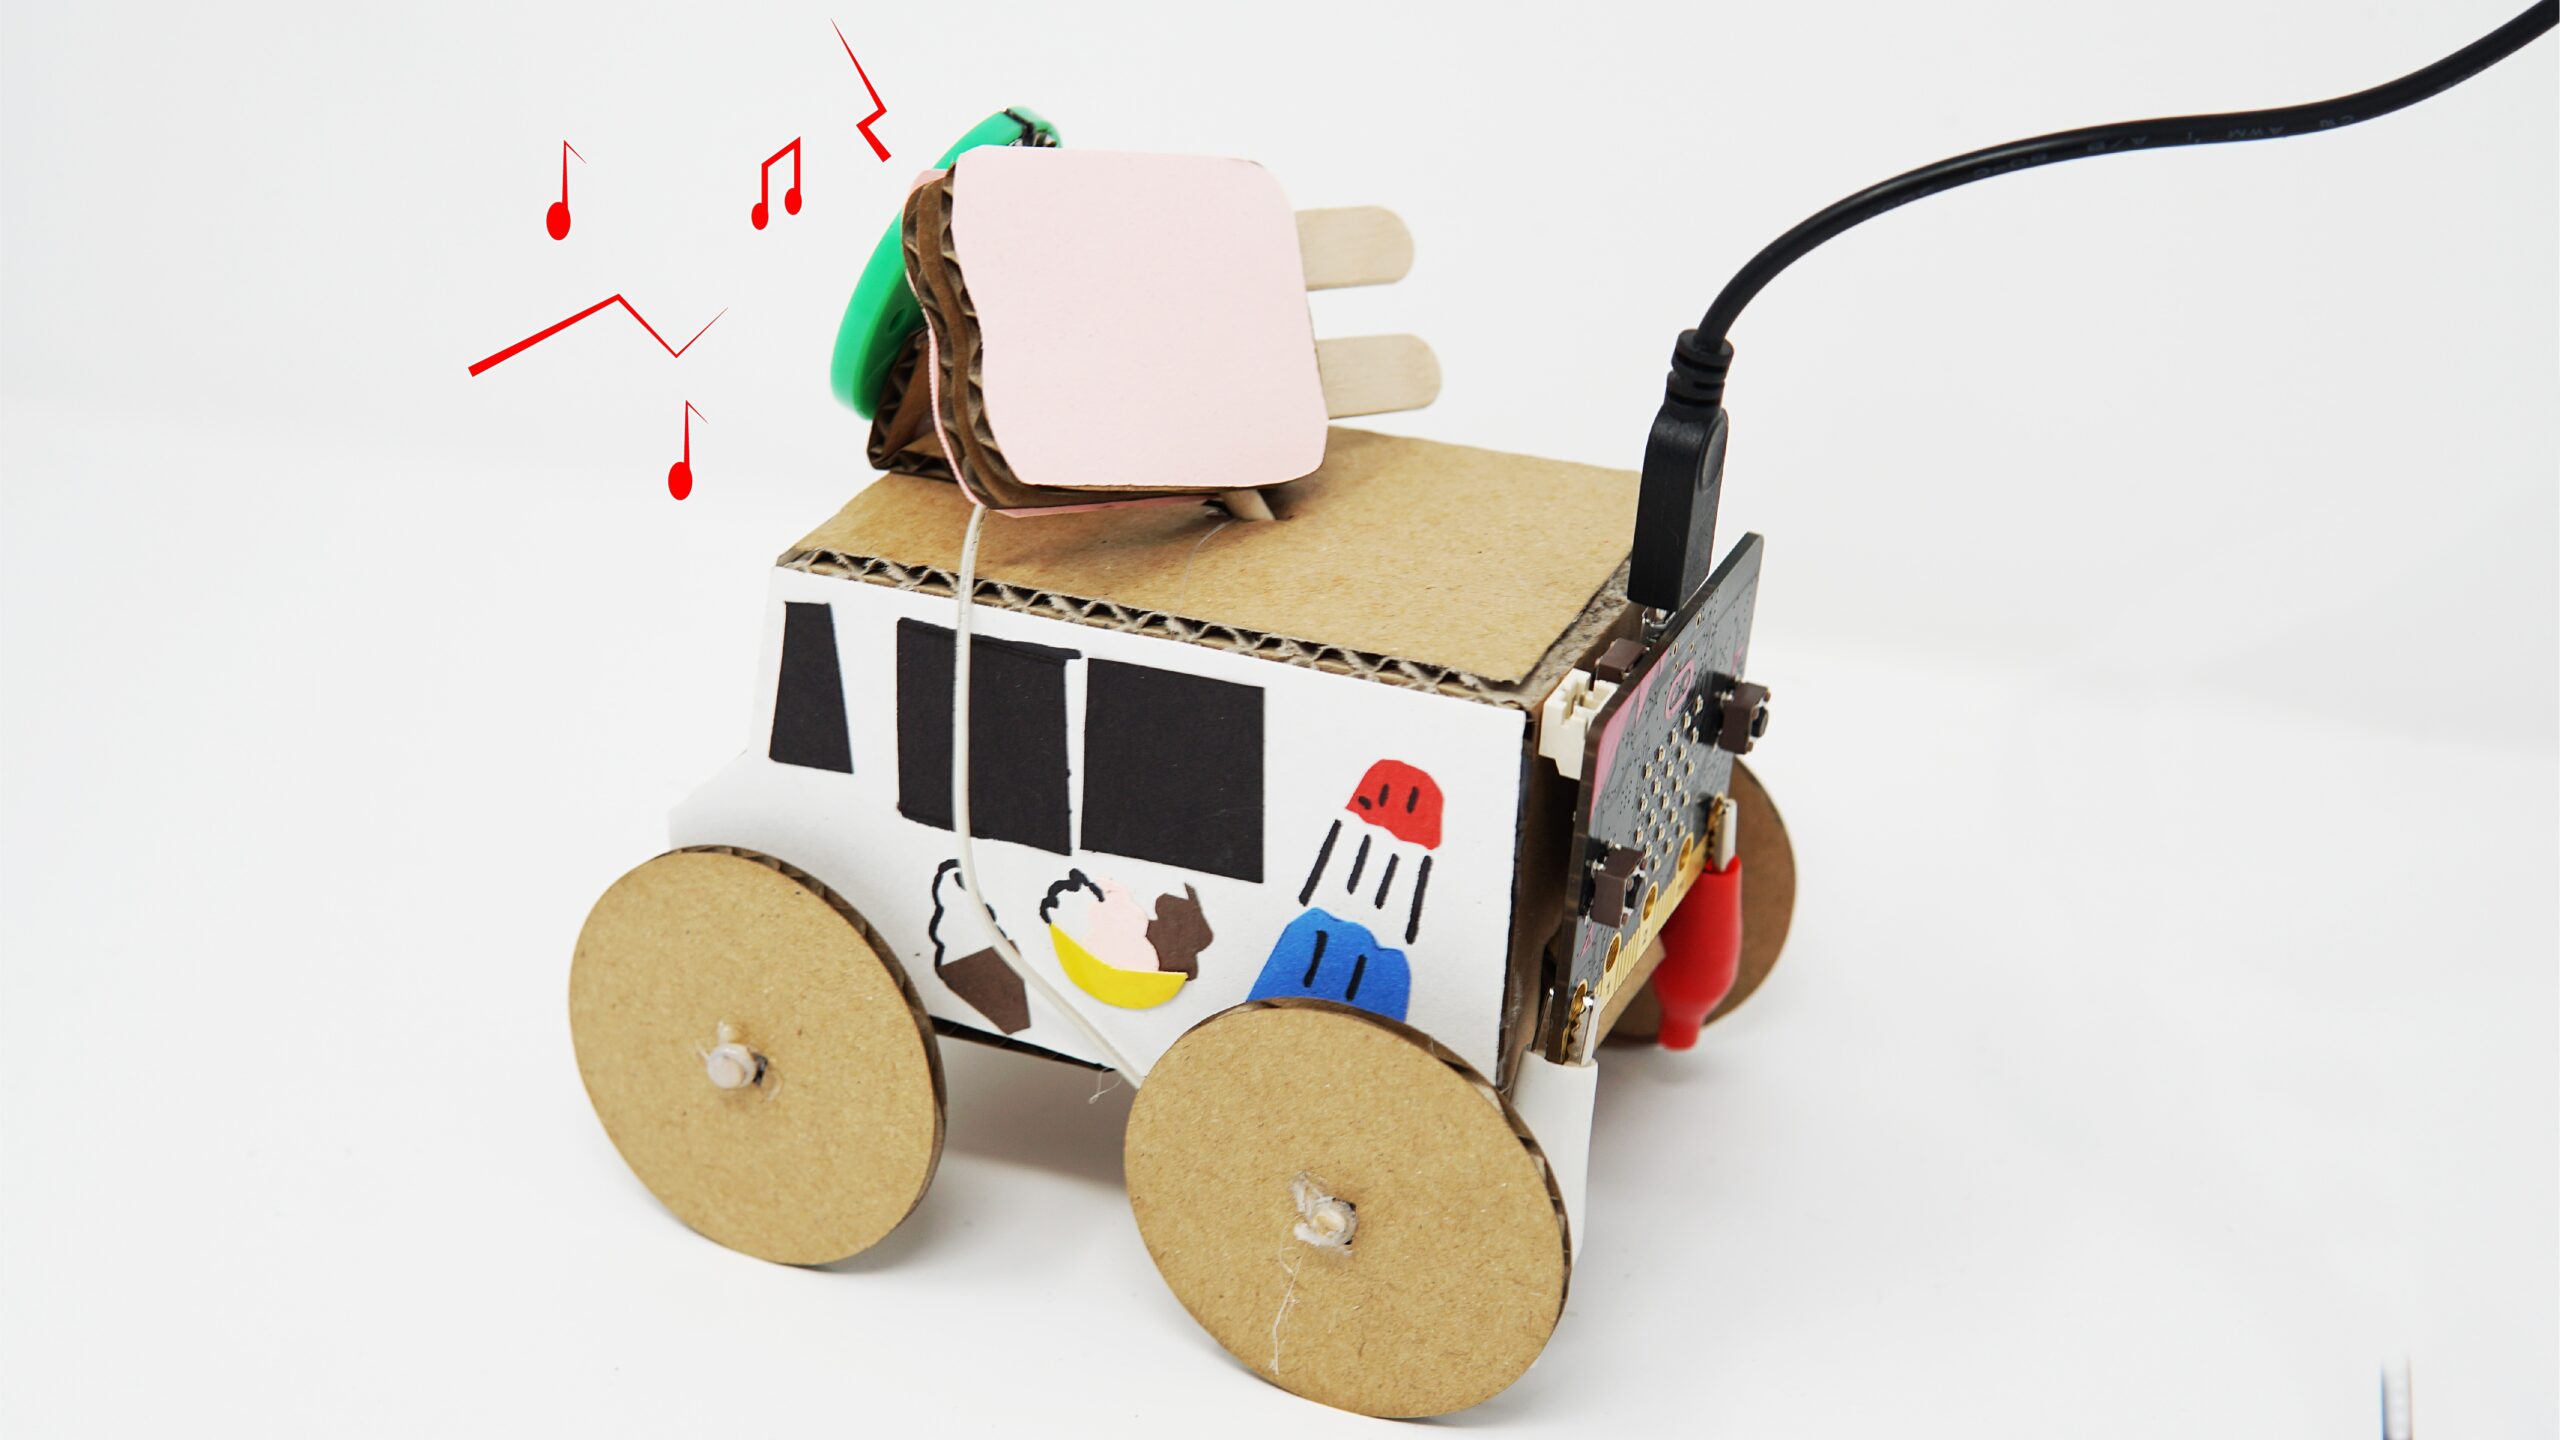
In this project, we’re going to train our AI to be able to recognize a few typical city vehicles and write a program in MakeCode to play sounds unique to each one on the micro:bit, depending on which vehicle is recognized.
For this project, we’re going to use three different types of cars made from cardboard. You can create vehicles similar to ours (Figures A, B, and C), but you can easily follow along by making any vehicle or machine you’d like! (Kathy Ceceri’s book Making Simple Robots is full of awesome micro:bit creations if you want inspiration!)
Figure AFigure BFigure C
AI Robots is a web tool developed by Steamlabs that allows you to easily integrate AI into your micro:bit projects. The micro:bit is not powerful enough to run most AI models, so AI Robots acts as a bridge between your micro:bit and the pre-trained AI model on the cloud. This allows your micro:bit to easily access the power of AI to recognize images, sounds, and more without having to do any of the heavy lifting itself. Try AI Robots and unlock the full potential of your micro:bit projects! makeairobots.com
Project Steps
1. How to train an AI engine
Google’s Teachable Machine allows anyone to create an AI prediction model to recognize images or even sounds. The process of training an AI model requires that you specify different classes of images that you want the AI to be able to recognize.
Each possible prediction, or class, needs to be filled with a bunch of photos — the more photos you add, the more examples it has to learn from, and the smarter your AI becomes because it detects similarities and patterns in the images that you upload. Machine learning AI algorithms are very powerful, but the AI needs to have many examples to reach a general understanding of what it’s seeing. If you only provide pictures of the side of your car, it will have no idea that the front view is also a car.
When you head over to Google Teachable Machine, you’ll find three different models to choose from. To recognize the images from a webcam, choose the Image Project option.
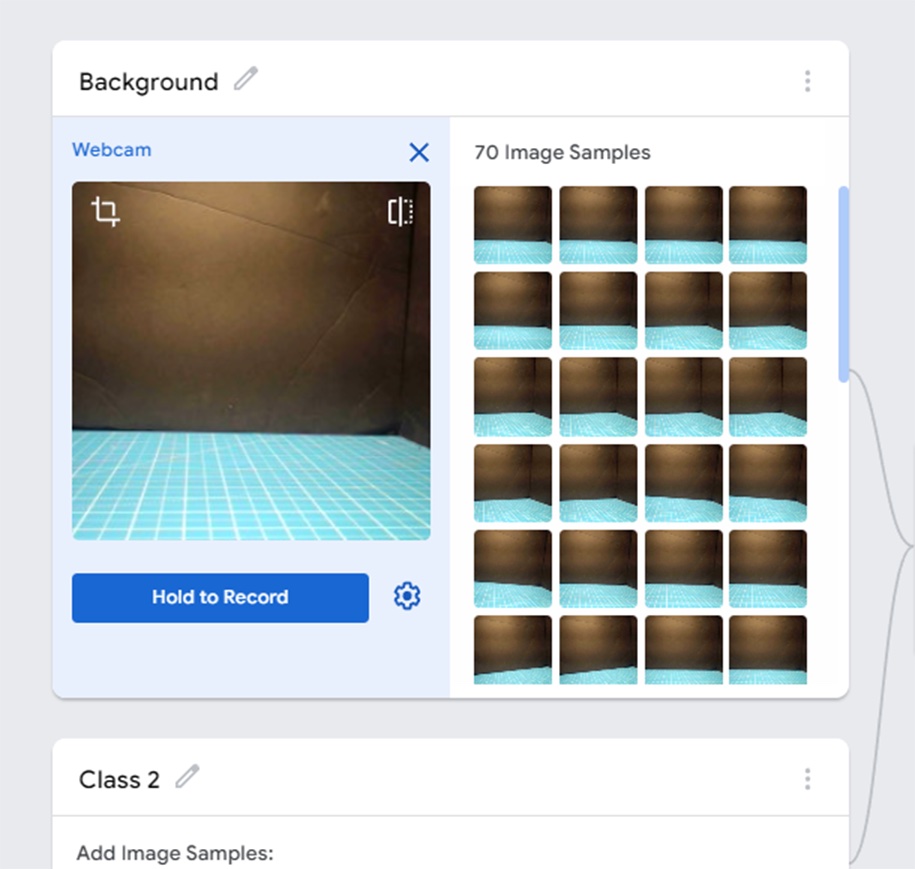
Start a new project and create an “empty” class (which we can call Background) so that the AI can recognize when there is no vehicle present at all, shown in Figure D. The system will only choose between the classes you add, so if there is no “empty” class, it will strain to pick up tiny clues in the empty scene that look like your vehicles and misrecognize it. Press the Hold to Record button to add photos to this class.
Figure D
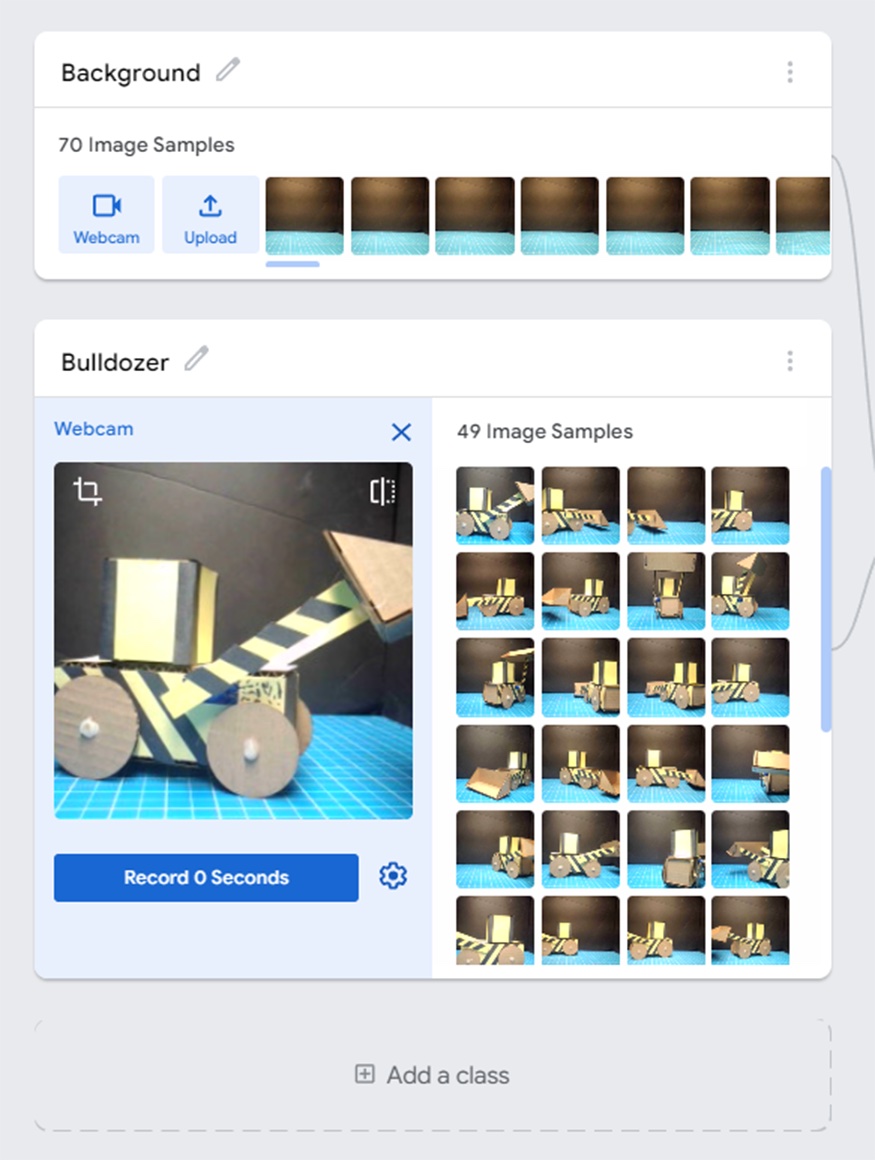
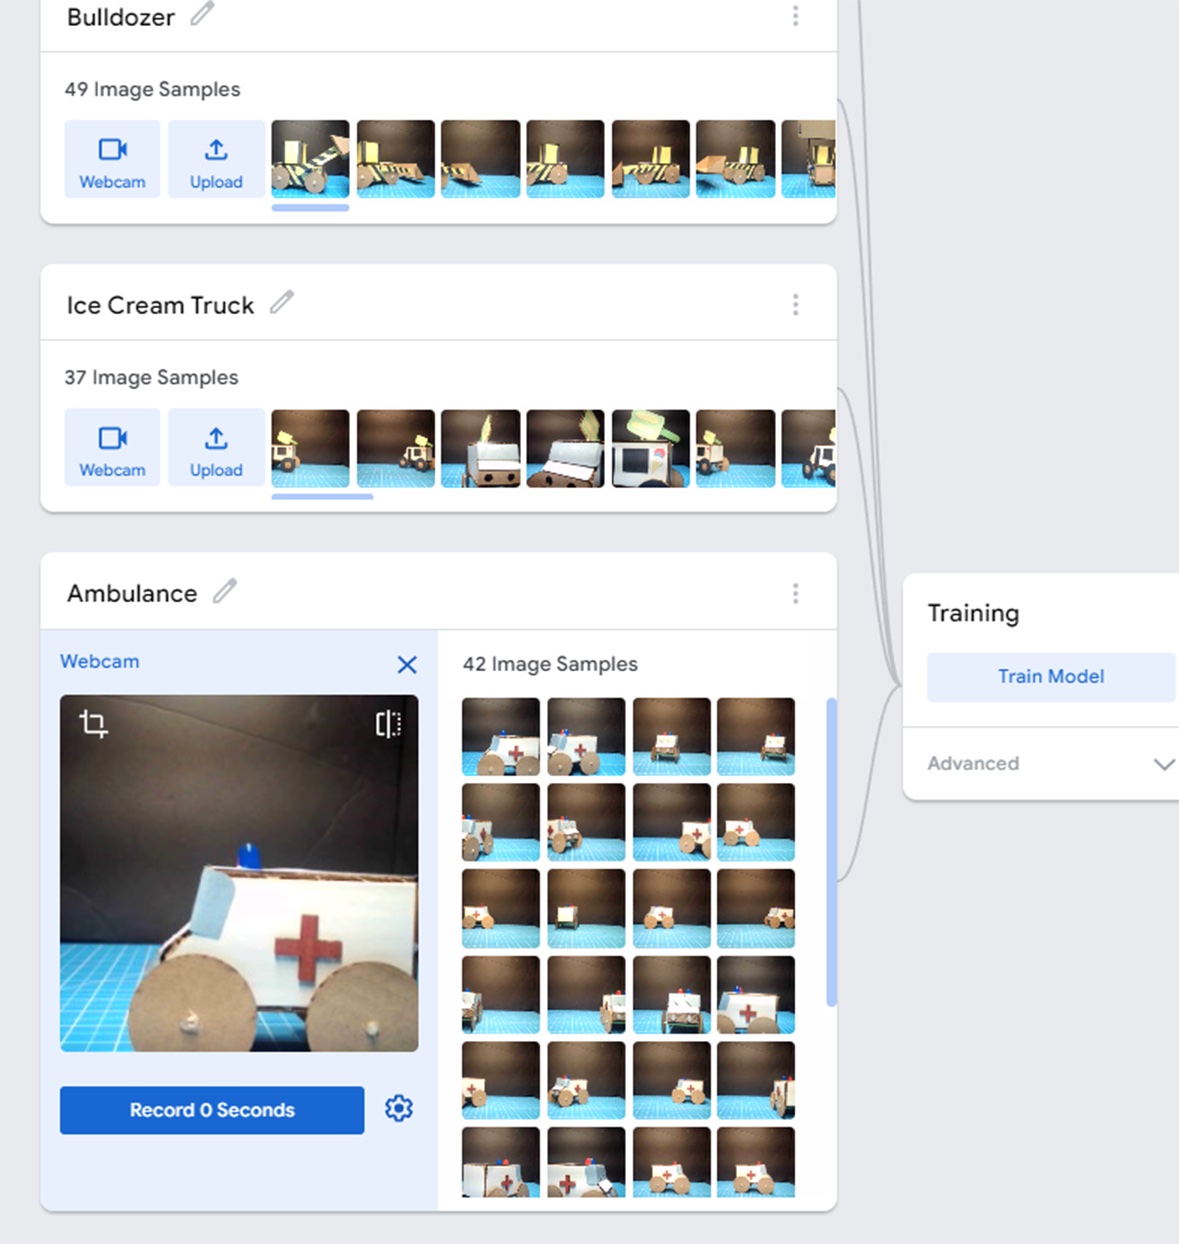
Continue creating classes and naming each one after a different vehicle, as shown in Figures E and F.
Figure E
Figure F
The photos for each class need to have as much variety as possible. A bunch of the same photos will not work; try to take photos from all different sides of your vehicles, moving them to one side of the camera, and placing parts of them out of frame. This will ensure the AI has a robust dataset to eventually compare to. Aim for at least 20–25 photos — the more, the merrier!
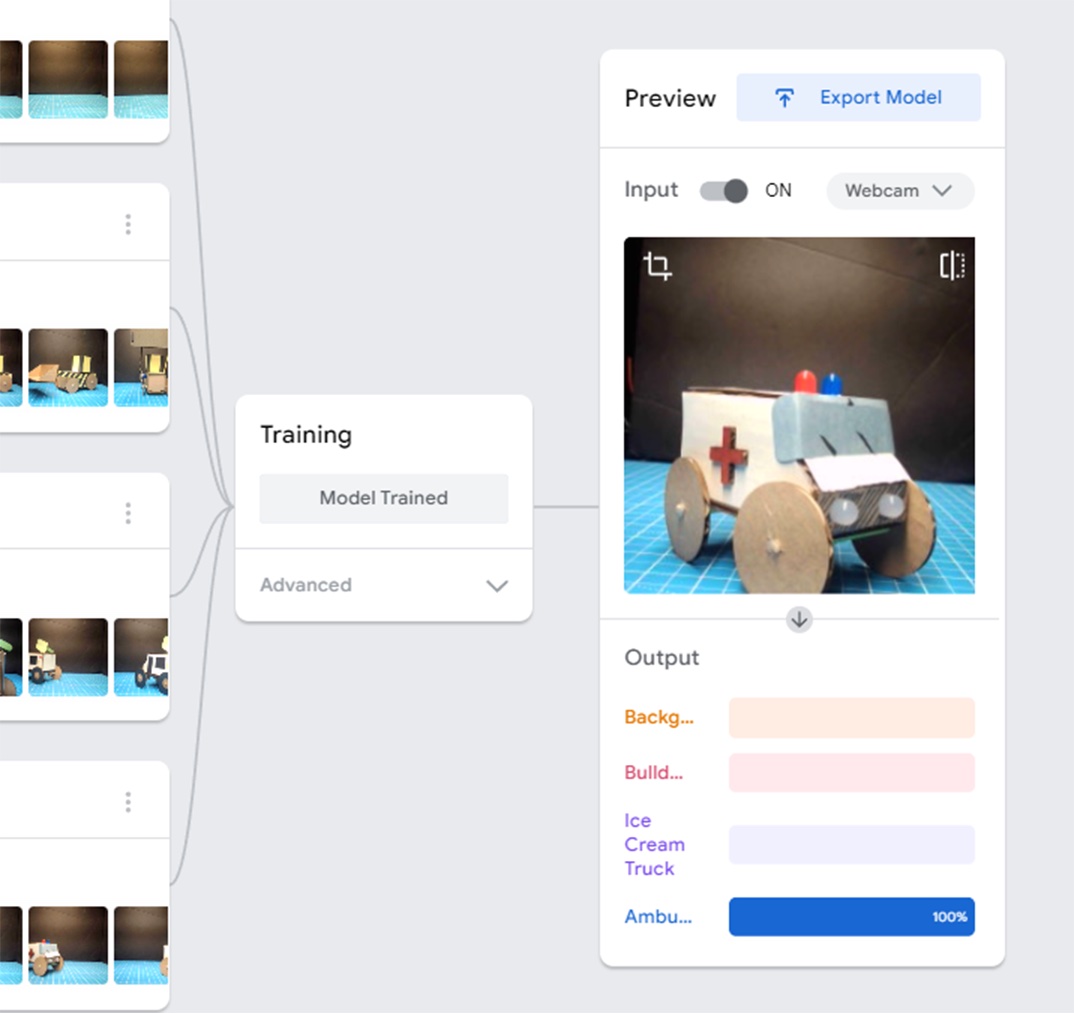
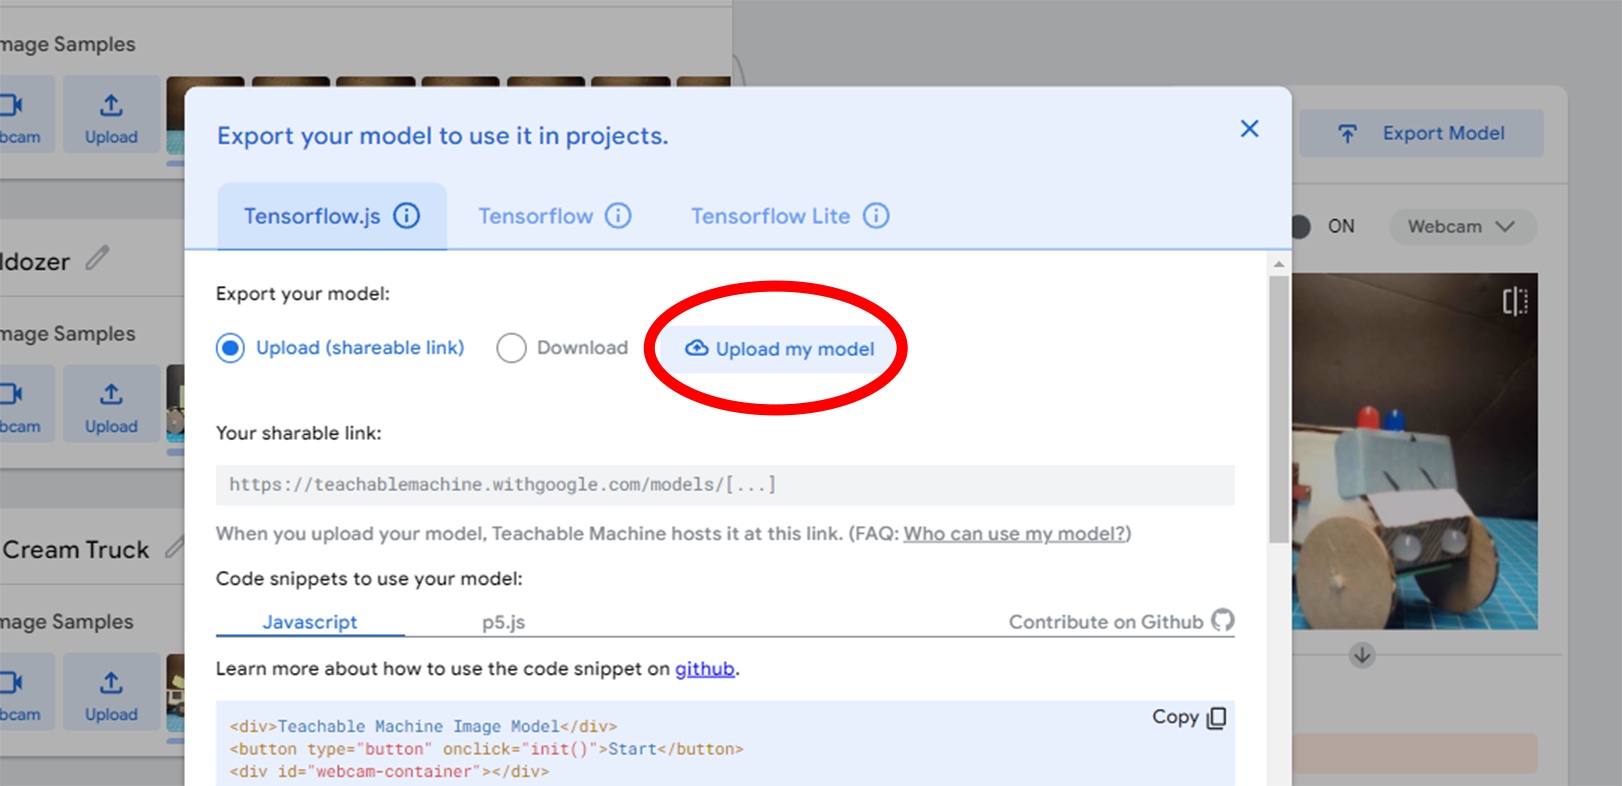
When you’ve finished adding photos, click the Train Model button, and test your AI off to the side, shown in Figure G. When you’re confident the AI can predict accurately enough, export the model, and select Upload My Model on the following screen, as shown in Figure H. Save the link it gives you, and then we’re ready to start coding for the micro:bit!
Figure G
Figure H
2. Code your application
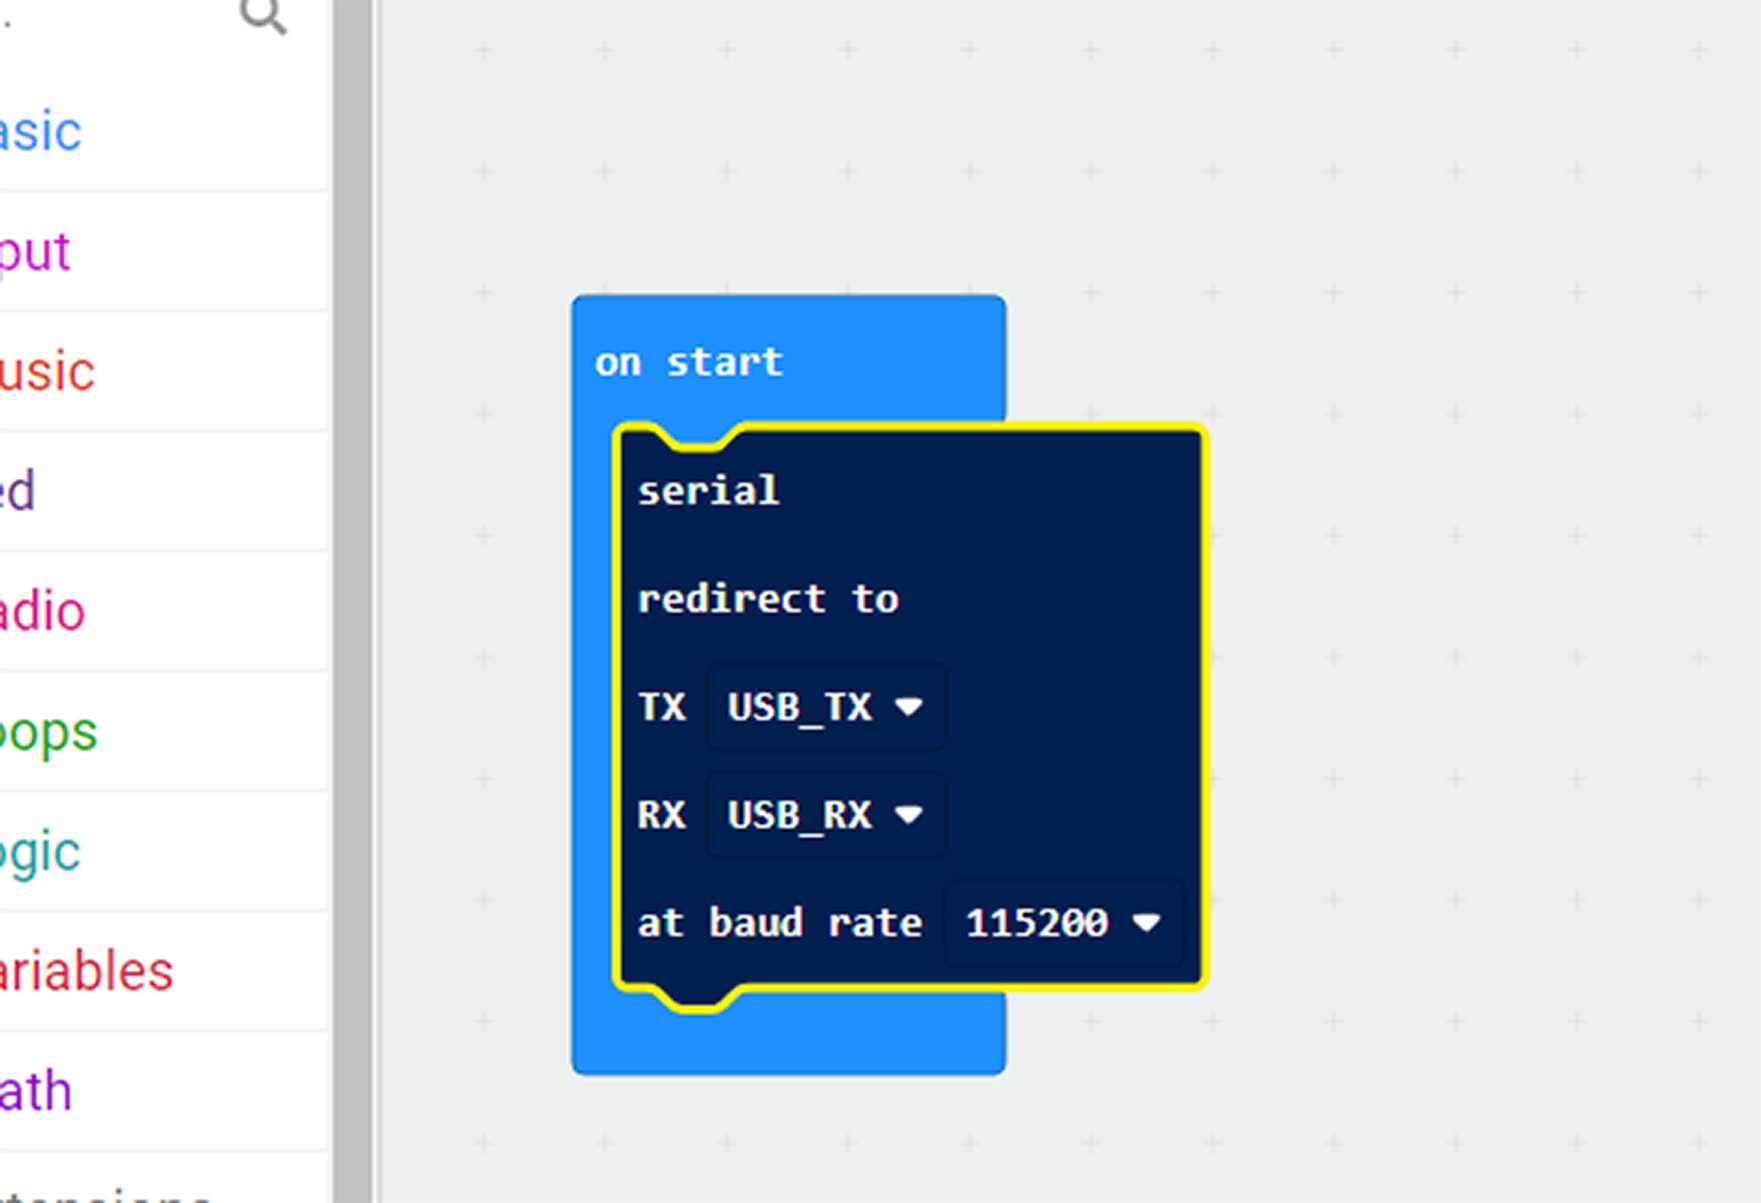
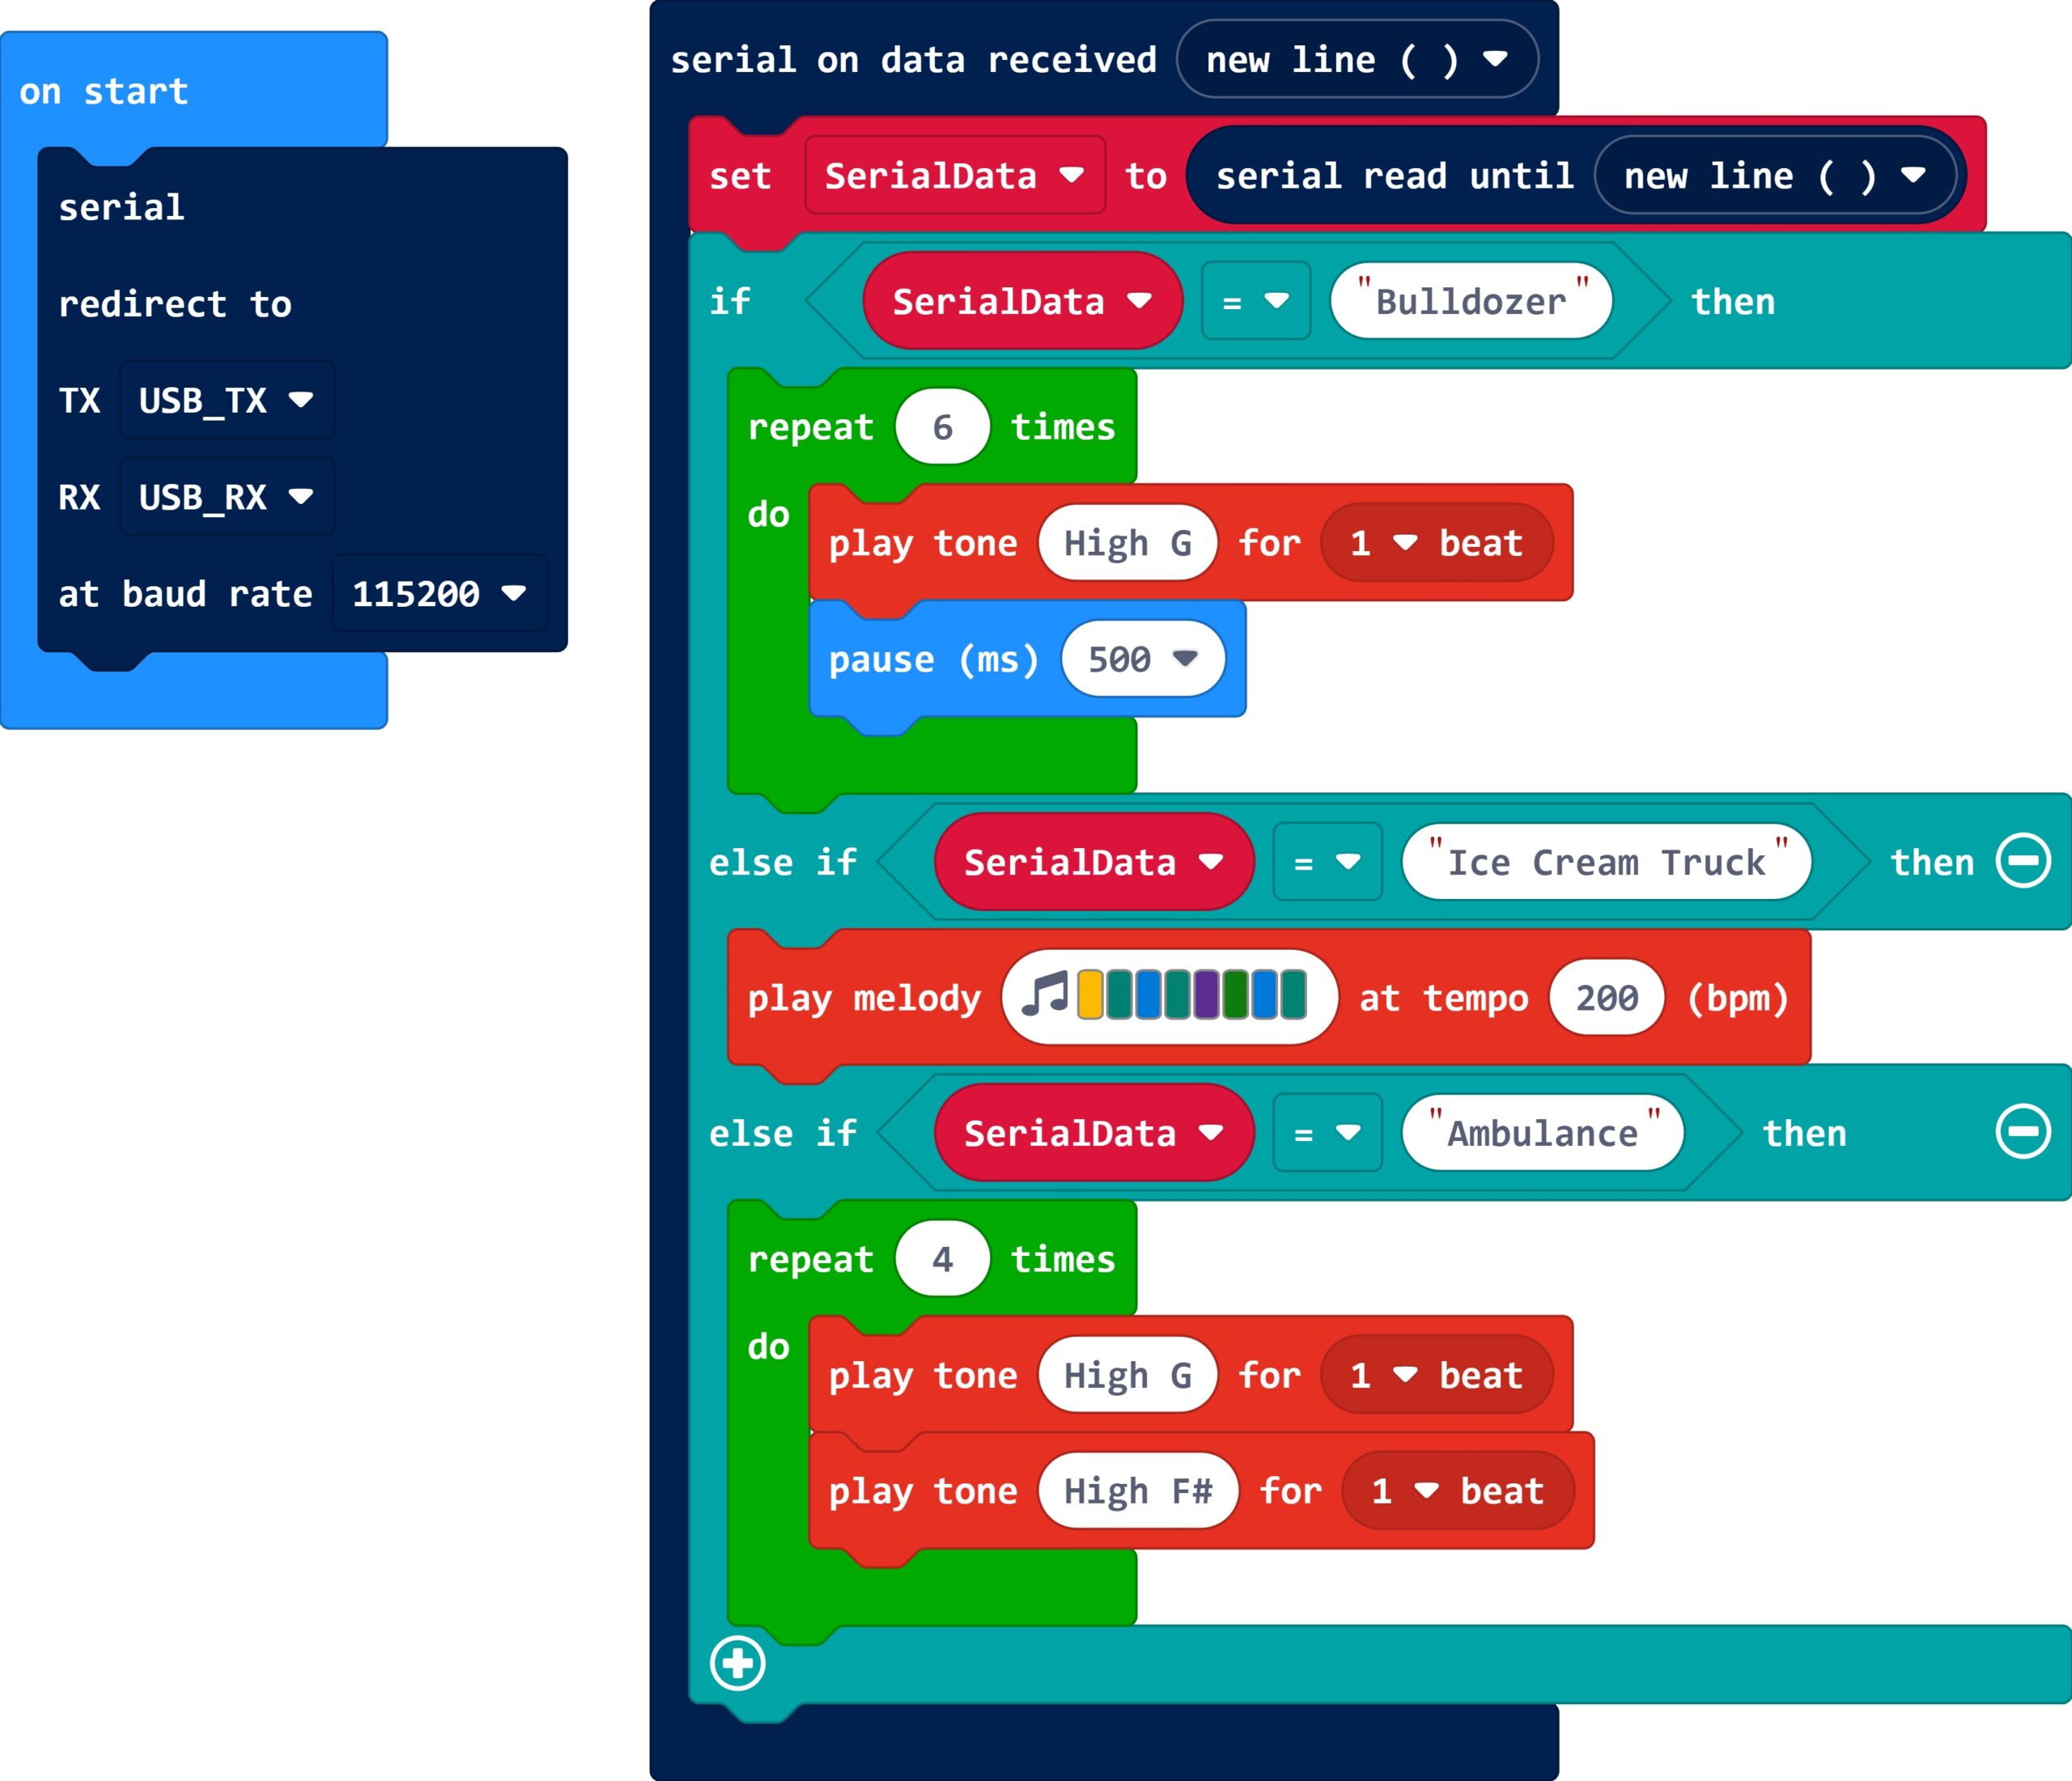
We will build an application in MakeCode to pass serial data back and forth from the micro:bit and the computer through a USB cable. We’ll need to add a few lines of specialized code, as shown in Figure I.
• Start a new project and explore the Serial category (aka Serial drawer) off to the side.
• Place the large square serial redirect to block into the on start block in your workspace to initialize communication.
• Set the TX and RX dropdown menus to USB_TX and USB_RX respectively, and leave the baud rate as high as it will go, 115200 (this allows lightning fast data transfer).
Figure I
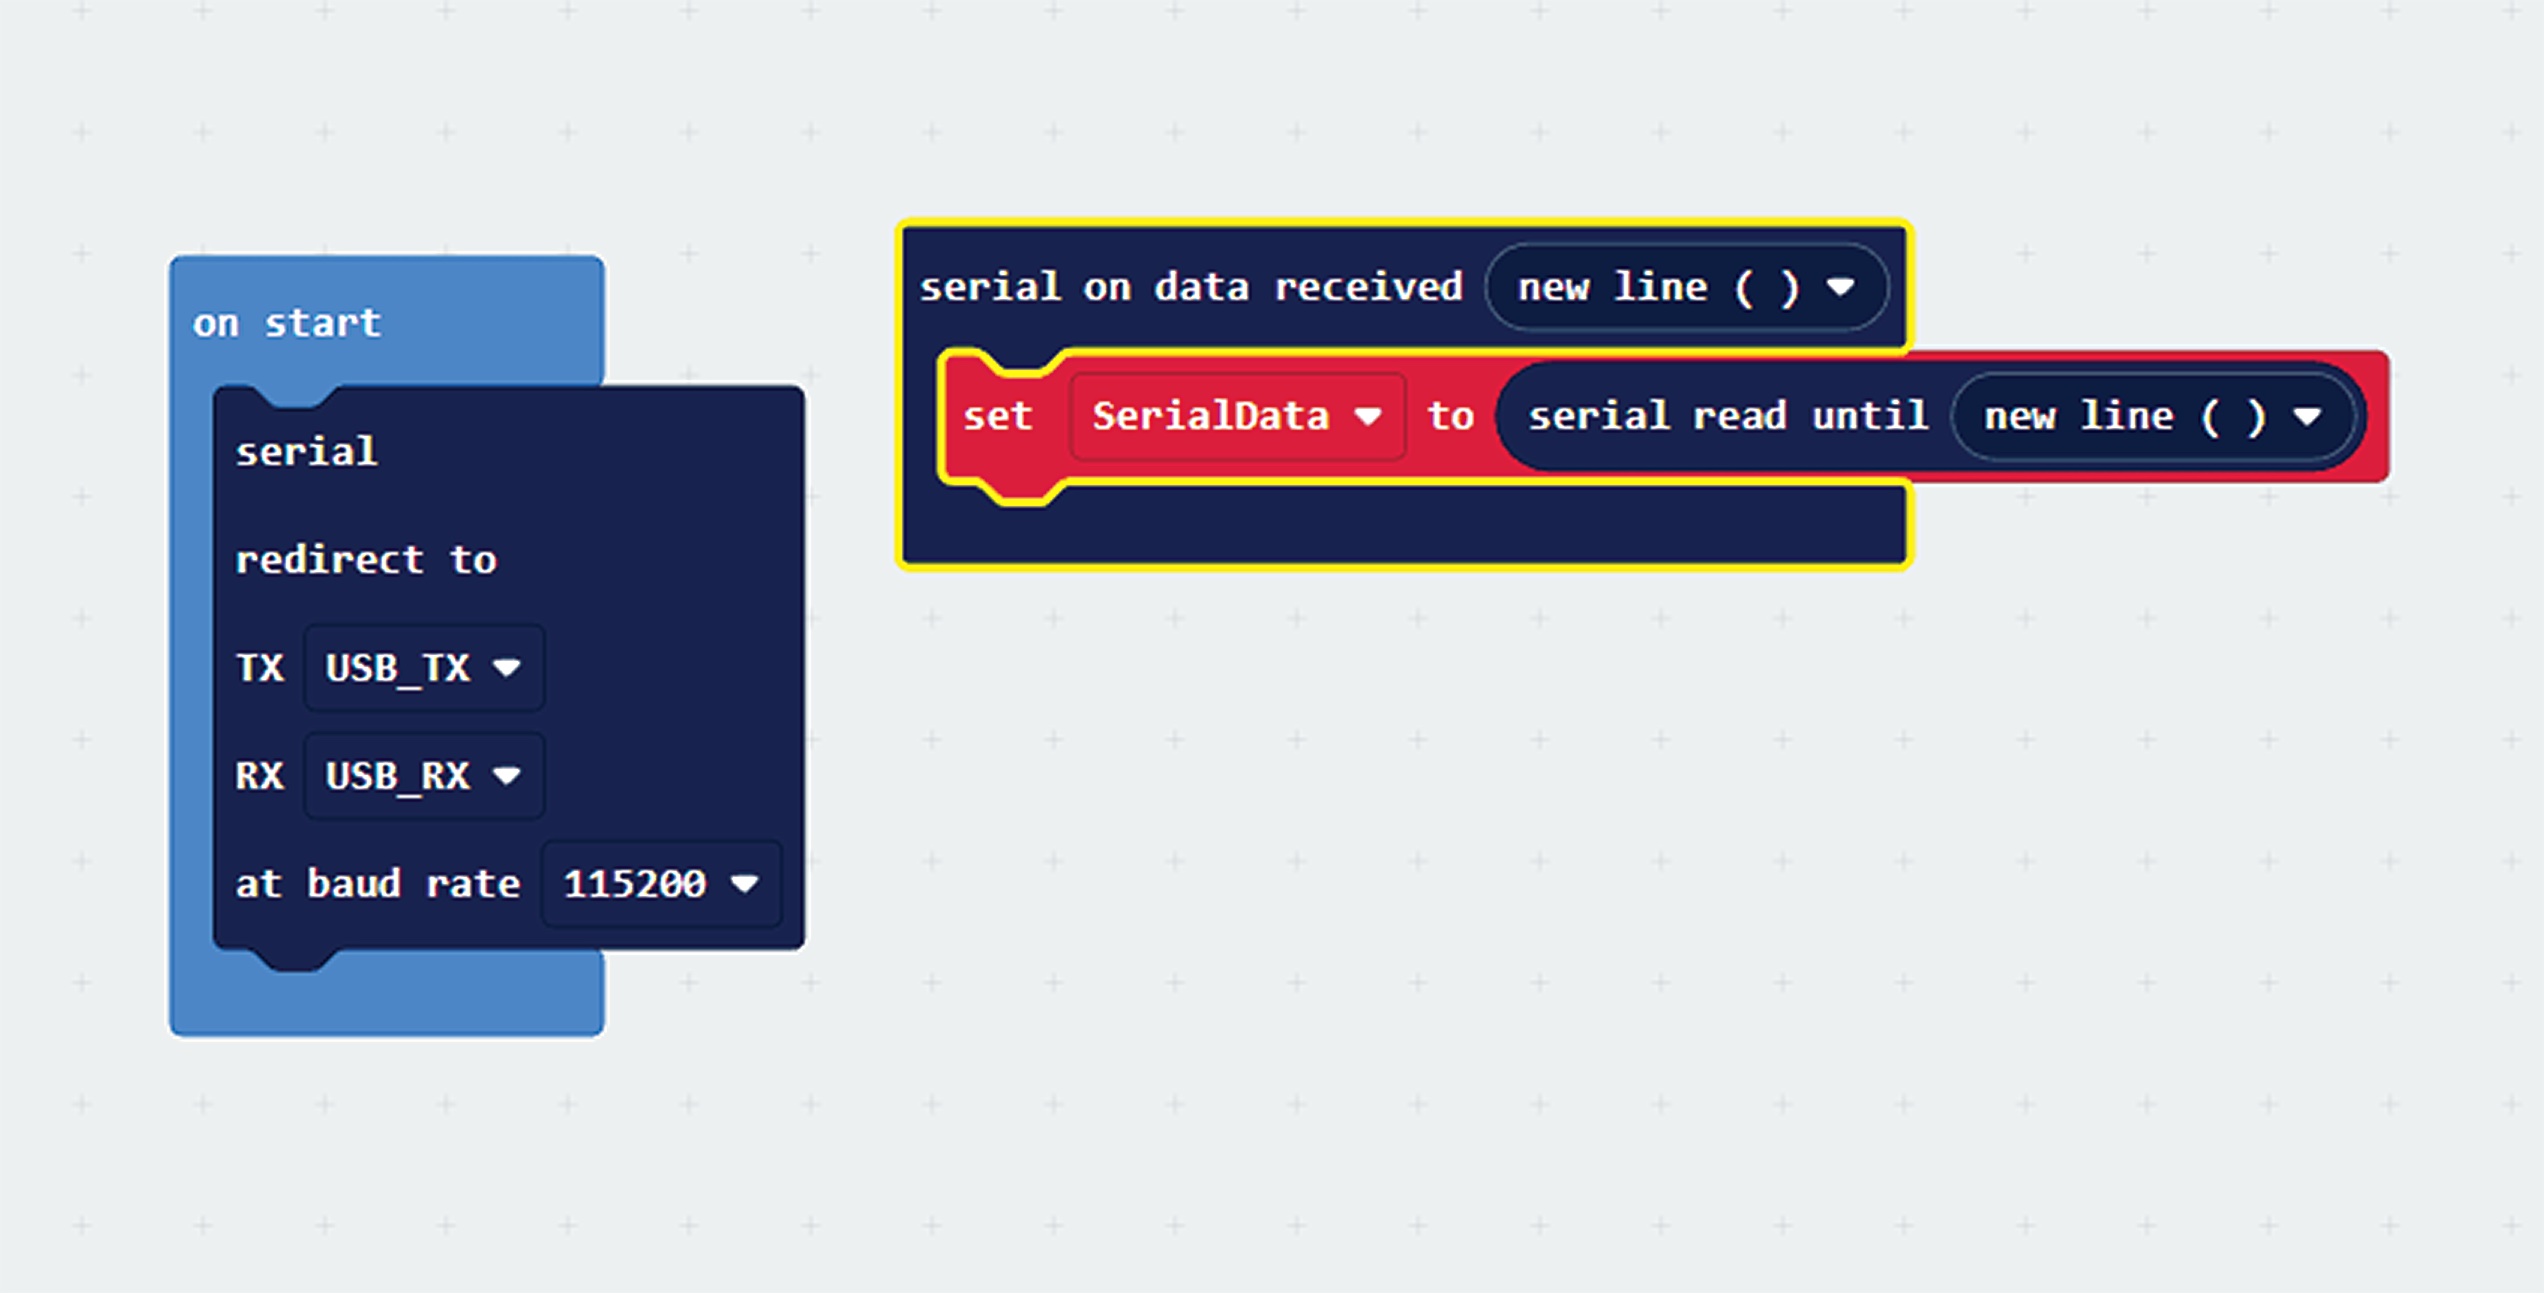
We’ll need a way for the micro:bit to be able to look at all of this info, so we’ll store all of that as a variable.
• Start by dragging the serial on data received block out of the Serial drawer and into the workspace, allowing us to run code every time new serial data is received.
• Then create a variable called SerialData.
• Place a set SerialData to block down first, and then a serial read until new line() block from the Serial drawer into the bubble at the end, as shown in Figure J.
Figure J
That’s all you need to do to set your code up to be ready for Vision Recognition activation.
At this point, the code is ready to receive the class name that the AI Robots site sends whenever it recognizes an object, and save that into the variable SerialData.
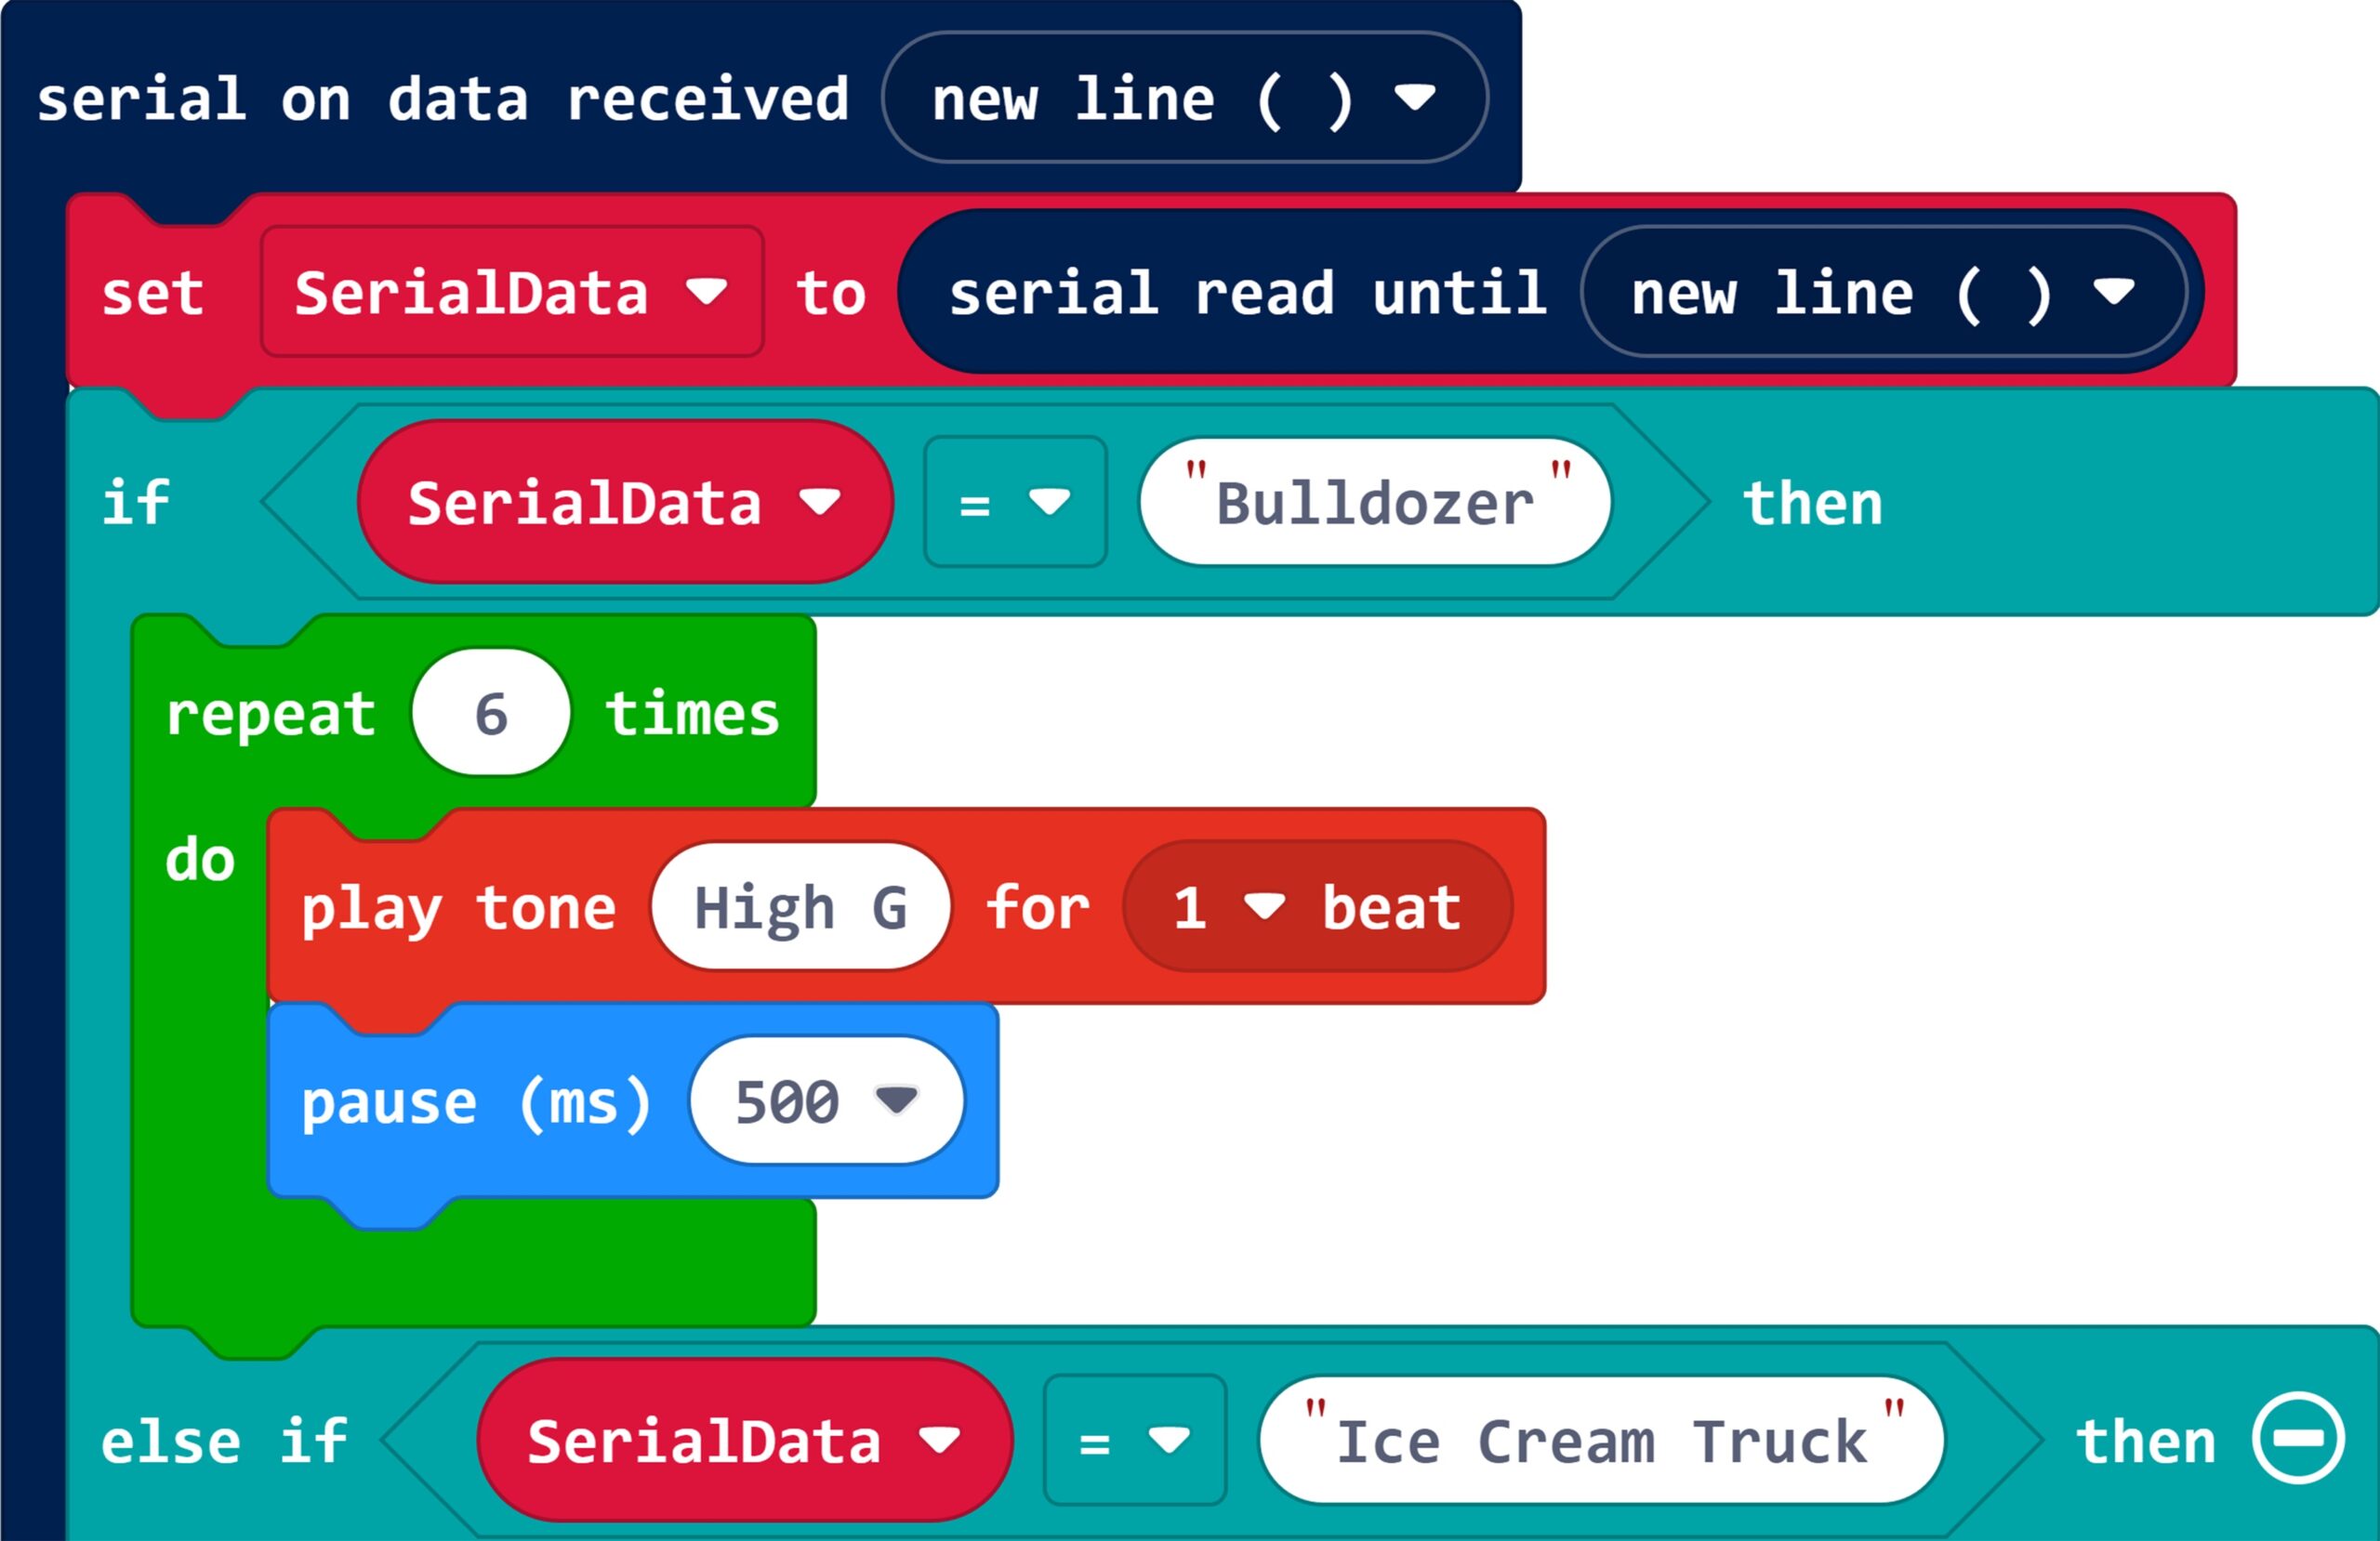
Now we want to do something with that class name!
• Set up an if statement and use text comparison blocks from the Logic drawer to check if SerialData matches any of our class names from the AI model.
• Add a new branch in the if statement for every class you trained in Teachable Machine.
Now it’s time to decide what your code will do when a class is recognized. You don’t necessarily need to add anything for the background class you trained. Take the bulldozer for instance — a unique sound made by this machine would be the distinct warning beeps it gives while raising its front blade or backing up, as shown in Figure K.
• Look through the Music drawer and find a play tone block that lets you select beeps of varying frequencies.
• Choose one that sounds appropriately high enough, and add a short rest after.
• Place this sound inside a loop from the Loop drawer to make the sound repeat over and over.
Figure K
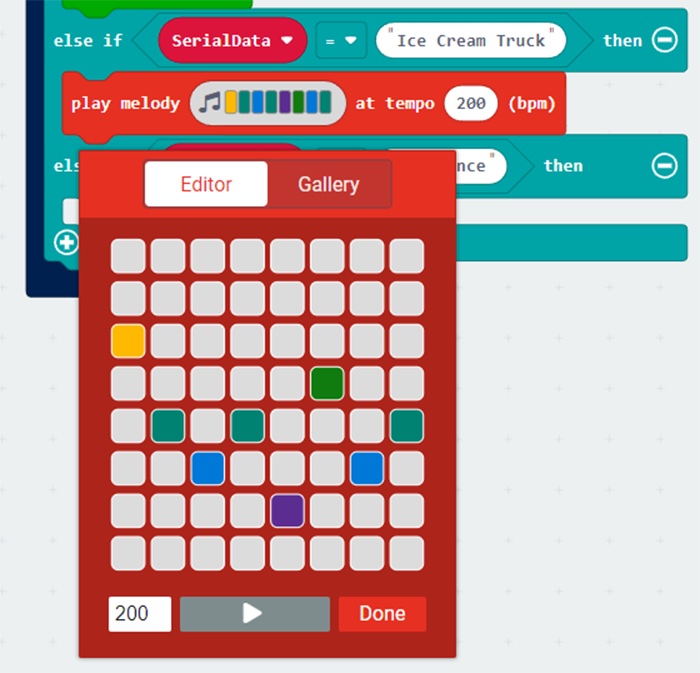
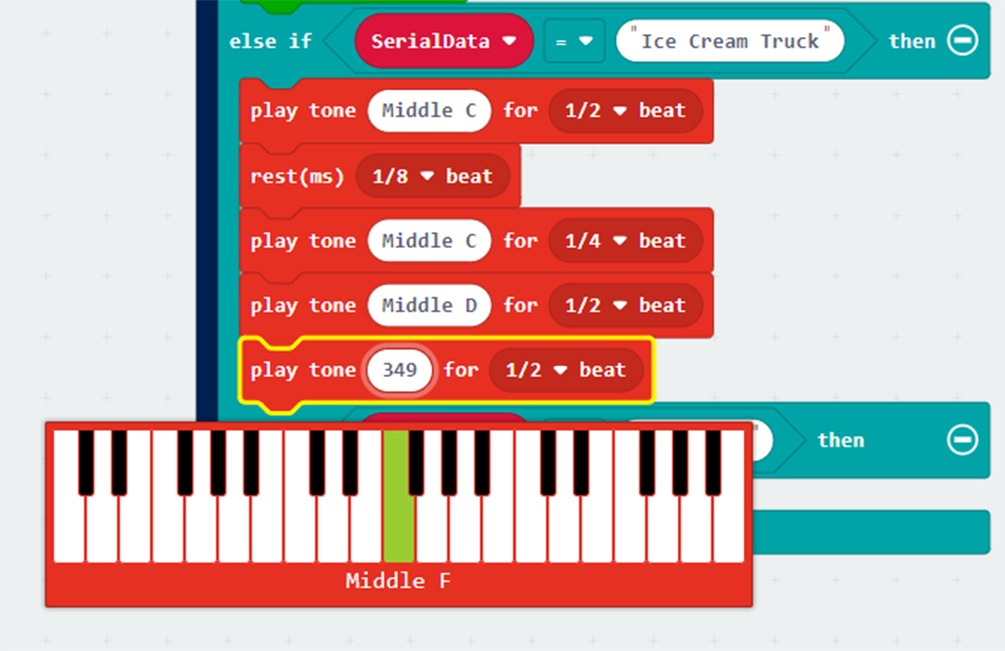
The sound for the ice cream truck can be handled in a similar way. You can either use a premade song or create a quick one yourself using the play melody block, as in Figure L. If you’re musically inclined, you could even write out an entire song using the play tone, beat, and rest blocks, shown in Figure M.
Figure L
Figure M
Lastly, the sounds of the siren wails from an ambulance should be easy to make using the blocks we’ve already explored here. You’ll need two tones that are close together in pitch, and a way to repeat those tones to create a constant whistle. Use the play tone and loop blocks we showed you above to create your own siren, as shown in Figure N.
Figure N
When you’ve chosen all the fun sounds for your vehicles, download your project to your micro:bit, and you’re ready to bring it to life (Figure O).
Figure O
3. Connect your AI to your micro:bit
Finally, we need to connect it all together! In this step you will use the vision recognition AI model you trained with Teachable Machine to send the class names to your micro:bit over your USB serial cable.
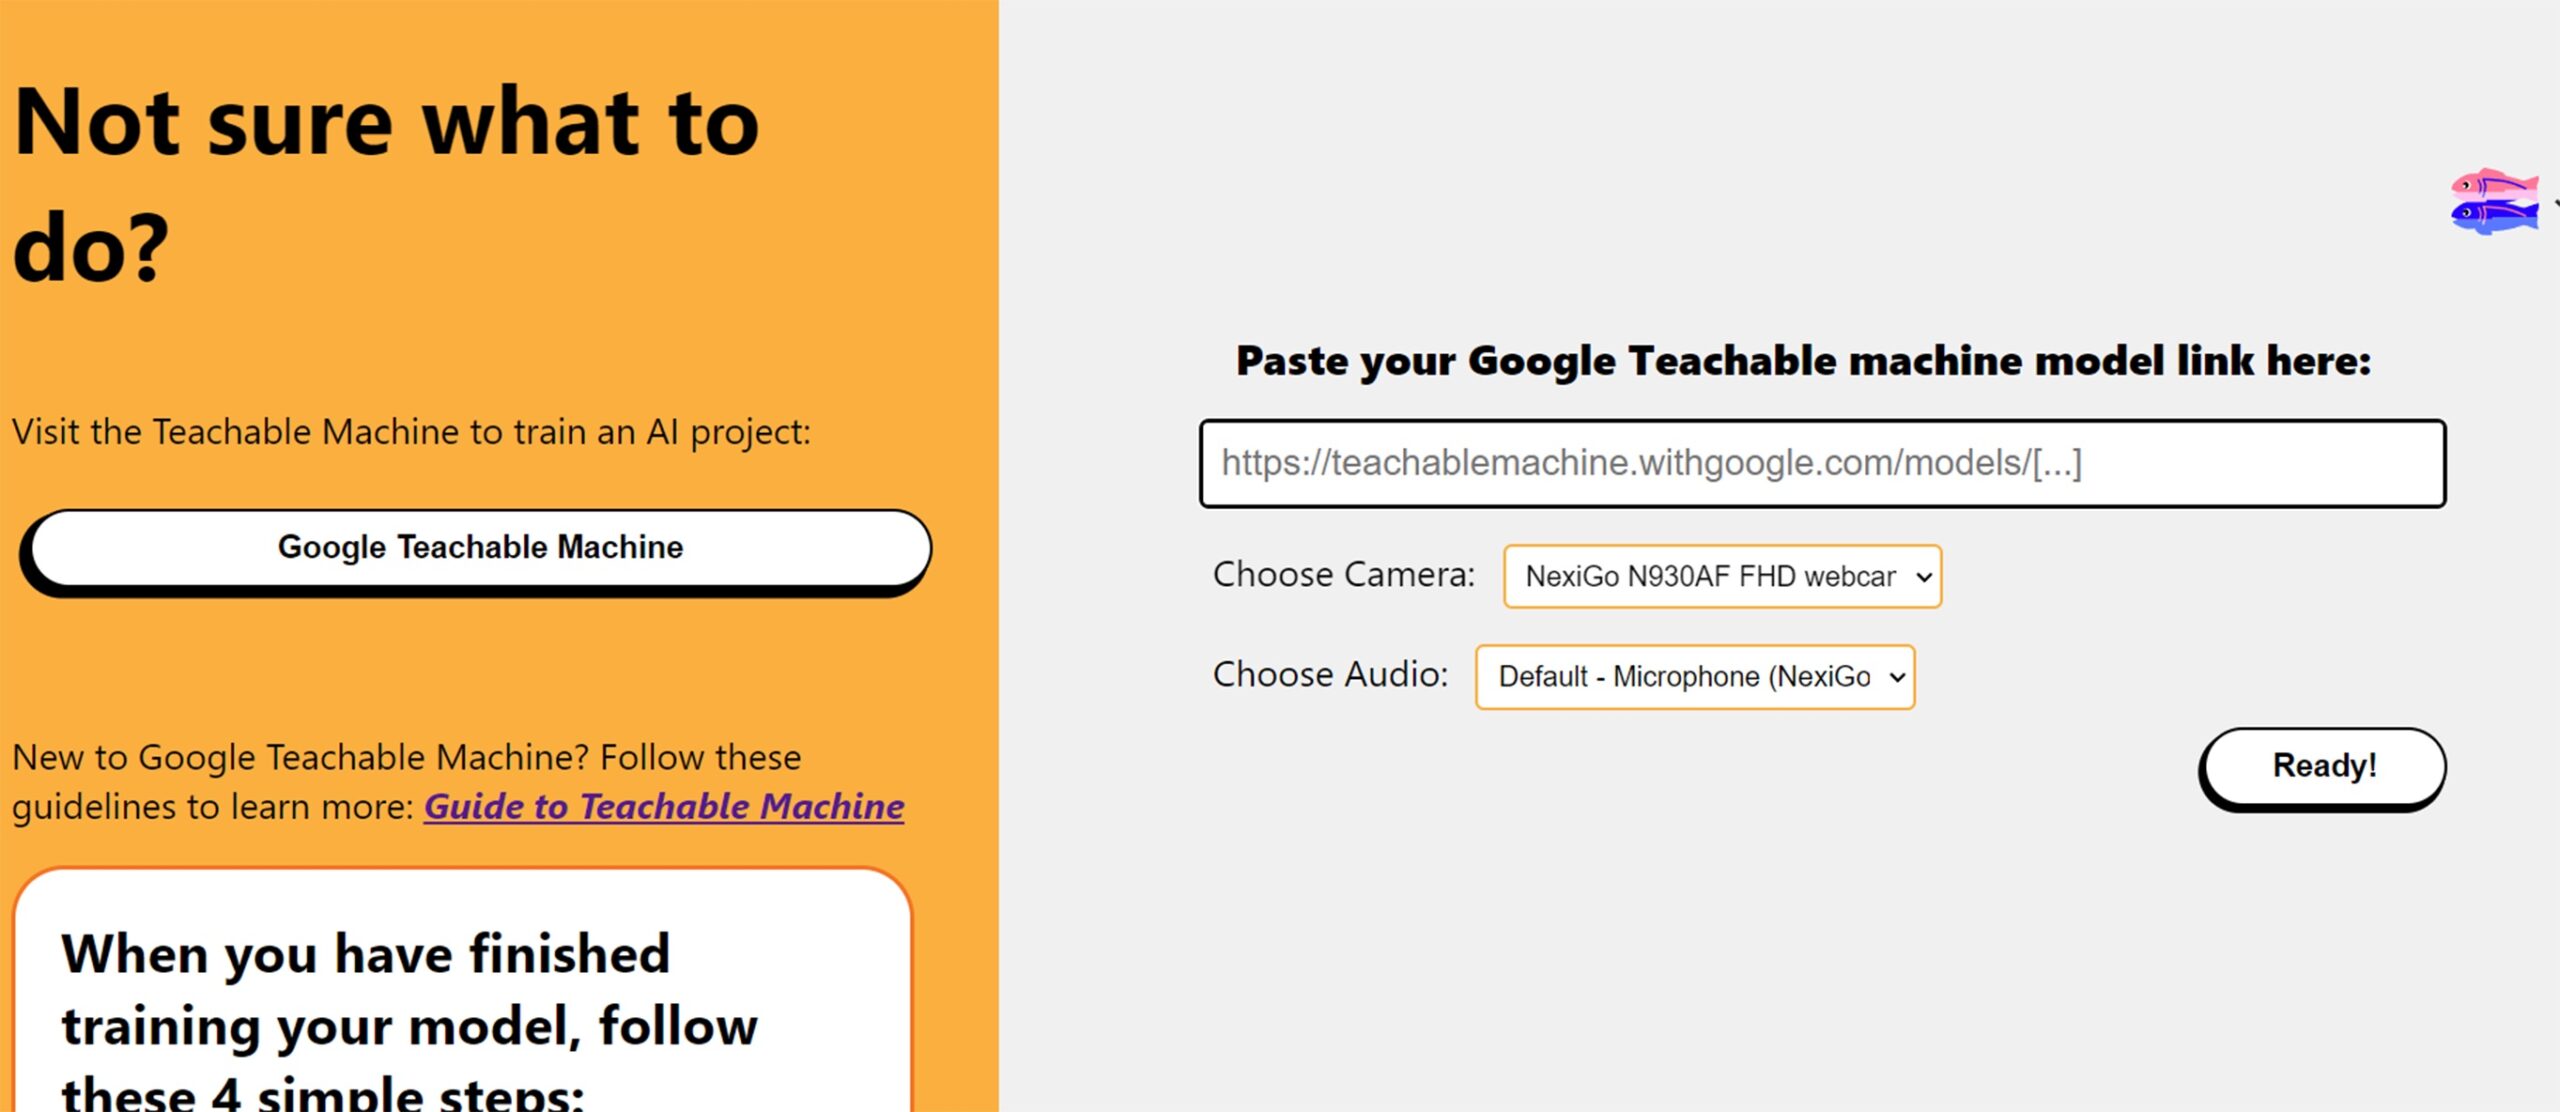
Go to Steamlabs’ AI Robots site and input the link you saved from the Teachable Machine site (this is the actual trained AI model), as shown in Figure P.
Figure P
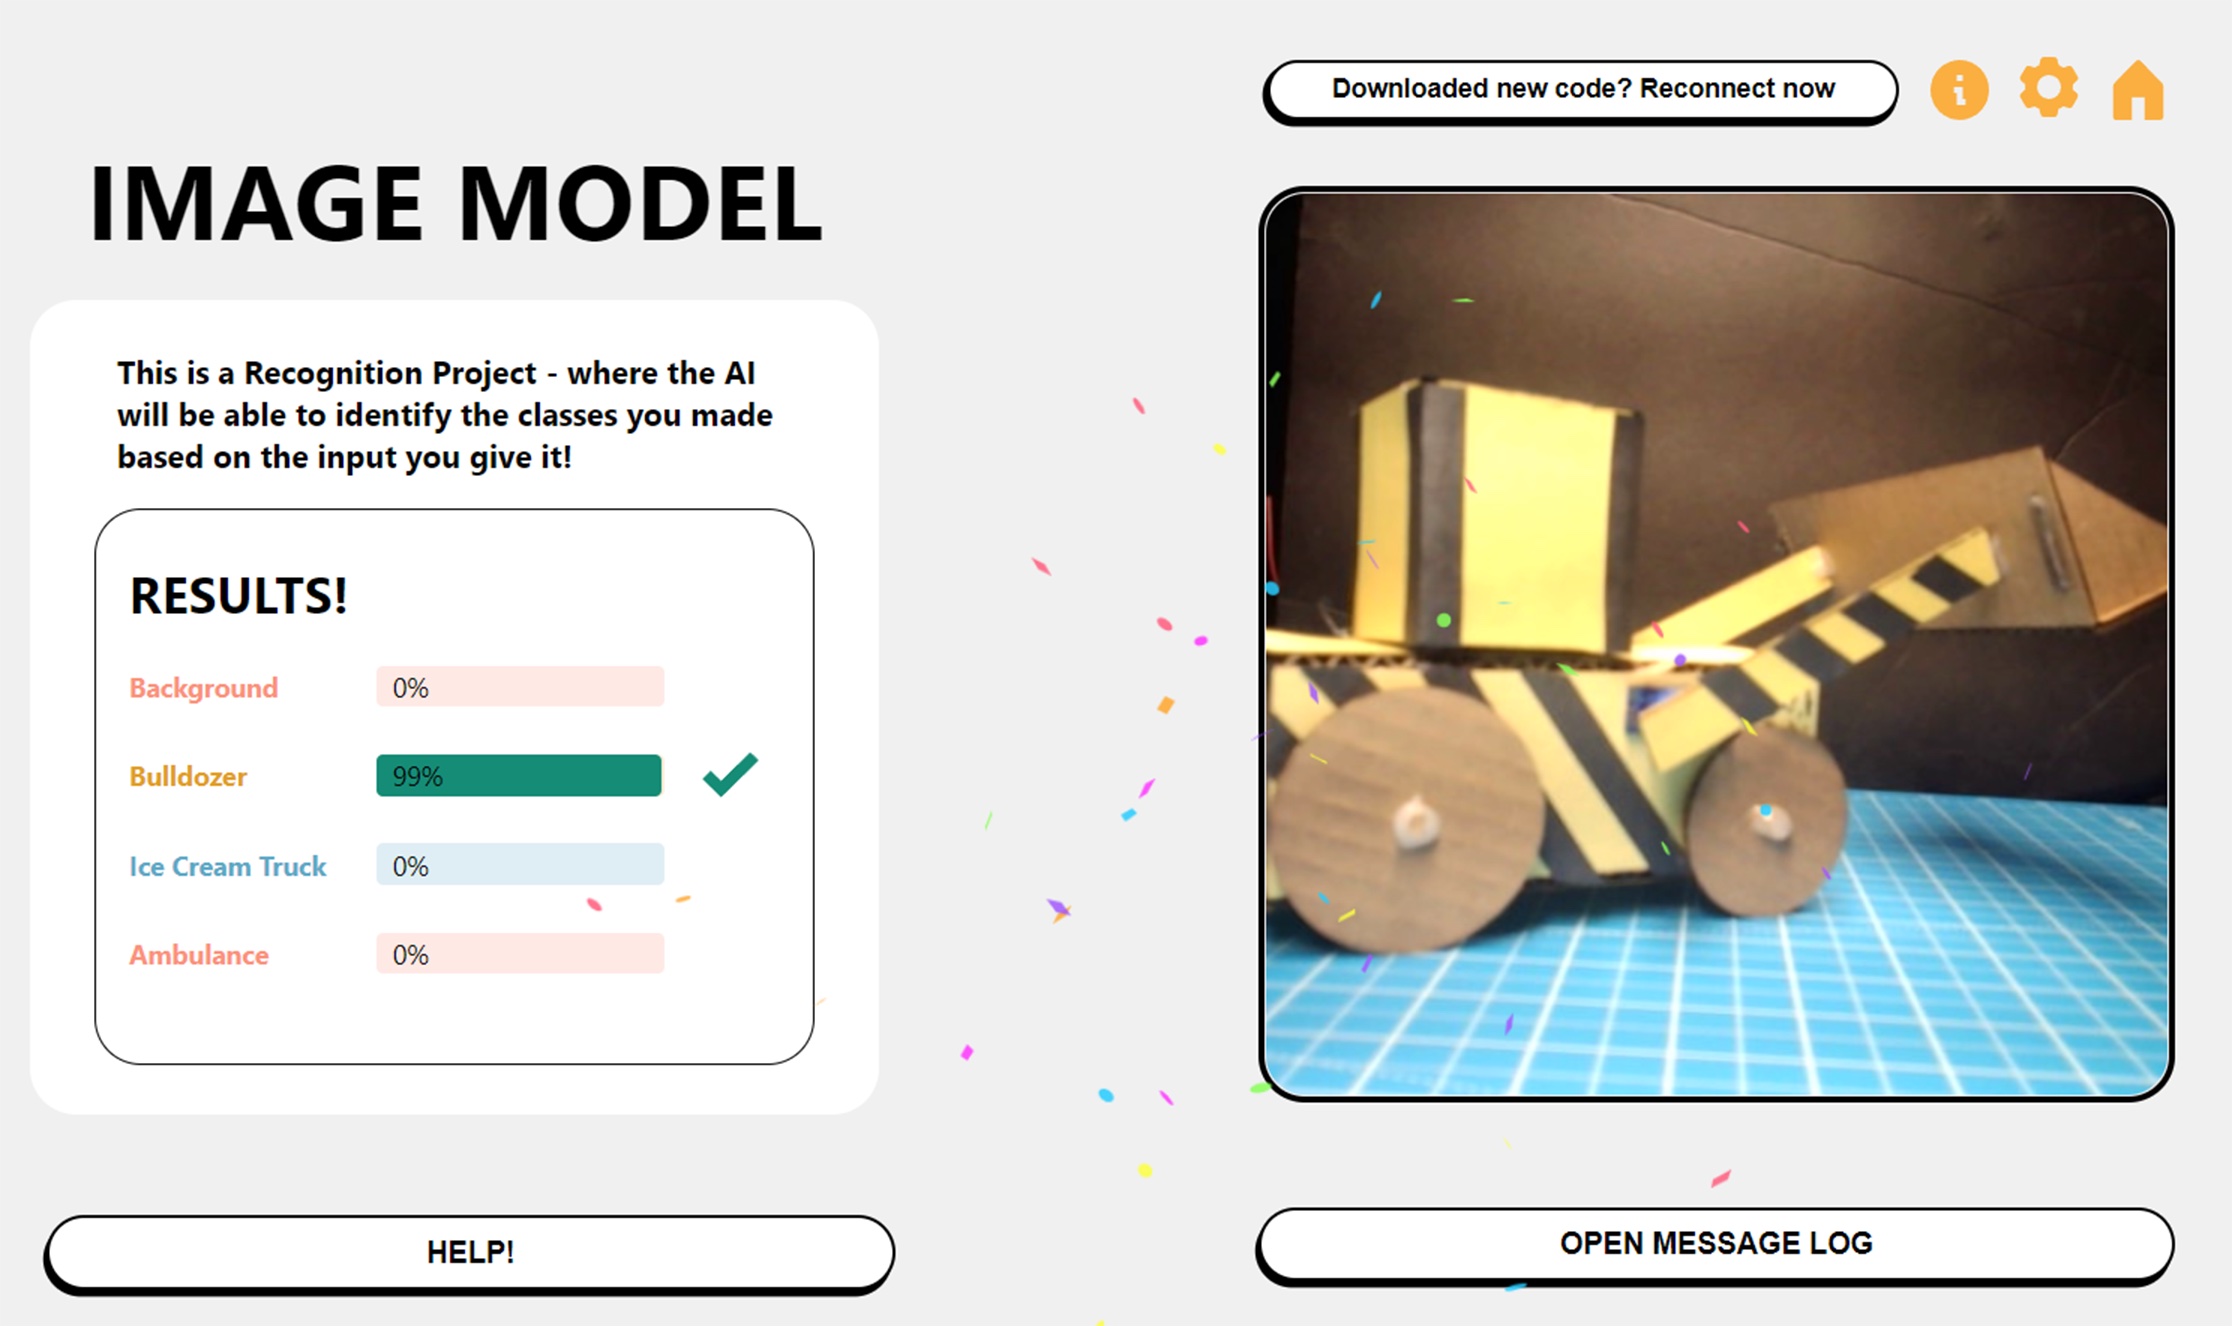
Once you upload the model and connect your micro:bit, you’ll be taken to the project page where you can watch the AI begin to make predictions about what it is seeing. Here you can also tweak your AI a little bit by increasing or decreasing the threshold for what it considers an accurate prediction, which is helpful if you find it’s having a hard time coming to a decision. Or you can even tell the AI to pause after making a decision — helpful if you’re looking for an AI to predict a race winner (marble races, anyone?).
If everything is set up properly, your micro:bit will spring to life as soon as a class has been detected, as shown in Figure Q. Place any vehicle you made in front of the camera and be amazed as your micro:bit decides to play a little tune all on its own!
Figure Q
Conclusion
If you thought this project was a fun idea, check out Make: AI Robots — a new project book featuring many other fun projects. With the help of our AI Robots site, you’ll never run out of ways to control your projects again!
This article is adapted from the new book Make: AI Robots, an introduction with 8 fun and educational projects for kids and parents using micro:bit with AI enhancements. Learn how to create interactive robots that respond to facial expressions, add up coins, judge marble races, and more! Find this and more great micro:bit projects and kits at the Maker Shed.
Reade Richard is a maker/educational content developer for Steamlabs with a passion for micro:bit and laser-cut activities. In his spare time, he enjoys bringing artifacts from his favorite films, books, and games to life using woodworking, laser cutting, and other fabrication tools at his disposal.
Andy is an innovator and a thought leader in education and connected learning. His passion and purpose are to empower kids and adults to invent the future!