Skip to content
POPULAR SEARCHES:
  • Arduino
  • CNC
  • Raspberry Pi
  • Woodworking
  • 3D Printing
  • IOT
  • Robot
  • Maker Faire

Make: Logo

Subscribe
  • Explore
    • Make: Magazine
      • The premier publication of maker projects, skill-building tutorials, in-depth reviews, and inspirational stories, accessible by all ages and skill ranges.
    • Maker Faire
      • A celebration of the Maker Movement, a family-friendly showcase of invention and creativity that gathers together tech enthusiasts, crafters, educators across the globe.
    • Maker Shed
      • A smart collection of books, magazines, electronics kits, robots, microcontrollers, tools, supplies, and more curated by us, the people behind Make: and the Maker Faire.
    • Make: Books
      • Maker-written books designed to inform and delight! Topics such as microcontrollers including Arduino and Raspberry Pi, Drones and 3D Printing, and more.
    • Maker Campus
      • Maker Campus is a place to connect, learn, and make together. Find enriching and interactive events, classes, workshops, and more. Let’s grow together!
    • Maker Camp
      • A free program that lights children’s creative fires and allows them to explore projects in areas such as arts & crafts, science & engineering, design, and technology.
    • Make: Community
      • Membership connects and supports the people and projects that shape our future and supports the learning initiatives for the next generation of makers.
    • Make: Projects
      • A project collaboration and documentation platform.
  • Learn
    • Books & Kits

      Get hands-on with kits, books, and more from the Maker Shed

    • Classes and Workshops

      On Maker Campus facilitated by makers but for everyone

    • Transformational Learning

      Make: Learning Labs for young adults

    • Young Maker Projects

      Find projects for young makers

    • Watch and Learn

      Skill builder, project tutorials, and more

  • Experience
    • Magazine

      Subscribers' Digital Portal

    • Membership

      Access Make: Community

    • Faires

      Find a Maker Faire near you

    • Classes and Workshops

      Register on Maker Campus

    • Makerspaces

      Find a Makerspace near you

  • Participate
    • Organize

      Start a local Maker Faire

    • Write

      Share a book or article proposal

    • Engage

      Become a Make: Community member

    • Teach

      Host a class or workshop

    • Share

      Post a project

  • Shop
    • Kits, Books, & More

      Maker Shed, the official store of Make:

    • Classes and Workshops

      From top makers on Maker Campus

    • Make: Magazine

      Subscribe to the premier DIY magazine today

    • Make: Membership

      Community access, print, and digital Magazine, and more

  • Awards
Log In
avatar Join Now
avatar
Log Out
Subscribe
Get Make: Magazine Issue 79
Subscribe Today to Make: Magazine
  • All Stories
  • Magazine Projects
  • Board Guide
  • Maker Spotlights

Projects from Make: Magazine

Arduino + 4 pin 5mm Full-Color LED

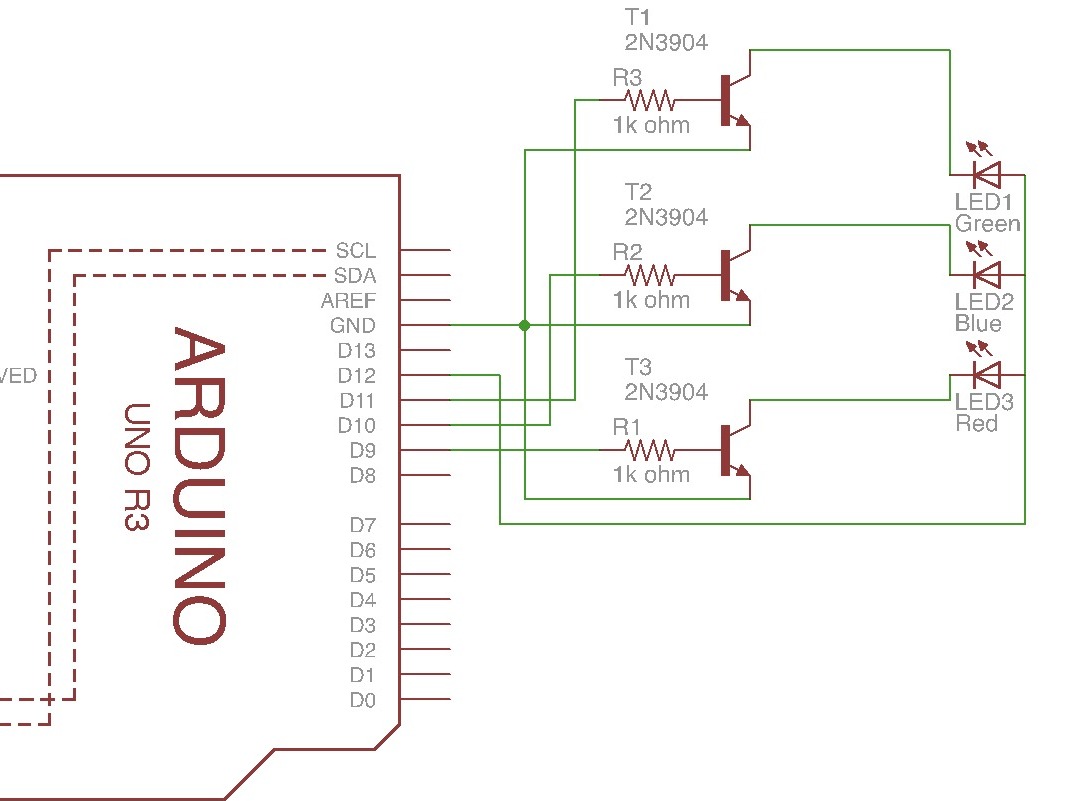
Play around with a Full-Color 5mm LED with four pins (3 cathodes which are RGB, and 1 anode) and an Arduino.

  • By Danny Pena
  • Time Required: 10 to 15 minutes
  • Print this Project
Share via
  • Facebook
  • Like
  • Twitter
  • Pinterest
  • LinkedIn
  • Digg
  • Del
  • Tumblr
  • VKontakte
  • Print
  • Email
  • Flattr
  • Reddit
  • Buffer
  • Love This
  • Weibo
  • Pocket
  • Xing
  • Odnoklassniki
  • WhatsApp
  • Meneame
  • Blogger
  • Amazon
  • Yahoo Mail
  • Gmail
  • AOL
  • Newsvine
  • HackerNews
  • Evernote
  • MySpace
  • Mail.ru
  • Viadeo
  • Line
  • Flipboard
  • Comments
  • Yummly
  • SMS
  • Viber
  • Telegram
  • Subscribe
  • Skype
  • Facebook Messenger
  • Kakao
  • LiveJournal
  • Yammer
  • Edgar
  • Fintel
  • Mix
  • Instapaper
  • Copy Link
Arduino + 4 pin 5mm Full-Color LED
December 18, 2012, 11:02 pm PST
  • Parts
  • Tools

Parts

  • Arduino, MEGA 2560 or UNO (1)
  • Breadboard (1)
  • Jumper Wire Pack (1)
  • 5mm Full-Color LED (1)
  • Resistor, 1kΩ Resistor (3)
  • Transistor, NPN, (2N222, 2N3904, or 2N4401) (3)

Tools

  • Computer running Windows, OSX or Linux

Advertisement

Hot Topics

  • Learn Electronics with Make: Kits and Books
  • Fix Our Planet

Advertisement

Steps

  • Project Steps View All
  • 1. Schematic
  • 2. Remember, the longest pin of...
  • 3. Circuit Assembly
  • 4. LED to Transistor
  • 5. Transistor to Resistor
  • 6. Transistor to Ground
  • 7. Resistor to Arduino
  • 8. Ground and LED anode to Arduino
  • 9. Arduino Program
  • 10. Arduino Serial Monitor Testing
  • 11. RGB colors
  • 12. RB, GB, and RG colors
  • 13. LED all on or off

Advertisement

Step #1: Schematic

NextPrev
Arduino + 4 pin 5mm Full-Color LED
  • This circuit uses an Arduino UNO but it still works on an Arduino MEGA 2560.
  • In this project we only use one 5mm LED, but since the LED has four pins, I used three LED symbols in place of the four-pin LED. The three cathodes of the LEDs in the schematic are the three cathodes on the Full-Color 5mm LED. The three anodes of the LEDs are the one anode on the Full-Color 5mm LED.

Step #2:

NextPrev
Arduino + 4 pin 5mm Full-Color LEDArduino + 4 pin 5mm Full-Color LEDArduino + 4 pin 5mm Full-Color LED
  • Remember, the longest pin of the LED is the anode, the other three short pins are the cathodes (RGB)
  • Also, while the flat side of the transistor is facing you, the left pin is the collector, the middle is the base, and the right pin is the emitter.
  • The photo notes the 2N2222 transistor. For the 2N3904 and 2N4401, the Collector and Emitter are switched.

Step #3: Circuit Assembly

NextPrev
Arduino + 4 pin 5mm Full-Color LEDArduino + 4 pin 5mm Full-Color LEDArduino + 4 pin 5mm Full-Color LEDArduino + 4 pin 5mm Full-Color LED
  • Connect the LED to the breadboard.
  • Connect the anode of the LED to the other half of the breadboard.
  • Connect the cathode (frist pin) to the other side of the breadboard.

Step #4: LED to Transistor

NextPrev
Arduino + 4 pin 5mm Full-Color LEDArduino + 4 pin 5mm Full-Color LEDArduino + 4 pin 5mm Full-Color LEDArduino + 4 pin 5mm Full-Color LED
  • Connect the collector of one transistor to the first cathode of the LED.
  • Connect the other transistors as shown in the image. Connect the collector of the second transistor to the second cathode of the LED.
  • Connect the collector of the third transistor to the third cathode of the LED.
  • I'm using the 2N2222 transistor, so in my case the transistor faces my direction. If the 2N3904 or 2N4401 transistor are used, the transistor will face the opposite direction.

Step #5: Transistor to Resistor

NextPrev
Arduino + 4 pin 5mm Full-Color LEDArduino + 4 pin 5mm Full-Color LEDArduino + 4 pin 5mm Full-Color LEDArduino + 4 pin 5mm Full-Color LED
  • Connect one resistor to the base of the third transistor.
  • Connect the second resistor to the base of the second transistor.
  • Connect the third resistor to the base of the first transistor.

Step #6: Transistor to Ground

NextPrev
Arduino + 4 pin 5mm Full-Color LED

Connect the emitter of all three transistors to ground.

Step #7: Resistor to Arduino

NextPrev
Arduino + 4 pin 5mm Full-Color LEDArduino + 4 pin 5mm Full-Color LEDArduino + 4 pin 5mm Full-Color LEDArduino + 4 pin 5mm Full-Color LED
  • Connect the resistor from the third transistor to pin 9 on the Arduino.
  • Connect the resistor from the second transistor to pin 10 on the Arduino.
  • Connect the resistor from the first transistor to pin 11 on the Arduino.

Step #8: Ground and LED anode to Arduino

NextPrev
Arduino + 4 pin 5mm Full-Color LEDArduino + 4 pin 5mm Full-Color LEDArduino + 4 pin 5mm Full-Color LED
  • Connect the anode of the LED to pin 12 on the Arduino.
  • Connect ground from the Arduino to the ground strip of the breadboard.

Step #9: Arduino Program

NextPrev
Arduino + 4 pin 5mm Full-Color LEDArduino + 4 pin 5mm Full-Color LEDArduino + 4 pin 5mm Full-Color LEDArduino + 4 pin 5mm Full-Color LED
  • Connect your Arduino to your computer (running Windows, OSX, Linux).
  • Open the Arduino program and upload the Arduino code within the following images.

Step #10: Arduino Serial Monitor Testing

NextPrev
Arduino + 4 pin 5mm Full-Color LED
  • After uploading the code, open the serial monitor and input a character from 1 - 8.
  • 1 = RED, 2 = GREEN, 3 = BLUE
  • The LED only has three pins for RGB (Red, Green, Blue), but turning on more then one pin creates diverse colors.
  • 4 = PURPLE, 5 = AQUA, 6 = ORANGE, 7 = BRIGHT WHITISH PURPLE
  • 8 = OFF

Step #11: RGB colors

NextPrev
Arduino + 4 pin 5mm Full-Color LEDArduino + 4 pin 5mm Full-Color LEDArduino + 4 pin 5mm Full-Color LEDArduino + 4 pin 5mm Full-Color LED

Normal RGB light settings.

Step #12: RB, GB, and RG colors

NextPrev
Arduino + 4 pin 5mm Full-Color LEDArduino + 4 pin 5mm Full-Color LEDArduino + 4 pin 5mm Full-Color LEDArduino + 4 pin 5mm Full-Color LED

Other RGB settings. RB, GB, or RG.

Step #13: LED all on or off

NextPrev
Arduino + 4 pin 5mm Full-Color LEDArduino + 4 pin 5mm Full-Color LEDArduino + 4 pin 5mm Full-Color LED

All RGB cathodes on or off.

Danny Pena

Danny Pena

When you buy through links on our site, we may earn an affiliate commission.

Subscribe & Save

  • Get dozens of projects in every issue covering DIY electronics, 3D printing, craft, and more
  • Learn tips and skill-building tutorials from experts in the maker community
  • Save over 40% off the annual cover price for a full year (4 issues) of Make:
SUBSCRIBE TO MAKE: MAGAZINE
Make: Community brand logo Publishers of Make:Magazine Producers of Maker Faire Logo
  • About us
  • Our team
  • Advertise with us
  • Help Center
  • Contact us
  • Support Make:
  • Find a Maker Faire
  • Manage Magazine Subscription

Make:
Maker Faire:
Privacy Policy
Terms of Use
©2022 Make Community LLC. All rights reserved
Special Pinterest-only offer!
One year of Make: Magazine for just $19.99
Cookie Settings
We use cookies to continuously improve our websites for you and optimize its design and customization.
We'll assume you're ok with this, but you can opt-out if you wish.

Our websites use cookies to improve your browsing experience. Some of these are essential for the basic functionalities of our websites. In addition, we use third-party cookies to help us analyze and understand usage. These will be stored in your browser only with your consent and you have the option to opt-out. Your choice here will be recorded for all Make.co Websites.

Allow Non-Necessary Cookies
Send this to a friend
FEEDBACK