This article appeared in Make: Vol 87. Subscribe for more great projects.

I’m thrilled that this illuminated tote bag is my seventh (!) project write-up to appear in Make: magazine. Coincidentally (or perhaps not), my very first Make: article from 2017 described an LED matrix handbag that displayed animations and scrolling text. This new geometric bag is both retrospective and forward-thinking, as it retains its predecessor’s mix of playfulness and practicality while incorporating more recent maker methods.

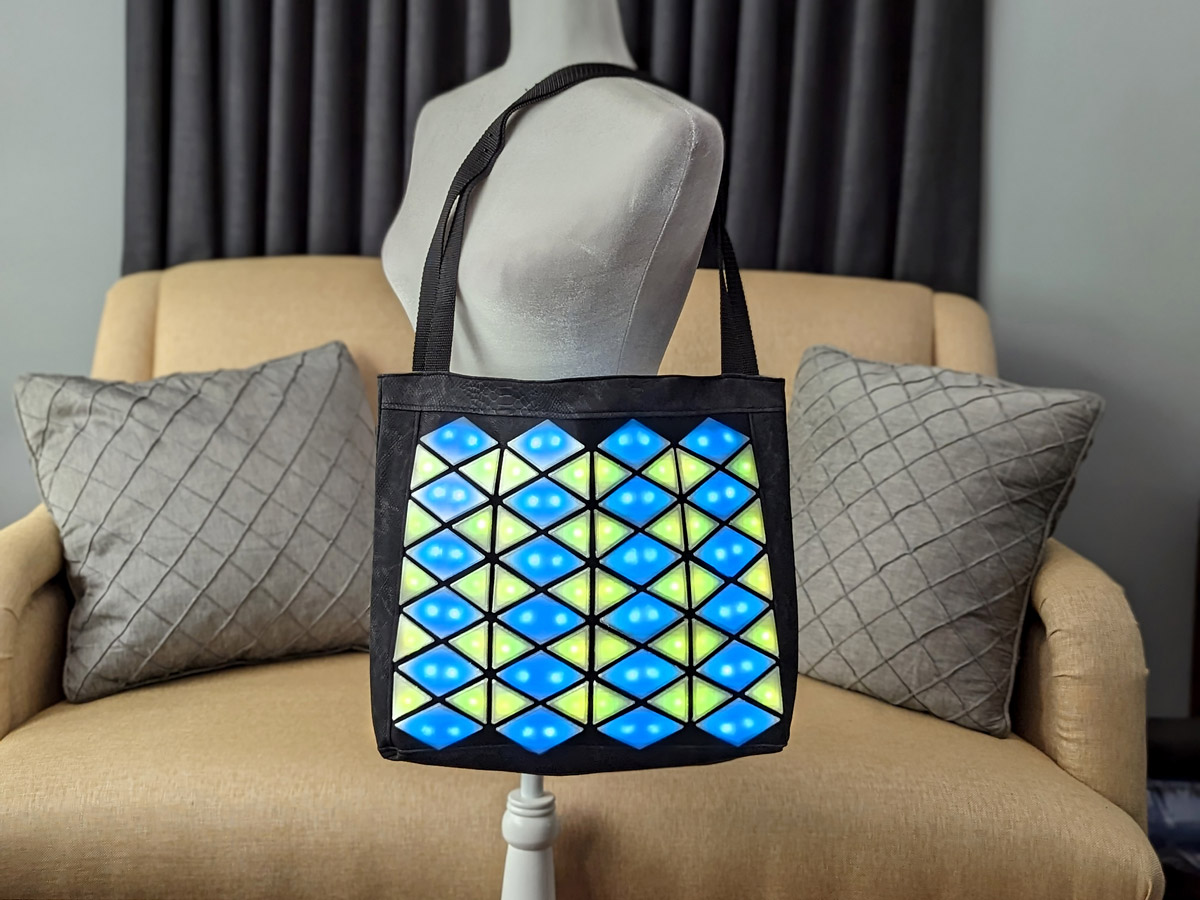
Since 2017, novel creative techniques, like 3D printing on fabric, and newly available products, such as uber-flexible LED strings, have continued to expand the potential of wearable tech. My new Tessellated Tote integrates a broad array of maker skills including 3D printing, sewing, and electronics to produce a modern carryall. The bag’s front panel is illuminated by lightweight addressable string lights secured behind translucent tiles which are 3D printed onto a layer of tulle fabric. The tulle holds the individual tiles in a space-filling geometric arrangement that moves and flexes with the fabric around it.

In addition, the tote holds a hidden homage to scientific discovery in its front panel. The 3D-printed diamond/triangle tessellation pattern represents a newly discovered type of exotic condensed matter — a bosonic crystal composed of particles called excitons packed tightly into two overlapping atomic lattices with this tessellated pattern. When turned at a slight angle to one another, the lattices interact in a moiré pattern that traps the excitons just so.

Of course, the Tessellated Tote is fundamentally a fashion accessory. You don’t need to recognize its futuristic tech or catch its subtle scientific references to enjoy its attractive design and colorful LED animations. And you can make it quite inexpensively depending on your choice of fabrics and LED controller.

Whichever aspect of this project most appeals to you, be it futurism or fashion, the result is a pretty and practical satchel that puts the “fun” back in “functional.”

What will the next generation of Make: look like? We’re inviting you to shape the future by investing in Make:. By becoming an investor, you help decide what’s next. The future of Make: is in your hands. Learn More.

Project Steps

1. Prepare the print files for the fabric

Download the design files. The full lattice of 3D-printed tiles measures about 11″×13″, larger than most desktop printers’ print beds. The grid can be printed in four (or more) smaller sections. If you’d prefer to subdivide the grid yourself, the full design file is in GeometricTilesAll.stl. Otherwise, two subsections of the grid are in the files GeometricTilesPartial1.stl and GeometricTilesPartial2.stl. Print two copies of each to generate the entire front panel.

Import the STL file into your slicer program to see the arrangement of triangular and diamond tiles. Each tile is widest at its base and top, with a narrower “neck” in the middle. This narrow section secures each printed tile into a hole in the bag’s front fabric panel. The tiles’ back faces are recessed to hold the LEDs.

Figure A. Photo by Debra Ansell

Print the grid of tiles with the flat face down for a smooth finish (Figure A). Set infill density to 100% and layer height to 0.2mm or finer. If your slicer supports variable layer heights, printing thinner layers near the tile’s flat front face will reduce overhang issues where the tiles are filleted. Inside the slicer, position the tile grid in the middle of your print bed so there will be space to secure the tulle around it on all sides. Set the slicer to pause the print at close to 2.6mm layer height. The cross-section of each tile is narrowest here, and this is where we will insert the tulle fabric into the print. Cut a piece of tulle that is smaller than your print bed but larger than the grid section you’re printing, and set it aside for the next step.

2. Print the translucent tiles

Figure B. Photo by Debra Ansell

Durable PETG is the best choice of filament for the thin-edged tiles as it will withstand everyday wear better than PLA. Select a clear or translucent filament color. Insert the filament into your printer and start the print. When the printer pauses at 2.6mm, lay the cut piece of tulle over the printed tile layers, and use the small neodymium magnets or Kapton tape to secure it to the print bed around the tile grid perimeter (Figure B). Pull gently around the edges of the tulle to eliminate wrinkles, so that it lies flat over the existing print.

Figure C. Photo by Debra Ansell

Restart the print. The small holes in the tulle mesh allow the next layers of filament to bond with the bottom layers, sandwiching the fabric in between. When the print is done, remove the tiles from the bed carefully so as not to rip the tulle. You now have a flexible mesh of 3D-printed shapes (Figure C). Repeat this procedure to print all sections of the grid. While the printing is taking place, you may proceed with the handbag construction in the following steps.

3. Cut the tote fabrics

Cut two 15″×17″ rectangles from the lining fabric.

Cut one 15″×17″ back piece, two 2½”×15″ strips and two 2½”×12″ strips from the main fabric.

Because the front tile panel contains many geometric holes, it’s easiest to cut this piece with a laser cutter or vinyl cutter. Use the vector file TilePanel.svg to cut the front panel from your leatherette or non-fraying fabric.

WARNING! Never laser-cut fabric containing vinyl/PVC or you can generate toxic chlorine gas.

4. Sew borders to tile panel

Align the 2½”×12″ fabric strips with the short edges of the tile panel, right sides together, and secure with clips or pins (Figure D). Sew together, then fold the strips open with the seam underneath the strip. Topstitch the strips so they lie flat (Figure E).

NOTE: All seams are 3/8″ unless otherwise indicated.

Next, take the 2½”×17″ strips and align them, right sides together with the long sides of the tile panel assembly. Sew the pieces together, then fold the strips open with the seam allowance underneath the strip. Topstitch along the fabric strips with the same technique as before.

The tile panel piece will form the front side of the bag (Figure F). It may now be slightly larger than the other 15″×17″ bag panels. If so, trim its edges symmetrically to make it the same size as the other panels.

If you wish to add pockets to the bag lining (Figure G), now is the time. There’s not enough space to describe the process here, but many online tutorials explain how to sew patch pockets or zipper pockets into a bag’s interior.

Place the lining pieces and exterior fabric pieces together. Cut 1½”×1½” squares out of the bottom corners of the both the lining (Figure H) and main fabric “sandwiches.” These cutouts will form the bags’ corners.

5. Sew the bag exterior and straps

Pin the two exterior fabric panels with right sides together. Sew straight lines to join both sides and the bottom of the exterior fabric pieces (red lines in Figure I), but do not sew the corner cutouts.

Then open the bag, pinching the unsewn corners together, opening the seam allowance, and folding the cutout edges together so that the seams align (Figure J). Sew directly across the folded cutout, going back and forth a few times for reinforcement to create the “boxed” corners (Figure K).

Cut two 24″ lengths of webbing (or whatever length straps you prefer) and sew them to the right side of the bag body, equidistant from the center on both sides of the bag, with the strap ends aligned with the bag opening (Figure L). Stitch the straps in place ¼” below the bag opening.

6. Sew the bag lining

The Tessellated Tote incorporates a zipper into the lining bottom to allow easy access to the electronics. Pin the zipper to the bottom edge of one of the bag lining pieces (Figure M), with right sides of zipper and lining together. The zipper ends should overhang the cutouts on both sides of the lining.

Using a zipper foot, sew the zipper to the lining, then fold the zipper away from the lining with seam allowance underneath the lining. Topstitch along the lining (Figure N). Next, place the unsewn zipper edge along the remaining lining piece, right sides together, and sew together with a zipper foot. Open up the zipper edge, fold the seam allowance under the lining and topstitch along the lining (Figure O).

Place the two lining pieces, which are now connected by a zipper along their bottom edges, right side together and pin them along their sides. Sew a straight seam down each side, following the red lines in Figure P.

Open the lining, pinching the square corner cutouts together so that the ends of the zipper stick out. Pin the corner sides together so that the middle of the zipper aligns with the side seams. Make sure that the zipper pull is located between the lining’s two corners before you sew them closed (Figure Q).

Pin the corner seams together and sew across the corners, using the same technique you did with the bag exterior. After sewing the corners, trim off any extra part of the zipper that hangs outside the lining (Figure R). The lining is now taking shape with boxed corners and a zip-open bottom (Figure S).

7. Join interior and exterior

Turn the main bag piece right side out and the lining wrong side out. With the lining zipper unzipped, insert the bag body into the lining (Figure T), right sides together, aligning the seams on both body and lining. Pin or clip the body and lining openings together, and sew around the circumference of the opening with a ½” seam allowance (Figure U).

Pull the bag exterior through the zipper to invert the bag so it’s right side out (Figure V). Next, push the interior into the exterior, then smooth out and pin the main bag opening around the seam (Figure W). Topstitch around the bag opening to make it lie flat.

8. Install the tiles

Invert the bag again so that it is inside out and pull the lining away from the body. Gather the tulle-connected tile grids, trim the excess tulle from around the outside edges of the grid segments, and gently push the tiles, flat side first, into the holes in the front bag panel until the narrowest part of each tile is seated in the fabric (Figure X). While maneuvering the tiles into place, carefully stretch the panel fabric around the tiles to avoid pulling hard on the tulle.

Once all tiles are in place, turn the bag right side out through the lining and use a fingernail or butter knife to settle the fabric into the narrow channel in each tile. When finished, the tiles will sit flush with each other, just above the bag surface (Figure Y).

9. Glue the LED string

Turn the bag inside out again. Cut a length of LED string containing 88 LEDs and solder a JST connector to its input end. Connect it to your controller and power it up to make sure all the LEDs are working. Notice that, when illuminated, each LED displays a brighter front side and dimmer backside.

The LED string attaches to the tile grid in a vertical zigzag pattern along the tile columns. Each LED nestles, bright side downward, into the center of a tile’s depression. Note that each of the diamond-shaped tiles contains two depressions and holds two LEDs in adjacent columns.

With the backside of the tile grid facing you, place the first LED in the string into the lowest leftmost triangle and run the LED string upwards along the first column of triangles as shown in Figure Z. Using skinny strips of masking or painters’ tape, secure the string in place as you lay the rest of the string into alternating up and down columns. Place the tape between the tiles and away from the triangular depressions in the tile’s centers (Figure Aa), to keep it out of the way of the hot glue in the next step.

Next, plug in the hot glue gun, and allow it to heat up. The hot glue serves a dual purpose by holding the LEDs in place and diffusing their light throughout each tile. Starting with the first LED in the string, place the nozzle of the glue gun in the center of the tile, just underneath the LED, and slowly squeeze a layer of glue about 5mm deep to cover the bottom of the tile’s indentation (Figure Bb). Gently press the LED bright side down into the glue, leaving it secured in place while the glue sets. Repeat this process for all 88 LEDs.

Once all LEDs are secured and the glue has cooled, remove all strips of tape, and turn the bag right side out through the lining. The bag construction is now complete (Figure Cc) and it’s time to light things up!

Figure Cc. Photo by Debra Ansell

10. Set up the Pixelblaze controller

I use the Pixelblaze controller for many different projects because its software makes it easy to use the same LED animations on any arrangement of pixels. Section 4 of the Pixelblaze Pillows build in Make: Volume 83 describes the steps to attach a Pixelblaze to an LED string and connect to the software in a web browser. Follow the same sequence of steps to join the LED string and 5V power supply to the controller (Figure Dd), then connect to the Pixelblaze software over Wi-Fi.

Once connected, open the Mapper tab in the Pixelblaze software, and cut and paste the contents of the downloaded TesselatedToteMap.txt file into the editor window (Figure Ee). Press the Save button below the editor to set the new LED layout.

There are several options on the Settings tab that can help to keep the power draw low and extend battery life. Most importantly, cap the LED brightness at or below 50%. Additionally, it is possible to run the Pixelblaze CPU at lower speeds than the default 240MHz; selecting the 80MHz option helps reduce energy consumption (Figure Ff). And if you won’t need to connect to your Tesselated Tote’s controller while wearing it, check the box to disable Wi-Fi on startup.

The best way to showcase your tote bag’s tessellating geometric display is to curate a selection of LED animation patterns designed to look good in two dimensions (Figure Gg). Using the Playlist feature on the Patterns tab (Figure Hh), you can compile a set of patterns from the default list, as well as from patterns you write yourself in the Pixelblaze’s JavaScript-based editor. You can set a default time for each animation to play, and you can advance through the list by physically pressing the button on the Pixelblaze controller.

Conclusion

This Build Is in the Bag

Much of the fun of creating this project came from experimenting with different tessellating tile patterns [see “Skill Builder: Tiles and Tessellations,” Make: Volume 87, page 112]. You’re free to create different geometric designs if you keep the spacing between your 3D-printed tiles the same as, or slightly smaller than your LED spacing. Fortunately, the flexible LED string used in this project is available with a variety of LED intervals, ranging from 1.5cm to 10cm.

You can also adapt the techniques in this project to create different styles of illuminated, tessellated bags, such as a backpack or sling bag. Any bag pattern containing a flat, unadorned front panel and a lining that can be modified to allow access to the bag interior will work. Simply insert an opening, zippered or otherwise, into the lining design, and before sewing the bag exterior, cut holes corresponding to your 3D-printed tile layout into its front panel.

If you enjoy coding your own LED patterns, there are an endless variety of ways to customize the Tessellated Tote’s illuminated display. You can also make it interactive: connecting a Pixelblaze Sensor board to the controller allows it to respond to sound and motion with dynamic animations.

The Tessellated Tote’s combination of 3D printing, sewing, and electronics provided a great way to stretch my maker skillset while building on the original 2017 design. As I continue to learn new techniques from others in the maker community, I’m excited to see what creative ideas will work their way into further sequels to this “Bag to the Future!”

This article appeared in Make: Volume 87.