Real-time streaming is a great way to interact with our environment. Such as a CCTV camera. But what is the technology behind it?

What if we could do exactly that with a Raspberry Pi – by streaming the Pi Camera’s live feed to any client devices. And even touch on real world applications.

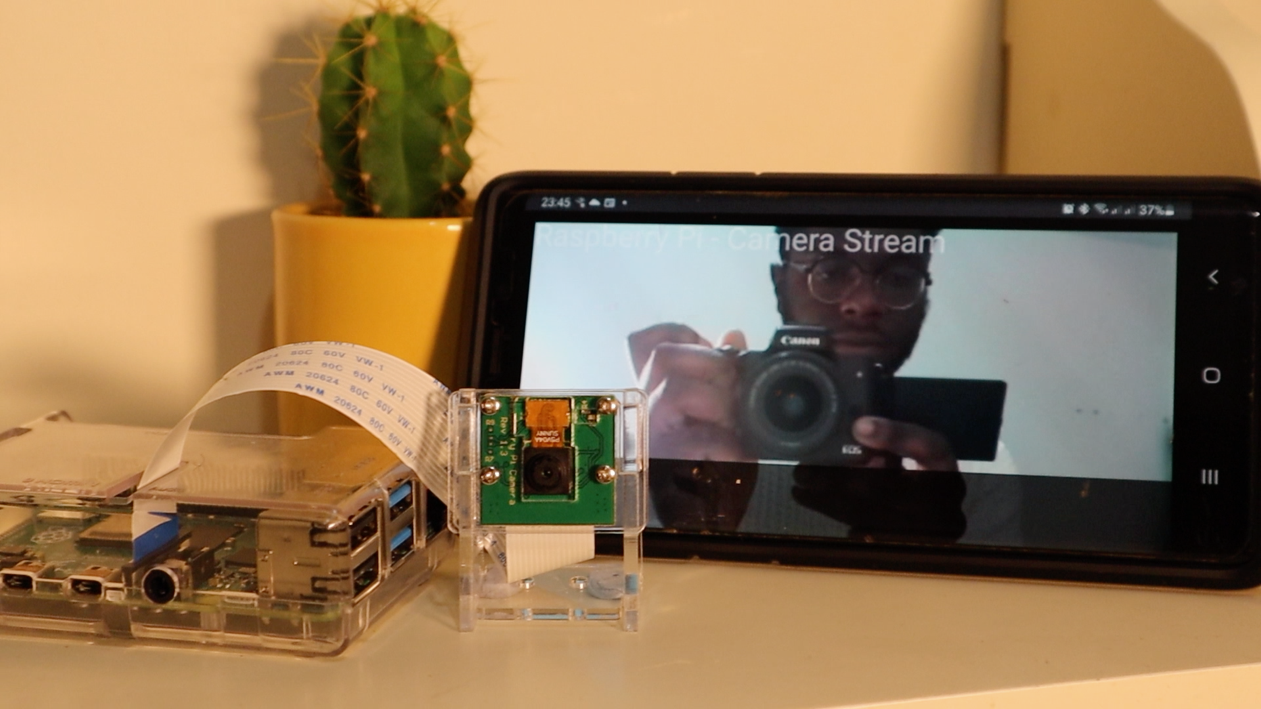
In this tutorial, we’re going to cover this. We’re building a live camera streaming from a Raspberry Pi to your phone (or any internet-connected device). If you recently got a Raspberry Pi and want to work on a new project, this project may be a good one to start on.

YouTube player

Introduction & Top Level Overview

By the end of this tutorial, you’ll be able to set up a wireless stream to view the camera feed from any device on your network. This means you can create your own mini camera stream for any application, think Plant monitor, Smart CCTV camera (with Face recognition), or even a portable camera.

We’re covering the assembly, installing the OS, and Setting up the Python stream. So let’s get started!

Introduction Raspberry Pi

To get a good understanding, it is always good to understand what hardware we’re using. This little piece of Marvel is a Raspberry Pi. Overall, a Raspberry is a computer. (A low-cost computer in fact). Like your MacBook or Desktop, it features USB peripherals and other ports such as an Audio Jack, Ethernet, and HDMI ports. Being able to do what your computer can do – the boards seem to be getting more powerful over time.

The interesting part is the form factor; because of its small size, this ‘credit-size computer’ is useful for different real-world applications and popular in the DIY community.

In this article, we’ll be using the Raspberry Pi 4 (4GB) Mode. However, you can use other models. Keep in mind; performance may vary between models.

What is streaming & How does it work?

Flask can be seen as a back-end web server/micro-framework for Python – making it easier to build web frameworks using Python.

So how does it work?

We’re capturing live footage from the Raspberry Pi camera and using a Flask to create the live stream to our client devices. (which can be any device).
Flask is a great bridge between Python and HTML Web pages and supports Motion JPEG, which works by streaming a sequence of independent JPEG images. Motion JPEG is widely used in Security IP cameras and webcams alike, and this is how we’re streaming our live feed.

Further, a device connected to the same network of the Pi would be able to visit the URL see the live footage of the stream whereby the OpenCV library would be used to access our video stream.  

Pi Cam vs. camera module – You may have heard of the latest Pi Camera Module and if you’re wondering about the Image comparison performance of the two. Here it is, although the Pi Camera module is more expensive, it’s definitely an improvement in image quality.

For the benefit of this project, we’re using the cheaper Pi Module.

Project Steps

Building process: 4 Step Process

  1. Connect Raspberry Pi Camera Module
    • The Pi Camera module provides the feature to take pictures, record videos, and stream. While the Pi is powered off, lightly pull on the Camera port latches to expose the camera module port. Insert the camera ribbon cable and push the latch back into position. Typically the correct orientation is with the blue part of the ribbon cable facing towards the USB ports.
    • Note: Handle the camera port clips/latches with care as they’re quite fragile.
    1. Connect your Pi to the Ethernet cable:

– This is optional: if you plan on using a wired connection for your application

    1. Connect your Pi to the HDMI Output – If you choose to use a Monitor, connect the micro HDMI to the port of the TV and the Raspberry Pi (Micro HDMI)

That’s the whole installation!

Etching OS

But before we can turn this Pi on, we’ll need to install an operating system onto the MicroSD. We’ll be using the Raspbian OS.

Once the downloaded Image, we’ll be flashing the Raspbian OS onto the Micro SD card using Balena Etcher. This process can take up to 15 minutes (dependent on your SD Card type). Once completed, you can safely eject the Micro SD Card.

Now, Insert your Micro SD card into the Raspberry Pi and connect the Ethernet Cable (if needed). And power the Raspberry Pi 4 by plugging the USB-C cable.

Note: This was installed on the Raspbian OS release, August 2020.

Pi OS Setup

Make sure your Pi has an internet connection either via Wireless or Ethernet.

    • Wired Connection – plug an ethernet cable from the Pi to the LAN port of the router.
    • Wireless – You can search for your Wi-Fi Access Point and enter the credentials to login wirelessly

Once logged in to the Pi, complete the setup installation dialog boxes and finish.

The next step is enabling the Camera Port and VNC. The camera port would enable the camera to be used on the Pi, and VNC would help access the Pi without the need for a display. In effect, we are accessing the Pi stream remotely without hooking the Pi up to the monitor again.

Open the terminal window and run:

sudo raspi-config

Camera port – Select Interface Options, Camera Port, and select Enabled.

VNC Viewer – Select Interface Options, VNC, and select Enabled.

(Enabling SSH is optional to access the pi via your laptop)

You can now exit. This may cause your Pi to reboot.

Camera Setup:

Once you reboot you Pi, confirm that your Pi camera works by taking a picture from your camera module by entering this command into your terminal:

raspistill -o Desktop/image.jpg

The following command will take a picture and save it to the Desktop of your Pi.

You can also check record a little a video output too:

raspivid -o Desktop/video.h264

Setup of Python Camera Stream

Now that we’ve confirmed that the camera module is working we can now move into installing the following dependencies and the GitHub Repo.

Upgrading your Pi:

Make sure that all your libraries and packages are up to date by running the below following commands:

sudo apt-get update

sudo apt-get upgrade

Optional: Make a Virtual Environment:

It is good to practice to create a virtual environment for the Python3 library dependencies. The reason is that we want to install Flask in a container within the raspberry pi; if anything goes wrong, you don’t need to start again. However, since we’re installing a couple of libraries, we’ll skip on this.

Installing the Dependencies

cies. The reason is that we want to install Flask in a container within the raspberry pi; if anything goes wrong, you don’t need to start again. However, since we’re installing a couple of libraries, we’ll skip on this.

Installing the Dependencies:

Depending on your Raspberry Pi you may require installing the following dependencies to create a live stream.

sudo apt-get update

sudo apt-get upgrade

sudo apt-get install libatlas-base-dev

sudo apt-get install libjasper-dev

sudo apt-get install libqtgui4

sudo apt-get install libqt4-test

sudo apt-get install libhdf5-dev

sudo pip3 install Flask

sudo pip3 install numpy

sudo pip3 install opencv-contrib-python

sudo pip3 install imutils

sudo pip3 install opencv-python

Upon successful installation, we’ll now all set up to download the camera stream repo to create Pi steam.

Git Clone the Camera Stream Repo

Open terminal and clone the Camera Stream repo:

cd /home/pi git clone https://github.com/EbenKouao/pi-camera-stream-flask.git

    • Templates Folder – This is where the index.html webpage would be stored
      • The basic HTML site is what the client would view in the browser and is fully customizable.
      • Note: is kept constantly updated by the browser with the latest stream of JPEG images

  • Python script:
    • Camera.py – The script accesses openCV and enables the camera module’s output, providing the sequence of frames via Motion JPEG.
    • main.py – where the Flask stream is created. The main application imports a camera class (module).

You can start the Flask Camera Stream via with the following command:

    • sudo python3 /home/pi/pi-camera-stream-flask/main.py

Where /home/pi/pi-camera-stream-flask/main.py is the direct path to your Python script, alternatively, you can access the file directly and run the python script.

A picture containing indoor, table, monitor, desk Description automatically generated

Optional: A good idea is to make the camera stream auto-start at bootup of your pi. You will now not need to re-run the script every time you want to create the stream. You can do this by going editing the /etc/profile to:

    • sudo nano /etc/profile

Go to the end of the and add the following (from above):

    • sudo python3 /home/pi/pi-camera-stream-flask/main.py

This would cause the following terminal command to auto-start each time the Raspberry Pi boots up. This, in effect, creates a headless setup, which would be accessed via SSH.
Note: make sure SSH is enabled.

A flat screen tv Description automatically generated

Demo of the flask implementation

You can now access the live stream of your pi by accessing its URL on port 5000. Visit :5000 in and access this stream on any devices connected to the same Wi-Fi network as you Raspberry Pi.

Note: You can find out your Pi’s IP address by entering ifconfig into your terminal command. And look for the Inet Address.

Final Build, Review, and Performance

d Performance

A picture containing indoor, table, sitting, wooden Description automatically generated

Final Build:

Stream Latency: The Pi stream’s latency depends on your network coverage of about 1-2 seconds (in some cases ~500ms). Since we’re streaming over our local network, a few factors may affect the performance of your stream such as:

    • Wi-Fi Coverage
    • Wi-Fi Performance
    • Raspberry Pi Build (why Raspberry Pi 4 is recommended to make the most out of the performance)

And that’s all! Now you’ve created your own Raspberry Pi Camera stream. You can take this one step further and make your own application from making an indoor live feed to a Portable camera. The options are down to your imagination.

Next Steps Projects

If you would like to take this further, here are a few ideas:

    1. Raspberry Pi Smart CCTV Camera
    2. DIY ‘GoPro’ Portable Camera
    3. Plant Monitor

If interested on the next camera Project, you can build your own Face recognition Smart CCTV camera (a DIY Ring alternative). Head off to smartbuilds.io for a full tutorial into how to build one.

Conclusion

Building your own Pi camera stream is a great start into the world of live camera stream projects. Using a Raspberry Pi brings down the cost significantly while retaining a good amount of processing power. This tutorial is to get you started. What live-stream applications will you make next?

Conclusion

References: